Xray Vision
Ingredients
Before you begin you will need:
- a domain name
- a cloud server provider
- a Cloudflare account
Prepare server
At your cloud server provider, instantiate a virtual private server (VPS) with 1 GB of RAM running a recent version of Debian or Ubuntu.
SSH into your server using Windows PowerShell or the terminal app in Linux or macOS. Replace <SERVER-IP-ADDRESS> by your actual server IP address in the command below:
1 | ssh root@<SERVER-IP-ADDRESS> |
Suppress lengthy login messages:
1 | touch .hushlogin |
Get the existing package metadata up to date, and upgrade all existing packages:
1 | apt update && apt upgrade |
Protect your server, replacing <HOME-IP-ADDRESS> by your actual home IP address:
1 | iptables -A INPUT -i lo -j ACCEPT |
Check that you can still access the server with these rules before you make them permanent:
1 | exit |
Make the iptables rules permanent:
1 | apt install iptables-persistent |
Set up DNS service provider
Add your site to Cloudflare.
Create DNS A (IPv4) and/or AAAA (IPv6) record(s) pointing from your server hostname to your server IP address. You do not need proxy services for this particular configuration of Xray – just DNS services. That is represented by a gray cloud against your DNS record in Cloudflare.
Check that DNS records have propagated at a service such as https://mxtoolbox.com/DnsLookup.aspx.
Install x-ui
For English-speaking users, use the following command to install the version that supports English:
1 | bash <(curl -Ls https://raw.githubusercontent.com/FranzKafkaYu/x-ui/master/install_en.sh) |
- When asked if you want to continue, put
yfor yes - When asked for an admin user name, put anything you want, e.g.
chief, but preferably not the old default ofadmin - When asked for a password, put anything you like, e.g.
str0ngP@$$w0rd - When asked for a port number, put anything you want, e.g.
55555, but preferably not the old default of54321
Whatever port number you put, you must open that port for TCP input in your server firewall. For example:
1 | iptables -I INPUT -p tcp --dport 55555 -j ACCEPT |
Obtain SSL certficate and key
On the Cloudflare site Overview page for your domain, on the right-hand site under API, Click Get your API token. On the line for Global API Key, click View. Enter your Cloudflare password, confirm you are human, and click View. Copy the API key and close the box. Save the API key (for example, paste it into Windows Notepad).
Go to your terminal SSH session with the server. To bring the control menu, enter the command:
1 | x-ui |
Choose the option:
1 | 16 |
For acme DNS API mode, where you need to provide your Cloudflare Global API Key, enter:
1 | 2 |
To confirm that you know the email for your Cloudflare account, your Cloudflare Global API Key, and that your domain uses Cloudflare for DNS resolution, enter:
1 | y |
The script will prompt you for the information it needs:
- Enter the server’s domain name (i.e., the fully qualified domain name of this host)
- Enter your Cloudflare Global API Key.
- Enter the email you use for your Cloudflare account.
It sometimes takes several minutes to verify your site and issue the SSL certificate and key. When the certificate and key have been issued, the script puts them in:
/root/cert/fullchain.cer/root/cert/<HOST.DOMAIN.NAME>.key
Open a browser and log in for the first time over plain HTTP (no security yet):
1 | http://<HOST.DOMAIN.NAME>:55555 |
Check that the xray status is running and that the version is what you expect.
Go to the x-ui settings page, and enter the fields:
- SSL cert file path
/root/cert/fullchain.cer - SSL cert key path
/root/cert/<HOST.DOMAIN.NAME>.key
Click Save then Restart.
Once the service has restarted, you can reach the HTTPS version of x-ui in your browser, e.g.
1 | https://<HOST.DOMAIN.NAME>:55555/<ROOT-PATH>/xui |
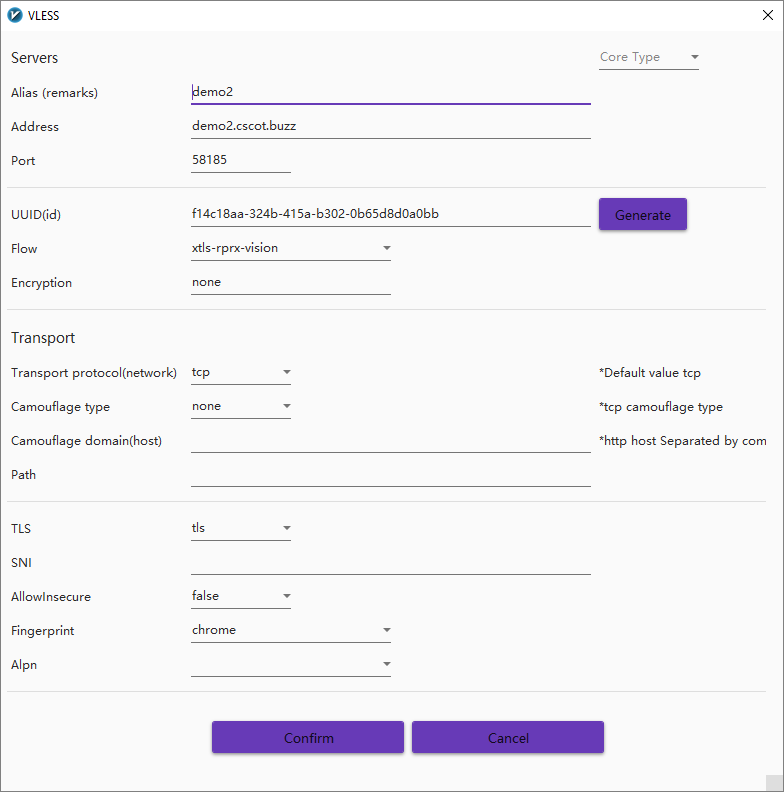
Add xtls-rprx-vision inbound
Click Inbounds then Add Inbound. You can base your server configuration on the example in https://github.com/XTLS/Xray-examples/tree/main/VLESS-TCP-XTLS-Vision.
- Remark as you wish
- Protocol
VLESS - Port as generated
- Network
tcp - Security
tls - Path to cert
/root/cert/fullchain.cer - Path to key
/root/cert/<HOST.DOMAIN.NAME>.key
Once you’ve specified the above basic parameters for the server, add for each user:
- User Id as generated
- Flow
xtls-rprx-vision
Click Operation then click QR code to display the QR code. Click Copy to copy the VLESS URL to your PC clipboard.
You must open the chosen port for TCP input in your server firewall. For example:
1 | iptables -I INPUT -p tcp --dport 33665 -j ACCEPT |
Download v2rayN
Download the lastest version of v2rayN from https://github.com/2dust/v2rayN/releases. The file you want is v2rayN-With-Core.zip.
Unzip the zip file.
Start the v2rayN application. If necessary, click More info and Run anyway.
Click the v2rayN icon in the system tray.
In the menu, click the three dots, and choose language en for English. Close the v2rayN panel. Exit the program on the context menu in the system tray.
Restart to see v2rayN in English.
Right-click on the v2rayN icon in the system tray. Select Set system proxy. The icon turns red.
Configure v2rayN for xtls-rprx-vision
Paste in the VLESS URL (Ctrl+v).
Select the server’s row, and press Enter to start the connection.