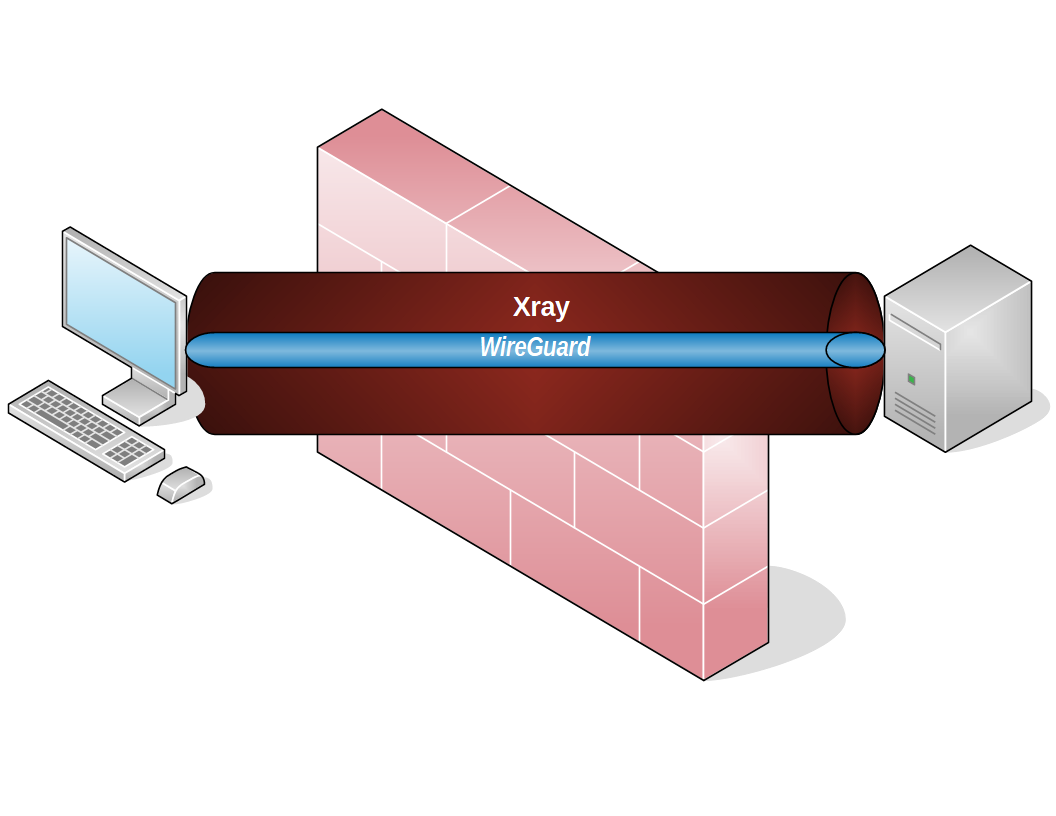
Tunnel WireGuard through Xray
There’s an old stock market adage, “If a system becomes too well known, it stops working.”
The same thing applies to tunneling. If everyone else is using a system, eventually it gets blocked. There’s a lot to be said for choosing a method different from everyone else’s.
In this post, you’ll tunnel your traffic though WireGuard, then tunnel the WireGuard connection through Xray.
Both server and client in this tutorial run Ubuntu Linux 22.04.
Server
Domain name
Since we are using Xray Vision, your server will need a domain name and a DNS A record for this tutorial.
Our hostname (fully qualified domain name) in the examples will be:
1 | charlie.cscot.buzz |
We represent the server IP address as <SERVER-IP-ADDRESS>.
Prepare server
SSH into your server, replacing <SERVER-IP-ADDRESS> by your actual server IP address:
1 | ssh root@<SERVER-IP-ADDRESS> |
Suppress lengthy login messages:
1 | touch .hushlogin |
Get your existing package metadata up to date, and upgrade all existing packages:
1 | apt update && apt upgrade |
You may be prompted to reboot and SSH back in again.
Protect your server with iptables, replacing <HOME-IP-ADDRESS> by your actual home IP address:
1 | iptables -A INPUT -i lo -j ACCEPT |
Notice that we opened ports 80/tcp and 443/tcp, but we did not open the WireGuard port 51820/udp. This is because the WireGuard traffic will pass through the Xray tunnel instead of arriving directly.
Check that you can still access the server with the above rules before you make them permanent:
1 | exit |
Reconnect:
1 | ssh root@<SERVER-IP-ADDRESS> |
Make the iptables rules permanent:
1 | apt install iptables-persistent |
Get an SSL certificate for the server
Use the Automatic Certificate Management Environment (ACME) script to request an SSL certificate for your server. In the commands that follow, replace both occurrences of charlie.cscot.buzz by your actual server hostname:
1 | apt install socat |
Install web server
The web server will receive control from Xray and handle fallbacks.
Install the Nginx web server:
1 | apt install nginx |
Edit the web server configuration file:
1 | vi /etc/nginx/nginx.conf |
Replace the existing contents with the template that follows, which is adapted from https://github.com/chika0801/Xray-examples/blob/main/VLESS-XTLS-Vision/nginx.conf.
1 | user www-data; |
Save the web server configuration file.
Test the configuration file:
1 | nginx -t |
Restart Nginx with the new configuration:
1 | systemctl restart nginx |
Review the status to make sure Nginx is active (running):
1 | systemctl status nginx |
If necessary, quit the status display by entering q for quit.
Install Xray on server
Install Xray version 1.8.0 on your server to run as root. If a more advanced release is available by the time you read this, you can omit --version 1.8.0 and just install the newest release.
1 | bash -c "$(curl -L https://github.com/XTLS/Xray-install/raw/main/install-release.sh)" @ install -u root --version 1.8.0 |
Generate UUID
On the Linux server, generate a universally unique id:
1 | xray uuid |
Example of output:
1 | 1e63753f-8f98-44e0-8d10-4bcbaa92f060 |
Plug this UUID into your Xray server and client configuration files.
Configure Xray on server
Edit the Xray server configuration file:
1 | vi /usr/local/etc/xray/config.json |
Model your configuration on the template below, which is adapted from https://github.com/chika0801/Xray-examples/blob/main/VLESS-XTLS-Vision/config_server.json. Notice that Chinese IP addresses are blocked. This impedes identification of the server as a proxy by the GFW.
1 | { |
Run Xray on server
After saving your server configuration file, /usr/local/etc/xray/config.json, restart the Xray service with the command:
1 | systemctl restart xray |
Review the status to make sure Xray is active (running):
1 | systemctl status xray |
If necessary, quit the status display by entering q for quit.
Install and configure WireGuard on server
Download the angristan WireGuard install script:
1 | curl -O https://raw.githubusercontent.com/angristan/wireguard-install/master/wireguard-install.sh |
Make the script executable:
1 | chmod +x wireguard-install.sh |
Run the script:
1 | ./wireguard-install.sh |
Answer the questions as shown below. Note that you must manually input the WireGuard port (51820) and possibly also the server’s public IP address:
1 | IPv4 or IPv6 public address: <SERVER-IP-ADDRESS> |
Generate WireGuard client configuration
After the server install has completed, the angristan script automatically generates a configuration file for the first client:
1 | The client name must consist of alphanumeric character(s). It may also include underscores or dashes and can't exceed 15 chars. |
At the end of its run, the script displays a message:
1 | Your client config file is in /root/wg0-client-home.conf |
Here is an example of the client configuration file:
1 | PrivateKey = 6FcyqKcFWPVUFW/mnbGgxx2JeTBlpJZSPFkDMvK7lEM= |
You will download this configuration file from the server to the client in a moment.
Although probably not essential, it is recommended at this stage that you reboot your server:
1 | reboot |
Check camouflage site
At this point, you can check your camouflage. Open an ordinary browser on your PC and attempt to visit your server:
1 | https://charlie.cscot.buzz |
The camouflage website should be displayed.
If there is a problem, try SSH-ing back into the server and restarting Nginx:
1 | systemctl restart nginx |
Check the status:
1 | systemctl status nginx |
Client
Now switch to working on your PC.
Download Xray command-line client
Open a browser, and visit https://github.com/XTLS/Xray-core/releases. From release 1.8.0 or greater, download Xray-linux-64.zip.
Unzip the .zip file.
1 | unzip ~/Downloads/Xray-linux-64.zip -d ~/Downloads/Xray-linux-64 |
This creates a folder ~/Downloads/Xray-linux-64 with the Xray application inside it.
Configure Xray client
Inside the folder ~/Downloads/Xray-linux-64, create a client configuration file config.json.
1 | vi ~/Downloads/Xray-linux-64/config.json |
Model your configuration on the one that follows. It simply routes WireGuard input straight to the proxy server. At a minimum, make these changes to the template:
- Replace
<SERVER-IP-ADDRESS>by your actual server IP address. - Replace
charlie.cscot.buzzby the name on your SSL certificate (i.e. your server hostname)
1 | { |
Save the file ~/Downloads/Xray-linux-64/config.json.
Install WireGuard client
Get your client PC up to date:
1 | sudo apt update && sudo apt upgrade |
Install WireGuard:
1 | sudo apt install resolvconf wireguard |
Download WireGuard client configuration
Securely download the WireGuard client configuration from your server by issuing the command:
1 | sudo scp root@<SERVER-IP-ADDRESS>:/root/wg0-client-home.conf /etc/wireguard/wg0.conf |
Edit the downloaded copy of the configuration file wg0.conf:
1 | sudo vi /etc/wireguard/wg0.conf |
Change the Endpoint to be localhost port 51820, i.e. 127.0.0.1:51820, which is where Xray will be listening.
Here is an example of the wg0.conf configuration file at this stage:
1 | [Interface] |
Calculate AllowedIPs
The idea is that WireGuard should handle traffic for all IP addresses except the IP address of the Xray server. Traffic for the Xray server must be sent directly, otherwise you will get a routing loop.
Open a browser. Visit https://www.procustodibus.com/blog/2021/03/wireguard-allowedips-calculator.
- Set Allowed IPs to
0.0.0.0/0,::/0. - Set Disallowed IPs to
<SERVER-IP-ADDRESS>. - Press Calculate.
- Copy the resulting
AllowedIPs =line into your downloaded copy of thewg0.confconfiguration file, replacing the original line. - Save the amended
wg0.conffile.
Connect both tunnels
Change into the Xray directory:
1 | cd ~/Downloads/Xray-linux-64 |
Run the Xray connection:
1 | ./xray run -c config.json |
Once the Xray tunnel is up, open a new terminal window.
In the second terminal, bring up your WireGuard tunnel:
1 | sudo wg-quick up wg0 |
Disconnect
Once you’ve finished browsing the web, bring down the WireGuard interface:
1 | sudo wg-quick down wg0 |
Press Ctrl+c to stop Xray.