Obfuscate WireGuard with Shadowsocks using V2Ray
Install WireGuard on server
There are many ways to install WireGuard on a server. Someone else may already have set up a server for you. If you are setting up the WireGuard server yourself, one quick way is to use an installation script. It generates both the server configuration and the client configuration for you.
If you are going to use that script, then just execute these three commands from the README:
1 | curl -O https://raw.githubusercontent.com/angristan/wireguard-install/master/wireguard-install.sh |
You must make a note of the randomly generated port number with this script. Our example will be 56051. You’ll need to know the WireGuard listening port number when you configure the client.
At the end of the script’s run, you can check the status of the systemd service with the command systemctl status wg-quick@wg0.
Install V2Ray on server
As with WireGuard, it is quicker to use a script for the installation. This tutorial uses the official V2Ray installation script from https://github.com/v2fly/fhs-install-v2ray. Run the following command to download and run the script on your server:
1 | bash <(curl -L https://raw.githubusercontent.com/v2fly/fhs-install-v2ray/master/install-release.sh) |
The script will provide information such as information, warning, and error messages when it is executed. Please read them carefully.
For the answer to common problems, consult the wiki. If your question is not listed, you are welcome to raise it on the Issues tab. Please read Issue #63 before asking a question, otherwise it may not be answered.
The script does not automatically generate configuration files for you; it only solves problems encountered during the installation phase. We are going to code our own configuration file below. Please refer to the documentation to understand the syntax of the configuration file. You can also refer to configuration file templates contributed by the community. Note that these templates need to be modified and adjusted by yourself after copying and cannot be used directly.
It is not recommended to use the script to install V2Ray in Docker. Please use the official Docker image directly. If the official Docker image cannot meet your custom installation needs, please fork and modify the upstream Dockerfile.
The files installed by the script conform to the Filesystem Hierarchy Standard (FHS):
/usr/local/bin/v2ray/usr/local/bin/v2ctl/usr/local/share/v2ray/geoip.dat/usr/local/share/v2ray/geosite.dat/usr/local/etc/v2ray/config.json/var/log/v2ray/access.log/var/log/v2ray/error.log/etc/systemd/system/v2ray.service/etc/systemd/system/v2ray@.service
Configure V2Ray on server
The V2Ray server will accept input in Shadowsocks format and send it to WireGuard running on the same server.
A convenient way to generate a password is to use https://passwordsgenerator.net.
Our example password below is %R#5<eA#ex~ZXuqR, but you must change this to your own choice of password.
Our example port is 1234, but again you must change this to your own choice of port number.
Edit the configuration file /usr/local/etc/v2ray/config.json, using what follows as a template:
1 | { |
Start V2Ray with your new configuration:
1 | systemctl enable v2ray |
Open server firewall
Open the corresponding port, which is udp/1234 in the example, in your server firewall. Some cloud providers call the firewall “security groups.”
Create V2Ray client configuration
Create a configuration file.
This configuration uses dokodemo-door. Dokodemo Door is Japanese for the “Anywhere Door” (どこでもドア) which has appeared in certain manga and video games. In V2Ray terms, dokodemo-door is an inbound protocol. It listens on a local port and sends all traffic entering this port to a specified port number on the server. It is similar to port forwarding.
Replace 56051 in the template below by your WireGuard listening port.
Replace {{ host }} by your server IP address.
Replace %R#5<eA#ex~ZXuqR by your password.
1 | { |
Save the file.
Install V2Ray command-line client
You can get the command-line client for many different platforms from https://github.com/v2fly/v2ray-core/releases.
For Windows the client is named v2ray-windows-64.zip. Unzip the .zip file.
Run V2Ray command-line client
Open a Command Prompt.
Change into the directory with your V2Ray application and configuration file in it. For example:
1 | cd Downloads\v2ray-windows-64 |
Run V2Ray with your configuration file:
1 | .\v2ray.exe run -c config.json |
Leave the Command Prompt window open with V2Ray running in it.
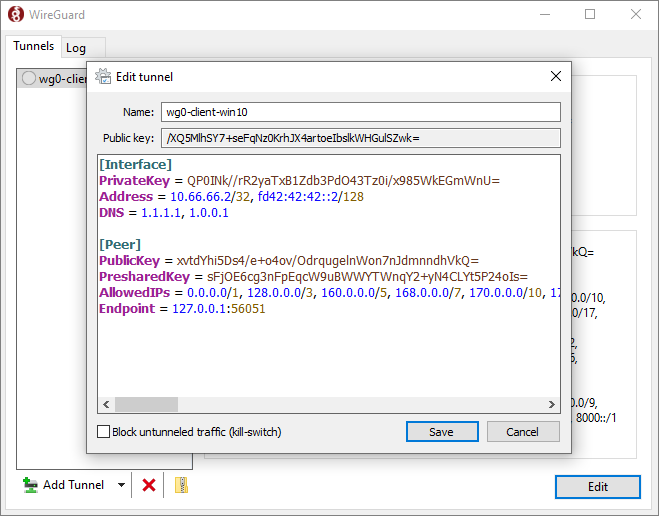
Route server IP address directly
Use the calculator at https://www.procustodibus.com/blog/2021/03/wireguard-allowedips-calculator to calculate the expression for all possible IP addresses except your server IP address.
- Set Allowed IPs to
0.0.0.0/0,::/0 - Set Disallowed IPs to your server’s IP address
- Press Calculate
Edit your WireGuard client configuration file.
Replace your client’s original AllowedIPs line with the one from the calculator.
Most important – also change the Endpoint so that it points to localhost, e.g.
1 | Endpoint = 127.0.0.1:56051 |
Save the amended WireGuard client configuration file.
Install WireGuard on client
Install your WireGuard client from https://www.wireguard.com/install.
Import your amended WireGuard client configuration file (called “Add Tunnel in the Windows GUI).
If you are using the Windows GUI, uncheck the box for Block untunneled traffic (kill switch).
Activate the tunnel.
Smoke test
Open a browser and test your end-to-end connection.