Testing gRPC HTTP/2 on Xray REALITY
gRPC is Google’s Remote Procedure Call framework. It is based around the idea of defining a service and specifying methods that can be called remotely. Services may handle either a one-time request or a streaming request. gRPC uses HTTP/2 for transport.
This post describes the procedure used to test gRPC HTTP/2 on Xray REALITY for a Linux server and a Windows client. The test server had 1 GB of RAM and ran Ubuntu 22.04. The test client ran Windows 10. Server and client configurations are based on https://github.com/chika0801/Xray-examples/tree/main/VLESS-gRPC-uTLS-REALITY.
Prepare server
SSH into your server using Windows PowerShell. In the command below, replace <SERVER-IP-ADDRESS> by your actual server IP address:
1 | ssh root@<SERVER-IP-ADDRESS> |
Suppress lengthy login messages:
1 | touch .hushlogin |
Get the existing package metadata up to date, and upgrade all existing packages:
1 | apt update && apt upgrade |
You may be prompted to reboot and then SSH back in again.
Protect your server with iptables, replacing <HOME-IP-ADDRESS> by your actual home IP address:
1 | iptables -A INPUT -i lo -j ACCEPT |
Check that you can still access the server with these rules before you make them permanent:
1 | exit |
Make the iptables rules permanent:
1 | apt install iptables-persistent |
Enable BBR congestion control algorithm
Copy and paste these three commands into your SSH session to enable the Bottleneck Bandwidth and Round-trip propagation time (BBR) congestion control algorithm:
1 | echo "net.core.default_qdisc=fq" >> /etc/sysctl.conf |
Install Xray on server
Install Xray version 1.8.0 to run as root:
1 | bash -c "$(curl -L https://github.com/XTLS/Xray-install/raw/main/install-release.sh)" @ install -u root --version 1.8.0 |
Generate parameters
On the Linux server, generate a universally unique id with xray uuid. Example of output:
1 | b29ce075-dcb5-46ce-a0c5-189e3f633701 |
Plug the id into both the server and the client configuration files.
Generate a public-private key pair with xray x25519. Example of output:
1 | Private key: uJTbBa9Wt4GfTWHkSBv4e9ph_rljUhGfTgV4Gx9JZWo |
Plug the private key into the server configuration file, and the public key into the client configuration file.
Choose a shortId of up to 16 hexadecimal characters. Example:
1 | b1 |
Plug this into the server and client configuration files.
Determine camouflage website
The minimum standard of the camouflage website is that it be a foreign website, support TLSv1.3 and HTTP/2, and have a URL that is not redirected elsewhere (though the apex domain name may be redirected to www).
Bonus points if it has a similar IP to your server, the handshake messages after the “Server Hello” are encrypted together (such as for dl.google.com), and the server implements Online Certificate Status Protocol (OCSP) stapling.
Plug your camouflage website into both the server and the client configuration files.
Our example: www.microsoft.com.
Xray configuration on the server
Edit /usr/local/etc/xray/config.json. The template used for testing was like this:
1 | { |
Run Xray on the server
After saving your server configuration file in /usr/local/etc/xray/config.json, restart the Xray service with the command:
1 | systemctl restart xray |
Exit SSH session with server
Since the server work is now done:
1 | exit |
Download v2rayN latest release
Download v2rayN-With-Core.zip version 6.19 from https://github.com/2dust/v2rayN/releases.
Unzip the .zip file.
Download Xray-core latest release
Download Xray-windows-64.zip version 1.8.0 from https://github.com/XTLS/Xray-core/releases.
Unzip the .zip file.
Update core
Copy Downloads\Xray-windows-64\xray.exe into Downloads\v2rayN-With-Core\v2rayN-With-Core\bin\Xray.
Check that you have the latest version by opening Windows PowerShell and issuing the command:
1 | .\Downloads\v2rayN-With-Core\v2rayN-With-Core\bin\Xray\xray.exe --version |
With version 1.8.0 you should see the results:
1 | Xray 1.8.0 (Xray, Penetrates Everything.) Custom (go1.20.2 windows/amd64) |
Change v2rayN to English
Launch v2rayN.exe for the first time.
Change the v2rayN panel language to English. If you have never done this before, watch the video demonstration How to change v2rayN to English.
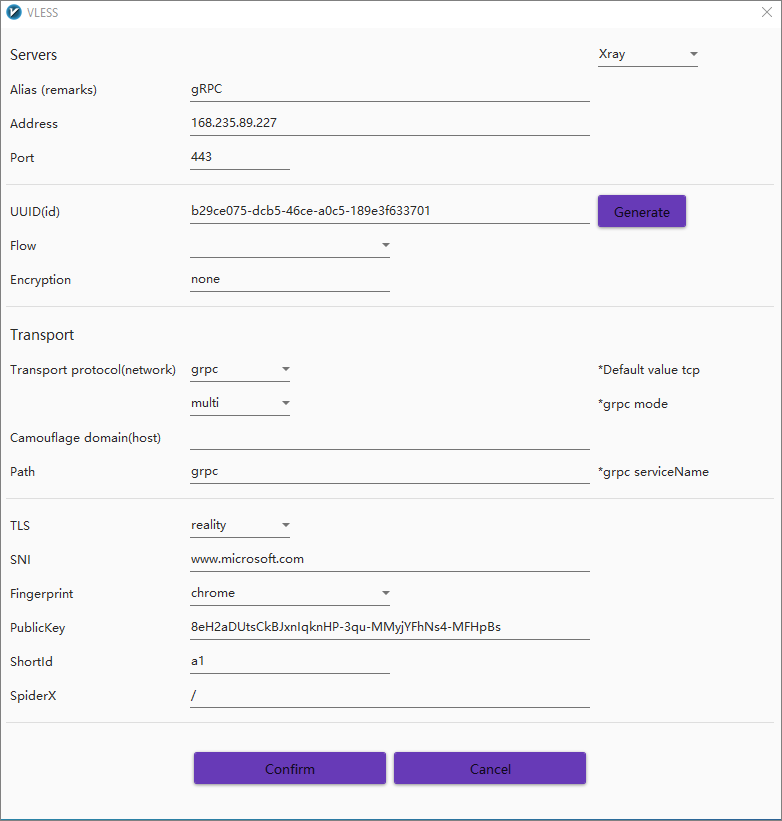
Add VLESS server configuration
From the v2rayN menu bar, select Servers > Add [VLESS] server.
Specify a VLESS server as follows:
| Field | Value |
|---|---|
| Core Type | Xray |
| Alias | Anything you like, e.g. gRPC |
| Address | Server IP address, e.g. 168.235.89.227 |
| UUID | E.g. b29ce075-dcb5-46ce-a0c5-189e3f633701 |
| Port | 443 |
| Flow | Blank |
| Encryption | none |
| Transport | grpc |
| grpc mode | multi |
| Camouflage type | Blank |
| Camouflage domain (host) | Blank |
| Path (grpc serverName) | grpc |
| TLS | reality |
| SNI | www.microsoft.com |
| Fingerprint | e.g. chrome |
| Public Key | 8eH2aDUtsCkBJxnIqknHP-3qu-MMyjYFhNs4-MFHpBs |
| Short Id | a1 |
| SpiderX | / |
Click Confirm to save the server configuration.
Set system proxy
To allow you to use any browser, find the v2rayN icon in the system tray, right-click to bring up the context menu, and select Set system proxy.
v2rayN screenshot