How to build your own IKEv2 IPsec VPN server
This post shows you how to manually create an IKEv2 IPsec VPN server using the strongSwan package on an Ubuntu 22.04 server. It also outlines the process for setting up the corresponding client on a Windows PC, a Linux PC, and an Android device. Since IPsec is a standards-based protocol, client devices often support IPsec natively. You can reach your server without installing additional software on the client.
VPS and domain name
You will need a Linux server running Ubuntu 22.04 with 1 GB of RAM.
You also need to buy a domain name and create a DNS A record pointing from your server hostname (moon.cscot.buzz in our examples) to the your server IP address.
Prepare server
SSH into your server using a terminal emulator app or Windows PowerShell. In the SSH command below, replace moon.cscot.buzz by your actual server hostname:
1 | ssh root@moon.cscot.buzz |
Suppress lengthy login messages:
1 | touch .hushlogin |
Get the existing package metadata up to date, and upgrade all existing packages:
1 | apt update && apt upgrade |
You may be prompted to reboot and then SSH back in again.
Protect your server with iptables, replacing <HOME-IP-ADDRESS> by your actual home IP address. We need to open the firewall for UDP input on ports 500 and 4500, and also for protocols AH and ESP. We masquerade the source IP address on outbound packets to set it to the IP address of the server, not the original client.
1 | iptables -A INPUT -i lo -j ACCEPT |
Check that you can still access the server with these rules before you make them permanent:
1 | exit |
Make the iptables rules permanent:
1 | apt install iptables-persistent |
Enable forwarding
Enable packet forwarding in the Linux kernel. Create a new configuration file in the /etc/sysctl.d directory, with a single line in it:
1 | echo 'net.ipv4.ip_forward=1' > /etc/sysctl.d/40-ipv4-forward.conf |
Make this change effective immediately:
1 | sysctl -p /etc/sysctl.d/40-ipv4-forward.conf |
Install packages
Install strongSwan and its related packages by entering the command:
1 | apt install strongswan libstrongswan strongswan-pki libstrongswan-standard-plugins libstrongswan-extra-plugins strongswan-swanctl strongswan-charon strongswan-starter strongswan-libcharon libcharon-extra-plugins libcharon-extauth-plugins charon-systemd libtss2-tcti-tabrmd0 |
Create Certificate Authority
Create a self-signed Certificate Authority (CA) key and certificate as follows.
Generate a private key for the CA:
1 | pki --gen --outform pem > /etc/swanctl/private/strongswanKey.pem |
Generate a self-signed CA certificate with a lifetime of 10 years (3652 days). Replace country CH, organization strongSwan, and common name strongSwan Root CA with your own choice of values.
1 | pki --self --ca --lifetime 3652 --in /etc/swanctl/private/strongswanKey.pem --dn "C=CH, O=strongSwan, CN=strongSwan Root CA" --outform pem > /etc/swanctl/x509ca/strongswanCert.pem |
Create server certificate
Generate a private key for the host moon.cscot.buzz:
1 | pki --gen --outform pem > /etc/swanctl/private/moonKey.pem |
Create a PKCS#10 certificate request that has to be signed by the CA:
1 | pki --req --type priv --in /etc/swanctl/private/moonKey.pem --dn "C=CH, O=strongswan, CN=moon.cscot.buzz" --san moon.cscot.buzz --outform pem > /etc/swanctl/x509/moonReq.pem |
Issue a signed server certificate based on the certificate request:
1 | pki --issue --cacert /etc/swanctl/x509ca/strongswanCert.pem --cakey /etc/swanctl/private/strongswanKey.pem --type pkcs10 --in /etc/swanctl/x509/moonReq.pem --flag serverAuth --flag ikeIntermediate --lifetime 365 --outform pem > /etc/swanctl/x509/moonCert.pem |
Create client certificate
Generate a private key for the client carol:
1 | pki --gen --outform pem > /etc/swanctl/private/carolKey.pem |
Create a PKCS#10 certificate request that has to be signed by the CA:
1 | pki --req --type priv --in /etc/swanctl/private/carolKey.pem --dn "C=CH, O=strongswan, CN=carol.cscot.buzz" --san carol.cscot.buzz --outform pem > /etc/swanctl/x509/carolReq.pem |
Issue a signed client certificate based on the certificate request:
1 | pki --issue --cacert /etc/swanctl/x509ca/strongswanCert.pem --cakey /etc/swanctl/private/strongswanKey.pem --type pkcs10 --in /etc/swanctl/x509/carolReq.pem --flag clientAuth --lifetime 365 --outform pem > /etc/swanctl/x509/carolCert.pem |
Create client PKCS#12 file
Many platforms prefer the private key, certificate, and CA certificate combined into a PKCS#12 container. Combine them with the openssl command:
1 | openssl pkcs12 -export -inkey /etc/swanctl/private/carolKey.pem -in /etc/swanctl/x509/carolCert.pem -name "carol" -certfile /etc/swanctl/x509ca/strongswanCert.pem -caname "strongSwan Root CA" -out /etc/swanctl/pkcs12/carolCert.p12 |
When prompted, enter and confirm an export password. You will need to know this export password when you import the .p12 file to your client.
Android cannot import newer .p12 files. Therefore if you aim to support an Android client, convert your client .p12 file to “legacy” format:
1 | openssl pkcs12 -nodes < /etc/swanctl/pkcs12/carolCert.p12 > /tmp/certbag.pem |
Enter the original export password. Then:
1 | openssl pkcs12 -export -legacy -in /tmp/certbag.pem > /etc/swanctl/pkcs12/carolCertLegacy.p12 |
Enter and confirm a new export password (which may be the same as the original one, if you wish).
Configure strongSwan server
Create a new file for IKEv2 connections with machine certificate authentication:
1 | vi /etc/swanctl/swanctl.conf |
Insert a configuration based on the template below:
1 | connections { |
Save the file /etc/swanctl/swanctl.conf.
Restart strongSwan
Restart strongSwan with your new configuration:
1 | systemctl restart strongswan-swanctl |
Check that strongSwan is active and running:
1 | systemctl status strongswan-swanctl |
Your server work is done for now, so exit from the SSH session with the server:
1 | exit |
Windows IKEv2 client
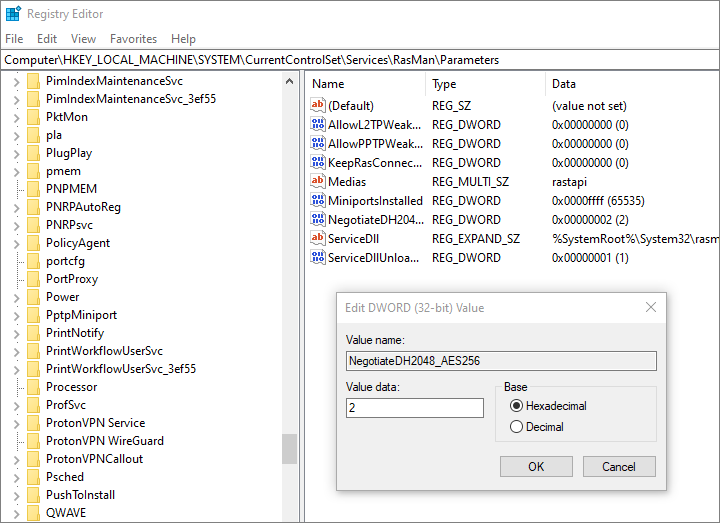
First, use the Registry Editor to enforce the use of MODP2048.
- Press the Win+r keys, type
regedit, then press Enter. - If asked if you want to allow the Registry Editor to make changes to your device, click Yes.
- In the tree in the left pane, navigate to
HKEY_LOCAL_MACHINE>SYSTEM>CurrentControlSet>Services>RasMan>Parameters. - Right-click on
Parameters, and insert a newDWORD (32-bit value). - Set the name to
NegotiateDH2048_AES256. - Set the value to
2, which means enforce the use of AES-256-CBC and MODP2048.
Close the Registry Editor.
Now securely copy the client .p12 file to your Windows workstation by opening PowerShell and running the scp command:
1 | scp root@moon.cscot.buzz:/etc/swanctl/pkcs12/carolCert.p12 Downloads/carolCert.p12 |
Use the Microsoft Management Console to import the client certificate and key, and also the CA certificate, from the .p12 file:
- Press the Win+r keys, type
mmc, and click OK. - If asked if you want to allow the Microsoft Management Console to make changes to your device, click Yes.
- From the Microsoft Management Console menu, select File, Add/Remove Snap-in, then choose Certificates.
- Click Add.
- Select Computer Account then press Next.
- Select Local computer then press Finish.
- Click OK.
- Expand the tree item Certificates (Local Computer) and select Personal.
- From the menu, select Action > All Tasks > Import.
- Click Next.
- Browse to your downloaded
.p12file (Downloads/carolCert.p12in our example) and click Next. - You will need to enter the password for the
.p12file and click Next. - Click Next.
- Click Finish.
- Click OK.
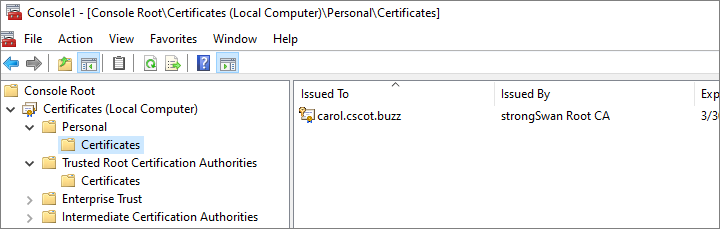
- The client certificate and the CA certificate appear under Personal > Certificates.
- Cut and paste the CA certificate from Personal to Trusted Root Certification Authorities.
- Close the Microsoft Management Console (there is no need to save the console settings).
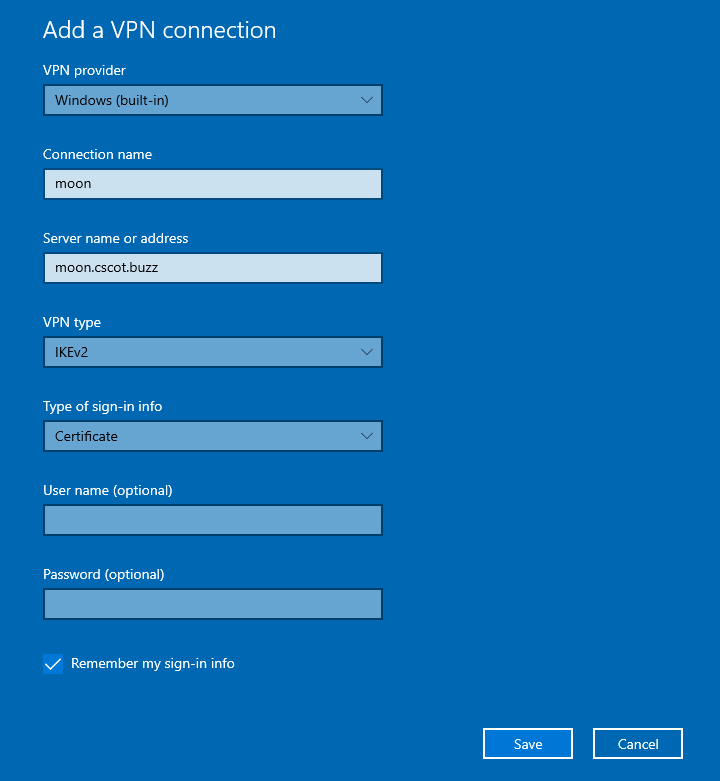
Add the new VPN connection using Settings > Network & Internet > VPN.
- Set the VPN provider to
Windows (built-in). - Set the connection name to (for example)
moon. - The server name or address in our example is
moon.cscot.buzz. - The VPN type is
IKEv2. - The type of sign-in info is
Certificate.
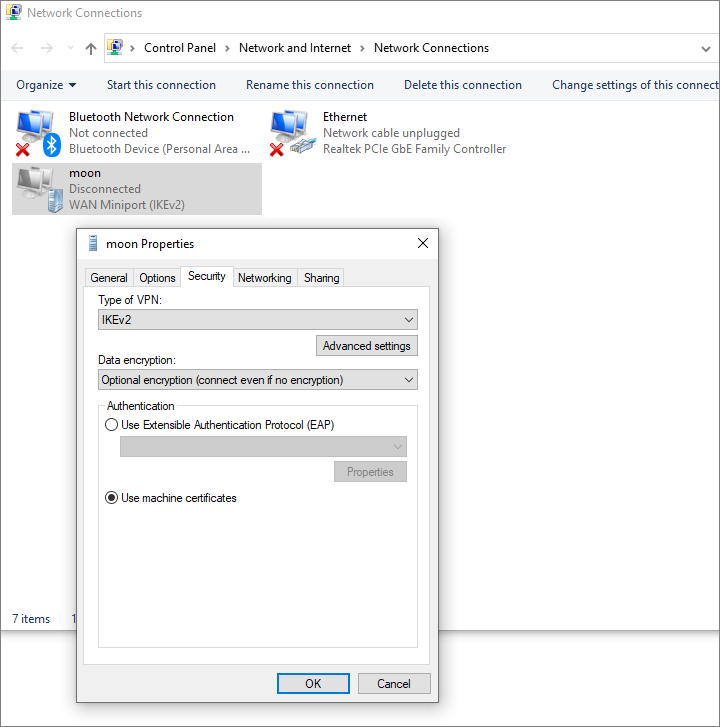
Now click Change adapter options.
- Right-click on the WAN Miniport for your IKEv2 connection
moon. - Select Properties.
- Select the Security tab.
- For Authentication, select the radio button for Use machine certificates.
- Click OK.
- Close the Network Connections window.
Use PowerShell to set the IPsec configuration for the IKEv2 tunnel:
1 | Set-VpnConnectionIPsecConfiguration -ConnectionName "Contoso" -AuthenticationTransformConstants None -CipherTransformConstants AES256 -EncryptionMethod AES256 -IntegrityCheckMethod SHA256 -PfsGroup None -DHGroup Group14 -PassThru -Force |
Close PowerShell.
Now connect your client to your server.
From Settings > Network & Internet > VPN, select your VPN moon.
Press Connect.
Linux IKEv2 client
Securely copy the client certificate and key files, and the CA certificate file, to your Linux workstation by opening your terminal emulator and running the scp commands:
1 | scp root@moon.cscot.buzz:/etc/swanctl/x509/carolCert.pem ~/Downloads/carolCert.pem |
Install strongSwan for Network Manager:
1 | sudo apt install network-manager-strongswan |
In the GNOME Settings app, go to the Network page. In the VPN section, click the plus sign + to add a new VPN client configuration.
Select type IPsec/IKEv2 (strongswan).
Fill in the fields as illustrated.
- Name is a name of your choice, e.g.
moon - Server Address is your server’s DNS name, e.g.
moon.cscot.buzz - Server Certificate is the CA certificate you downloaded
- Server Identity can be left blank
- Client Authentication is
Certificate - Client Certificate is
Certificate/private key - Client Certificate file is the one you downloaded
- Client Private key is the one you downloaded
- Client Identity can be left blank
- Client Username can be left blank
- Client Password can be left blank
- Check the box for Request an inner IP address
- Check the box for Enforce UDP encapsulation
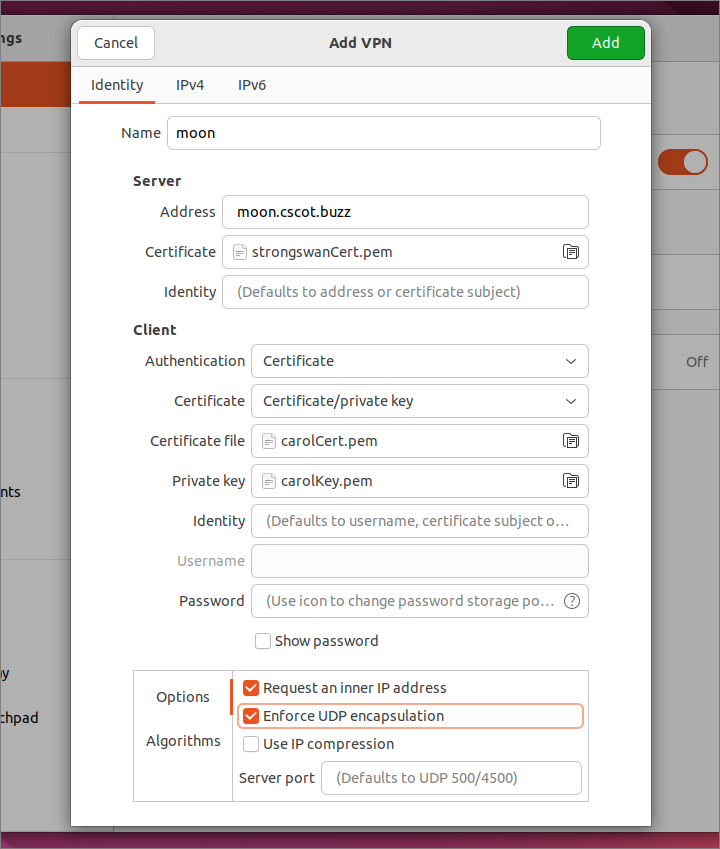
Click Add.
Connect the client to the server by toggling the VPN switch to the on position.
Android IKEv2 client
You need to securely copy the legacy-format .p12 file from the server to your client. You also need to copy the CA certificate, though this need not be transmitted securely.
The easiest way to do all this is to copy the files to a PC first, then copy them over a USB cable from your PC to your Android device. For an alternative method using a local web server, see the section below titled “Securely transfer a certificate from a PC to a mobile device.”
Securely copy the legacy-format client .p12 file from the server to your PC:
1 | scp root@moon.cscot.buzz:/etc/swanctl/pkcs12/carolCertLegacy.p12 Downloads/carolCertLegacy.p12 |
Copy the CA certificate file from the server to your PC:
1 | scp root@moon.cscot.buzz:/etc/swanctl/x509ca/strongswanCert.pem Downloads/strongswanCert.pem |
Now connect your PC to your Android device with a USB cable. Copy the two downloaded files from your PC to your Android device’s Download directory.
Next install the client .p12 certificate and the CA certificate on your Android device. The exact menu path for doing this varies depending on which version of Android you are running. It will be something like Settings > Lock screen and security > Other security settings > Install from device storage.
Select strongswanCert.pem from the list. Enter your device PIN. Choose a certificate name such as strongSwan. Click OK.
Now repeat the process, but this time select carolCertLegacy.p12 from the list. Enter the export password. Choose a certificate name such as carol. Enter your device PIN. Click OK.
On recent versions of Android, you have a choice of clients:
- the Android native IPSec IKEv2 RSA client
- the strongSwan app from Google’s Play Store
We will describe here the process for configuring the Android native client.
Go to Settings > Connections > More connection settings > VPN.
Tap ADD VPN.
- Give it a name, e.g.
moon. - Type is
IPSec IKEv2 RSA. - Server address is
moon.cscot.buzzin our example. - IPSec user certificate is
carol. - IPSec CA certificate was named
strongSwan. - IPSec server certificate is received from the server.
- Tap SAVE.
Tap the row for the VPN configuration. Click CONNECT.
Apple IKEv2 clients
Both macOS and iOS allow you to configure IKEv2 clients from their respective graphical user interfaces.
Additionally, if you have a macOS computer, you can create a .mobileconfig file for a VPN client using the Apple Configurator from the App Store.
Securely transfer a certificate from a PC to a mobile device
One way to securely copy a .p12 file from your PC to an Android, iOS, or iPadOS device is to build a small website on your PC that serves up the file to mobile devices.
If all communication takes place over your LAN, and if your LAN is behind a firewalled router, then all your transfers are secure.
To host a website on a Windows 10 computer, first enable Internet Information Services (IIS):
- Search for and launch the Control Panel app.
- Go to the Programs page.
- Click Turn Windows features on or off.
- Check the box for Internet Information Services.
- Click OK.
- Wait while Windows searches for the required files and applies the changes.
- When the install has completed, click Close.
- Close the Control Panel app.
Copy your certificate file, carolCertLegacy.p12 in our example, into the folder C:\inetpub\wwwroot. This needs administrator permissions.
In your Documents folder, create a simple HTML page named index.html.
1 | <!DOCTYPE html> |
If you use Windows Notepad as your editor, make sure you save the HTML as index.html without .txt on the end.
Copy index.html into your C:\inetpub\wwwroot folder. This needs administrator permissions.
Determine your PC’s IP address on the LAN:
1 | ipconfig |
Now visit your PC’s LAN IP address from a browser on a mobile device which is connected to the same LAN.
The webpage index.html is displayed.
Click on the link to download the .p12 file and install the certificate on your mobile device.