WireGuard Double-Hop
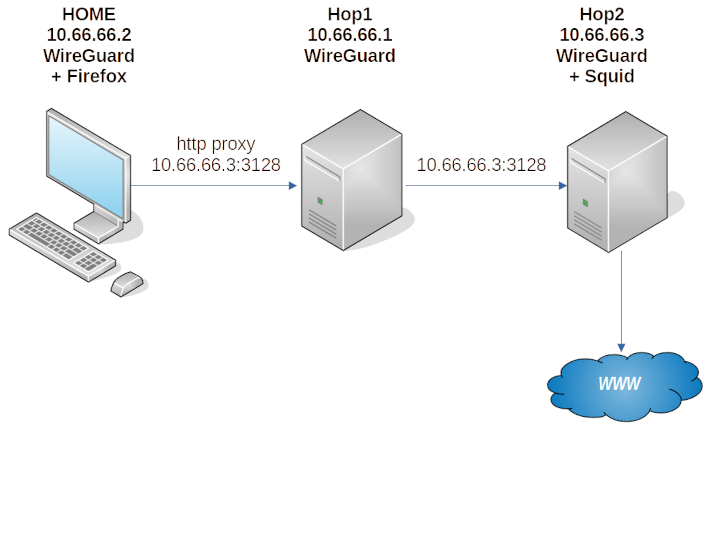
The scenario in this post is that you are browsing the web from a Windows PC at a location called HOME. You want your web traffic to emerge from a server we’ll call Hop2. However, to get to Hop2, you want your traffic to pass through a relay server we’ll call Hop1.
Hop1
Start by working on the server in the middle, which will act as a relay.
SSH from your HOME PC into Hop1. Replace XX.XX.XX.XX by the IP address of Hop1:
1 | ssh root@XX.XX.XX.XX |
Get the server Hop1 up to date:
1 | apt update && apt upgrade |
Download the angristan WireGuard install script from https://github.com/angristan/wireguard-install:
1 | curl -O https://raw.githubusercontent.com/angristan/wireguard-install/master/wireguard-install.sh |
Make the script executable:
1 | chmod +x wireguard-install.sh |
Run the script:
1 | ./wireguard-install.sh |
Answer the questions like this. Note that you must manually select the WireGuard port and possibly also the public IP address:
1 | IPv4 or IPv6 public address: XX.XX.XX.XX |
After the server install has completed, the script automatically continues by generating a configuration file for the first client:
1 | The client name must consist of alphanumeric character(s). It may also include underscores or dashes and can't exceed 15 chars. |
At the end of the script, it displays a message to say:
1 | Your client config file is in /root/wg0-client-home.conf |
Here is an example of the client configuration file contents:
1 | [Interface] |
Now run the script a second time to generate a WireGuard client configuration for Hop2:
1 | ./wireguard-install.sh |
This time, answer the questions like this:
1 | What do you want to do? |
At the end of the second run of the script, a message appears to say:
1 | Your client config file is in /root/wg0-client-hop2.conf |
Here is an example of the contents of the second client configuration file:
1 | [Interface] |
Your work on Hop1 is done for now, so exit your SSH session:
1 | exit |
Hop2
SSH from your HOME PC into Hop2. Replace YY.YY.YY.YY by the IP address of Hop2:
1 | ssh root@YY.YY.YY.YY |
Get the server Hop2 up to date:
1 | apt update && apt upgrade |
Install WireGuard on Hop2:
1 | apt install resolvconf wireguard |
Configure WireGuard by editing the wg0 configuration file:
1 | vi /etc/wireguard/wg0.conf |
Insert the Hop2 client configuration file that was generated by the script. Make these changes to the generated file:
- Replace the
AllowedIPsline so that only traffic for10.66.66.0/24goes through the WireGuard tunnel. - Add a
PersistentKeepaliveline so that the “client” (Hop2) always stays connected to the “server” (Hop1).
1 | [Interface] |
Save the file.
Bring up the WireGuard interface wg0:
1 | wg-quick up wg0 |
Show the current WireGuard configuration and runtime information of the interface:
1 | wg show |
Ping the server Hop1:
1 | ping 10.66.66.1 |
Do Ctrl+c to stop the ping command.
Assuming you are using iptables and iptables-persistent for your firewall, open the iptables firewall for Squid:
1 | iptables -I INPUT -p tcp -s 10.66.66.0/24 --dport 3128 -j ACCEPT |
Install Squid proxy server:
1 | apt install squid |
Edit the Squid configuration file:
1 | vi /etc/squid/squid.conf |
Find the existing localnet Access Control Lists. Insert a localnet ACL line for traffic from your WireGuard network:
1 | acl localnet src 10.66.66.0/24 # WireGuard network |
Uncomment the line:
1 | http_access allow localnet |
Save the Squid configuration file.
Restart Squid (this can take up to a minute):
1 | systemctl restart squid |
Check that Squid is active (running):
1 | systemctl status squid |
Your work on Hop2 is done for now, so exit your SSH session:
1 | exit |
HOME
Install Firefox browser from https://www.mozilla.org.
Download and run the WireGuard for Windows installer from https://www.wireguard.com/install.
Securely download the home WireGuard client configuration from Hop1 by opening Windows PowerShell and issuing the command:
1 | scp root@XX.XX.XX.XX:/root/wg0-client-home.conf Downloads/wg0-client-home.conf |
Here is an example of the wg0-client-home.conf configuration file:
1 | [Interface] |
In the WireGuard for Windows GUI, click Import tunnel(s) from file.
Select the configuration file Downloads/wg0-client-home.conf.
Click the Activate button.
You should see a successful connection be made and the tunnel becomes Active.
At this point you can ping both relay server Hop1:
1 | ping 10.66.66.1 |
And the far client Hop2:
1 | ping 10.66.66.3 |
Now open Firefox.
- From the hamburger menu select Settings > General > Network Settings.
- Click the Settings button.
- Select Manual proxy configuration.
- Specify the HTTP Proxy as
10.66.66.3port3128. - Check the box to Also use this proxy for HTTPS.
- Click OK.