Xray-core v1.8.0 adds support for REALITY.

REALITY implements full TLS using the SNI of a camouflage website. This eliminates the TLS fingerprint of the server, while preserving perfect forward secrecy and preventing certificate chain attacks. It is not only more conventient, it also provides greater security than conventional TLS.

This article shows you how to install Xray-core on a server and client with REALITY security.

With thanks to @rprx, @chika0801, @2dust, and all other contributors to this post. Any errors that remain are my own.

Buy VPS

International lines out of China are congested. Therefore it is important to pay attention to the routing of traffic to your VPS. The most expensive option is IPLC/IEPL. Assuming you can’t or won’t go that far, the next most expensive is a VPS with CN2 GIA routing in Hong Kong. That service is offered by BandwagonHost. Again, it is still very expensive. A CN2 GIA server in Los Angeles is more affordable. To find all the CN2 GIA options on the BandwagonHost website, click CN2 GIA, read the description of the different possibilities, then scroll down and click All Services. Search the services page (Ctrl+f) for CN2 GIA.

Some other options for China are Vultr and Aliyun (Alibaba Cloud).

For Iran, the difficulty is in making payment. Try AlphaVPS, RackNerd, Noez, or Aeza.

Since IP addresses frequently get blocked, ask potential providers if you can change your server’s IP address whenever necessary.

For the VPS hardware, 1 GB of RAM is sufficient for a small number of users. Choose a recent version of Debian or Ubuntu as your operating system.

You do not need a domain name or DNS records for Xray REALITY.

Get terminal app

You can use the terminal application in macOS or Linux to SSH into your server. Modern versions of Windows PowerShell also support SSH.

You may prefer to use a purpose-built SSH app such as PuTTY, XSHELL, or FinalShell.

Prepare server

SSH into your server using Windows PowerShell or the terminal app in Linux or macOS. Replace <SERVER-IP-ADDRESS> by your actual server IP address in the command below:

1
ssh root@<SERVER-IP-ADDRESS>

Suppress lengthy login messages:

1
touch .hushlogin

Get the existing package metadata up to date, and upgrade all existing packages:

1
apt update && apt upgrade

You may be prompted to reboot and then SSH back in again.

Protect your server with iptables, replacing <HOME-IP-ADDRESS> by your actual home IP address:

1
2
3
4
5
6
7
8
9
10
11
12
13
iptables -A INPUT -i lo -j ACCEPT
iptables -A INPUT -m conntrack --ctstate ESTABLISHED,RELATED -j ACCEPT
iptables -A INPUT -p icmp -j ACCEPT
iptables -A INPUT -p tcp --dport 22 -s <HOME-IP-ADDRESS> -j ACCEPT
iptables -A INPUT -p tcp --dport 22 -j DROP
iptables -A INPUT -p tcp --dport 80 -j ACCEPT
iptables -A INPUT -p tcp --dport 443 -j ACCEPT
iptables -P INPUT DROP

ip6tables -A INPUT -i lo -j ACCEPT
ip6tables -A INPUT -m state --state RELATED,ESTABLISHED -j ACCEPT
ip6tables -A INPUT -p ipv6-icmp -j ACCEPT
ip6tables -P INPUT DROP

Check that you can still access the server with these rules before you make them permanent:

1
2
3
exit

ssh root@<SERVER-IP-ADDRESS>

Make the iptables rules permanent:

1
apt install iptables-persistent

Enable BBR congestion control algorithm

Copy and paste these three commands into your SSH session to enable the Bottleneck Bandwidth and Round-trip propagation time (BBR) congestion control algorithm:

1
2
3
echo "net.core.default_qdisc=fq" >> /etc/sysctl.conf
echo "net.ipv4.tcp_congestion_control=bbr" >> /etc/sysctl.conf
sysctl -p

Install Xray on server

Install Xray version 1.8.0 or later to run as root:

1
bash -c "$(curl -L https://github.com/XTLS/Xray-install/raw/main/install-release.sh)" @ install --beta -u root

Generate parameters

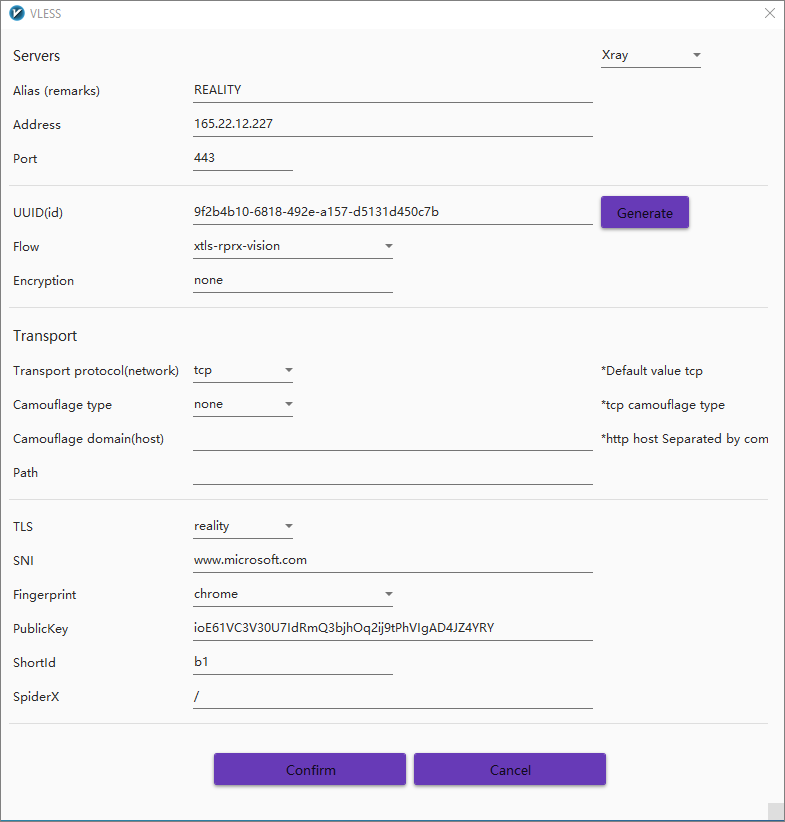
On the Linux server, generate a universally unique id with ./xray uuid. Example of output:

1
9f2b4b10-6818-492e-a157-d5131d450c7b

Plug the id into both the server and the client configuration files.

Generate a public-private key pair with ./xray x25519. Example of output:

1
2
Private key: M4cZLR81ErNfxnG1fAnNUIATs_UXqe6HR78wINhH7RA
Public key: ioE61VC3V30U7IdRmQ3bjhOq2ij9tPhVIgAD4JZ4YRY

Plug the private key into the server configuration file, and the public key into the client configuration file.

Choose a shortId of up to 16 hexadecimal characters. Example:

1
b1

Plug this into the server and client configuration files.

Determine camouflage website

The minimum standard of the camouflage website is that it be a foreign website, support TLSv1.3 and H2, and have a URL that is not redirected elsewhere (though the apex domain name may be redirected to www).

Bonus points if it has a similar IP to your server, the handshake messages after the “Server Hello” are encrypted together (such as for dl.google.com), and the server implements Online Certificate Status Protocol (OCSP) stapling.

Plug your camouflage website into both the server and the client configuration files.

Our example: www.microsoft.com.

Xray configuration on the server

If you specify security of reality, these are the possible properties of realitySettings:

Property Specification
show Optional. If true, output debugging information.
dest Required. The format is the same as the dest of VLESS fallbacks.
xver Optional. The format is the same as xver of VLESS fallbacks.
serverNames Required. The serverName list available to the client. Does not support * wildcards.
privateKey Required. Execute ./xray x25519 to generate
minClientVer Optional. The minimum version of client Xray. The format is x.y.z.
maxClientVer Optional. The highest version of client Xray. The format is x.y.z.
maxTimeDiff Optional. The maximum time difference allowed in milliseconds.
shortIds Required. The shortId list available to the client, which can be used to distinguish different clients. If set to an empty string, the client shortId can be empty. If non-empty, should be a multiple of 2 hexadecimal digits, with a maximum of 16 hexadecimal digits.

In the template for /usr/local/etc/xray/config.json below, Xray listens on 0.0.0.0:443.

1
2
3
4
5
6
7
8
9
10
11
12
13
14
15
16
17
18
19
20
21
22
23
24
25
26
27
28
29
30
31
32
33
34
35
36
37
38
39
40
41
42
43
44
45
46
47
48
49
50
51
52
53
54
55
56
57
58
59
60
61
62
63
64
65
66
67
68
69
70
71
72
73
74
75
76
77
78
79
80
81
82
83
84
{
"log": {
"loglevel": "warning"
},
"routing": {
"domainStrategy": "IPIfNonMatch",
"rules": [
{
"type": "field",
"domain": [
"geosite:category-ads-all"
],
"outboundTag": "block"
},
{
"type": "field",
"ip": [
"geoip:cn"
],
"outboundTag": "block"
}
]
},
"inbounds": [
{
"listen": "0.0.0.0",
"port": 443,
"protocol": "vless",
"settings": {
"clients": [
{
"id": "9f2b4b10-6818-492e-a157-d5131d450c7b",
"flow": "xtls-rprx-vision"
}
],
"decryption": "none"
},
"streamSettings": {
"network": "tcp",
"security": "reality",
"realitySettings": {
"show": false,
"dest": "www.microsoft.com:443",
"xver": 0,
"serverNames": [
"www.microsoft.com"
],
"privateKey": "M4cZLR81ErNfxnG1fAnNUIATs_UXqe6HR78wINhH7RA",
"minClientVer": "",
"maxClientVer": "",
"maxTimeDiff": 0,
"shortIds": [
"b1"
]
}
},
"sniffing": {
"enabled": true,
"destOverride": [
"http",
"tls"
]
}
}
],
"outbounds": [
{
"protocol": "freedom",
"tag": "direct"
},
{
"protocol": "blackhole",
"tag": "block"
}
],
"policy": {
"levels": {
"0": {
"handshake": 3,
"connIdle": 180
}
}
}
}

Run Xray on the server

After saving your server configuration file in /usr/local/etc/xray/config.json, restart the Xray service with the command:

1
systemctl restart xray

Xray-core command-line client for Windows

Download the latest release from https://github.com/XTLS/Xray-core/releases, e.g. Xray-windows-64.zip version 1.8.0.

Unzip the .zip file.

Create a client configuration file config.json. If you specify security of reality, these are the possible properties of realitySettings:

Property Specification
show Optional. If true, output debugging information.
fingerprint Required. Use uTLS library to emulate client TLS fingerprint.
serverName One of the server names.
publicKey The public key corresponding to the private key of the server.
shortId One of the server shortIds.
spiderX The initial path and parameters of the crawler are recommended to be different for each client.

Here is a template for Downloads\Xray-windows-64\config.json into which you can substitute your own values:

1
2
3
4
5
6
7
8
9
10
11
12
13
14
15
16
17
18
19
20
21
22
23
24
25
26
27
28
29
30
31
32
33
34
35
36
37
38
39
40
41
42
43
44
45
46
47
48
49
50
51
52
53
54
55
56
57
58
59
60
61
62
63
64
65
66
67
68
69
70
71
72
73
74
75
76
77
78
79
80
81
82
83
84
85
86
87
88
89
90
91
92
93
94
95
96
97
98
99
100
101
102
103
104
105
106
107
108
109
110
111
112
113
114
115
116
117
{
"log": {
"loglevel": "warning"
},
"routing": {
"domainStrategy": "IPIfNonMatch",
"rules": [
{
"type": "field",
"domain": [
"geosite:category-ads-all"
],
"outboundTag": "block"
},
{
"type": "field",
"domain": [
"geosite:category-games@cn"
],
"outboundTag": "direct"
},
{
"type": "field",
"domain": [
"geosite:geolocation-!cn"
],
"outboundTag": "proxy"
},
{
"type": "field",
"domain": [
"geosite:cn",
"geosite:private"
],
"outboundTag": "direct"
},
{
"type": "field",
"ip": [
"geoip:cn",
"geoip:private"
],
"outboundTag": "direct"
}
]
},
"inbounds": [
{
"listen": "127.0.0.1",
"port": 10808,
"protocol": "socks",
"settings": {
"udp": true
},
"sniffing": {
"enabled": true,
"destOverride": [
"http",
"tls"
]
}
},
{
"listen": "127.0.0.1",
"port": 10809,
"protocol": "http",
"sniffing": {
"enabled": true,
"destOverride": [
"http",
"tls"
]
}
}
],
"outbounds": [
{
"protocol": "vless",
"settings": {
"vnext": [
{
"address": "167.99.243.148",
"port": 443,
"users": [
{
"id": "9f2b4b10-6818-492e-a157-d5131d450c7b",
"flow": "xtls-rprx-vision",
"encryption": "none"
}
]
}
]
},
"streamSettings": {
"network": "tcp",
"security": "reality",
"realitySettings": {
"show": false,
"fingerprint": "chrome",
"serverName": "www.microsoft.com",
"publicKey": "ioE61VC3V30U7IdRmQ3bjhOq2ij9tPhVIgAD4JZ4YRY",
"shortId": "b1",
"spiderX": "/"
}
},
"tag": "proxy"
},
{
"protocol": "freedom",
"tag": "direct"
},
{
"protocol": "blackhole",
"tag": "block"
}
]
}

If you use Windows Notepad as your editor, remember to save Downloads\Xray-windows-64\config.json without the usual .txt on the end of its name.

Open Windows PowerShell and run the client:

1
2
cd Downloads\Xray-windows-64
.\xray.exe -c config.json

Configure your browser to use the SOCKS proxy on 127.0.0.1 port 10808.

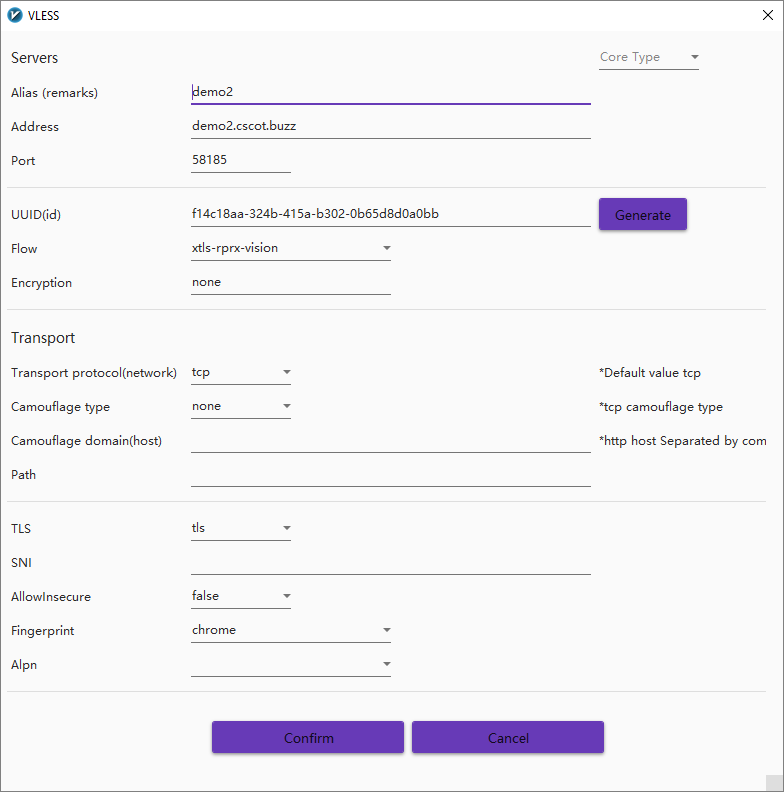
v2rayN GUI client for Windows

v2rayN version 6.17 adds support for REALITY and removes legacy XTLS settings.

The screenshot below shows the v2rayN panel with language set to English. If you have never changed the v2rayN language before, watch the video demonstration How to change v2rayN to English.

v2rayN configured for REALITY

v2rayNG client for Android

v2rayNG version 1.8.0 adds support for REALITY and removes legacy XTLS settings.

Learn more

Consult the README in the Xray-core repository.

Ingredients

Before you begin you will need:

  • a domain name
  • a cloud server provider
  • a Cloudflare account

Prepare server

At your cloud server provider, instantiate a virtual private server (VPS) with 1 GB of RAM running a recent version of Debian or Ubuntu.

SSH into your server using Windows PowerShell or the terminal app in Linux or macOS. Replace <SERVER-IP-ADDRESS> by your actual server IP address in the command below:

1
ssh root@<SERVER-IP-ADDRESS>

Suppress lengthy login messages:

1
touch .hushlogin

Get the existing package metadata up to date, and upgrade all existing packages:

1
apt update && apt upgrade

Protect your server, replacing <HOME-IP-ADDRESS> by your actual home IP address:

1
2
3
4
5
6
7
8
9
10
11
iptables -A INPUT -i lo -j ACCEPT
iptables -A INPUT -m conntrack --ctstate ESTABLISHED,RELATED -j ACCEPT
iptables -A INPUT -p icmp -j ACCEPT
iptables -A INPUT -p tcp --dport 22 -s <HOME-IP-ADDRESS> -j ACCEPT
iptables -A INPUT -p tcp --dport 22 -j DROP
iptables -P INPUT DROP

ip6tables -A INPUT -i lo -j ACCEPT
ip6tables -A INPUT -m state --state RELATED,ESTABLISHED -j ACCEPT
ip6tables -A INPUT -p ipv6-icmp -j ACCEPT
ip6tables -P INPUT DROP

Check that you can still access the server with these rules before you make them permanent:

1
2
3
exit

ssh root@<SERVER-IP-ADDRESS>

Make the iptables rules permanent:

1
apt install iptables-persistent

Set up DNS service provider

Add your site to Cloudflare.

Create DNS A (IPv4) and/or AAAA (IPv6) record(s) pointing from your server hostname to your server IP address. You do not need proxy services for this particular configuration of Xray – just DNS services. That is represented by a gray cloud against your DNS record in Cloudflare.

Check that DNS records have propagated at a service such as https://mxtoolbox.com/DnsLookup.aspx.

Install x-ui

For English-speaking users, use the following command to install the version that supports English:

1
bash <(curl -Ls https://raw.githubusercontent.com/FranzKafkaYu/x-ui/master/install_en.sh)
  1. When asked if you want to continue, put y for yes
  2. When asked for an admin user name, put anything you want, e.g. chief, but preferably not the old default of admin
  3. When asked for a password, put anything you like, e.g. str0ngP@$$w0rd
  4. When asked for a port number, put anything you want, e.g. 55555, but preferably not the old default of 54321

Whatever port number you put, you must open that port for TCP input in your server firewall. For example:

1
2
iptables -I INPUT -p tcp --dport 55555 -j ACCEPT
dpkg-reconfigure iptables-persistent

Obtain SSL certficate and key

On the Cloudflare site Overview page for your domain, on the right-hand site under API, Click Get your API token. On the line for Global API Key, click View. Enter your Cloudflare password, confirm you are human, and click View. Copy the API key and close the box. Save the API key (for example, paste it into Windows Notepad).

Go to your terminal SSH session with the server. To bring the control menu, enter the command:

1
x-ui

Choose the option:

1
16

For acme DNS API mode, where you need to provide your Cloudflare Global API Key, enter:

1
2

To confirm that you know the email for your Cloudflare account, your Cloudflare Global API Key, and that your domain uses Cloudflare for DNS resolution, enter:

1
y

The script will prompt you for the information it needs:

  1. Enter the server’s domain name (i.e., the fully qualified domain name of this host)
  2. Enter your Cloudflare Global API Key.
  3. Enter the email you use for your Cloudflare account.

It sometimes takes several minutes to verify your site and issue the SSL certificate and key. When the certificate and key have been issued, the script puts them in:

  • /root/cert/fullchain.cer
  • /root/cert/<HOST.DOMAIN.NAME>.key

Open a browser and log in for the first time over plain HTTP (no security yet):

1
http://<HOST.DOMAIN.NAME>:55555

Check that the xray status is running and that the version is what you expect.

Go to the x-ui settings page, and enter the fields:

  • SSL cert file path /root/cert/fullchain.cer
  • SSL cert key path /root/cert/<HOST.DOMAIN.NAME>.key

Click Save then Restart.

Once the service has restarted, you can reach the HTTPS version of x-ui in your browser, e.g.

1
https://<HOST.DOMAIN.NAME>:55555/<ROOT-PATH>/xui

Add xtls-rprx-vision inbound

Click Inbounds then Add Inbound. You can base your server configuration on the example in https://github.com/XTLS/Xray-examples/tree/main/VLESS-TCP-XTLS-Vision.

  • Remark as you wish
  • Protocol VLESS
  • Port as generated
  • Network tcp
  • Security tls
  • Path to cert /root/cert/fullchain.cer
  • Path to key /root/cert/<HOST.DOMAIN.NAME>.key

Once you’ve specified the above basic parameters for the server, add for each user:

  • User Id as generated
  • Flow xtls-rprx-vision

Click Operation then click QR code to display the QR code. Click Copy to copy the VLESS URL to your PC clipboard.

You must open the chosen port for TCP input in your server firewall. For example:

1
2
iptables -I INPUT -p tcp --dport 33665 -j ACCEPT
dpkg-reconfigure iptables-persistent

Download v2rayN

Download the lastest version of v2rayN from https://github.com/2dust/v2rayN/releases. The file you want is v2rayN-With-Core.zip.

Unzip the zip file.

Start the v2rayN application. If necessary, click More info and Run anyway.

Click the v2rayN icon in the system tray.

In the menu, click the three dots, and choose language en for English. Close the v2rayN panel. Exit the program on the context menu in the system tray.

Restart to see v2rayN in English.

Right-click on the v2rayN icon in the system tray. Select Set system proxy. The icon turns red.

Configure v2rayN for xtls-rprx-vision

Paste in the VLESS URL (Ctrl+v).

Select the server’s row, and press Enter to start the connection.

v2rayN configured for Xray and xtls-rprx-vision

SoftEther VPN Server has a “clone function” of Microsoft SSTP VPN Server. You can connect to a SoftEther VPN server from Windows with the built-in SSTP VPN client.

Create VPS

You need a VPS and a domain name.

Instantiate a VPS with 1 GB RAM running a recent version of Debian or Ubuntu.

Create a DNS entry pointing from your server’s fully qualified domain name to your server’s IP address.

Prepare VPS

Update the existing packages:

1
apt update && apt upgrade

Open the server’s firewall for input on ports 80/tcp and 443/tcp. How you do this depends on whether your server uses ufw, iptables, nftables, security groups, or some other firewall software. Consult the documentation for your firewall software.

Obtain a TLS certificate for the server:

1
snap install core; sudo snap refresh core
1
snap install --classic certbot
1
ln -s /snap/bin/certbot /usr/bin/certbot

SoftEther VPN software supports only RSA 1024-bit or 2048-bit certificates. Request a certificate and key:

1
certbot certonly --standalone --preferred-challenge http --key-type rsa --rsa-key-size 2048 --agree-tos --register-unsafely-without-email

Enter your server’s fully qualified domain name. Example:

1
demo14.cscot.buzz

Using the example of a fully qualified domain name of demo14.cscot.buzz, on successful issuance the certificate and key are store in files:

  • /etc/letsencrypt/live/demo14.cscot.buzz/fullchain.pem
  • /etc/letsencrypt/live/demo14.cscot.buzz/privkey.pem

Test automatic renewal for your certificates by running this command:

1
certbot renew --dry-run

Install SoftEther VPN server

Use your workstation’s browser to determine the latest version of SoftEther VPN Server source for Linux on AMD64 from https://www.softether-download.com/en.aspx?product=softether.

Download the latest version of the source to your server, e.g.

1
wget https://github.com/SoftEtherVPN/SoftEtherVPN_Stable/releases/download/v4.41-9782-beta/softether-vpnserver-v4.41-9782-beta-2022.11.17-linux-x64-64bit.tar.gz

Extract the archive:

1
tar xzvf softether-vpnserver-v4.41-9782-beta-2022.11.17-linux-x64-64bit.tar.gz

Change into the extracted directory:

1
cd vpnserver

Install the prerequisites to compile SoftEther from source:

1
apt install build-essential binutils gzip libreadline-dev libssl-dev libncurses5-dev libncursesw5-dev libpthread-stubs0-dev

Make the software from source:

1
make

Move the binary into place:

1
2
cd ..
mv vpnserver /usr/local/

Run SoftEther VPN server

Create a file /etc/systemd/system/vpnserver.service.

Insert the following lines in this file:

1
2
3
4
5
6
7
8
9
10
11
12
[Unit]
Description=SoftEther VPN server
After=network-online.target
After=dbus.service

[Service]
Type=forking
ExecStart=/usr/local/vpnserver/vpnserver start
ExecReload=/bin/kill -HUP $MAINPID

[Install]
WantedBy=multi-user.target

Save the file.

Start the VPN server:

1
systemctl enable vpnserver
1
systemctl start vpnserver
1
systemctl status vpnserver

Configure SoftEther VPN Server

1
/usr/local/vpnserver/vpncmd

Select 1 for server management.

For hostname, put 127.0.0.1:5555.

For virtual hub name, press Enter for now.

Enter and confirm a SoftEther VPN server password:

1
ServerPasswordSet

Example:

1
123456

Select the virtual hub to manage as DEFAULT:

1
Hub DEFAULT

Create a user named cscot (for example):

1
UserCreate cscot

Leave group, name, and description blank by just pressing Enter.

Set a password for your username. For example, for user name cscot:

1
UserPasswordSet cscot

Example password: 123456.

Enable secure NAT:

1
SecureNatEnable

Set your TLS certificate:

1
ServerCertSet

Enter your TLS certificate and key locations. For example, if your server’s fully quaified domain name is demo14.cscot.buzz, they will be at:

  • /etc/letsencrypt/live/demo14.cscot.buzz/fullchain.pem
  • /etc/letsencrypt/live/demo14.cscot.buzz/privkey.pem

Enable SSTP server:

1
SstpEnable yes

Enable virtual IP address allocation to clients:

1
DhcpSet

You can enter responses which are pretty much the defaults as per the manual:

Question Answer
Start Point for Distributed Address Band 192.168.30.10
End Point for Distributed Address Band 192.168.30.200
Subnet Mask 255.255.255.0
Lease Limit (Seconds) 7200
Default Gateway 192.168.30.1
DNS Server 1 192.168.30.1
DNS server 2 Press Enter
Domain Name demo14.cscot.buzz
Save Log yes

Exit VPN server management:

1
exit

Exit your SSH session with the server:

1
exit

Use Windows built-in VPN client

On your Windows PC, go to Settings > Network & Internet > VPN.

Click Add a VPN connection.

Field Value
VPN provider Windows (built-in)
Connection name e.g. demo14
Server name or address e.g. demo14.cscot.buzz
VPN type Secure Socket Tunneling Protocol (SSTP)
Type of sign-in info User name and password
User name (optional) e.g. cscot
Password e.g. 123456

Check the box to remember your sign-in info, and click Save.

Select the row for this VPN connection.

Connect the VPN client to the VPN server.

The sources of this post include:

Buy VPS

International lines out of China are congested. Therefore it is important to pay attention to the routing of traffic to your VPS. The most expensive option is IPLC/IEPL. Assuming you can’t or won’t go that far, the next most expensive is a VPS with CN2 GIA routing in Hong Kong. That service is offered by BandwagonHost. Again, it is still very expensive. A CN2 GIA server in Los Angeles is more affordable. To find all the CN2 GIA options on the BandwagonHost website, click CN2 GIA, read the description of the different possibilities, then scroll down and click All Services. Search the services page (Ctrl+f) for CN2 GIA.

Some other options for China are Vultr and Aliyun (Alibaba Cloud).

For Iran, the difficulty is in making payment. Try AlphaVPS, RackNerd, Noez, or Aeza.

Since IP addresses frequently get blocked, ask potential providers if you can change your server’s IP address whenever necessary.

For the VPS hardware, 1 GB of RAM is sufficient for a small number of users. Choose a recent version of Debian or Ubuntu as your operating system.

Get terminal app

You can use the terminal application in macOS or Linux to SSH into your server. Modern versions of Windows PowerShell also support SSH.

You may prefer to use a purpose-built SSH app such as PuTTY, XSHELL, or FinalShell.

Buy domain name

A cheap domain name registrar is NameSilo. You can search for top-level domains (TLDs) with a low cost for the first year. If necessary, you can just buy a new domain name when the first-year discounted domain name expires.

Add DNS record(s)

You can add your DNS record(s) at your domain name registrar, or you can switch your domain over to use Cloudflare DNS services. That gives you the option of proxying certain ports through Cloudflare. On the other hand, censors have sometimes started to block access to Cloudflare.

Once your DNS record(s) have propagated, ping your DNS name to both check DNS resolution and check access to your IP address.

Prepare server

SSH into your server using Windows PowerShell or the terminal app in Linux or macOS. Replace <SERVER-IP-ADDRESS> by your actual server IP address in the command below:

1
ssh root@<SERVER-IP-ADDRESS>

Suppress lengthy login messages:

1
touch .hushlogin

Get the existing package metadata up to date, and upgrade all existing packages:

1
apt update && apt upgrade

You may be prompted to reboot and then SSH back in again.

Protect your server with iptables, replacing <HOME-IP-ADDRESS> by your actual home IP address:

1
2
3
4
5
6
7
8
9
10
11
12
13
iptables -A INPUT -i lo -j ACCEPT
iptables -A INPUT -m conntrack --ctstate ESTABLISHED,RELATED -j ACCEPT
iptables -A INPUT -p icmp -j ACCEPT
iptables -A INPUT -p tcp --dport 22 -s <HOME-IP-ADDRESS> -j ACCEPT
iptables -A INPUT -p tcp --dport 22 -j DROP
iptables -A INPUT -p tcp --dport 80 -j ACCEPT
iptables -A INPUT -p tcp --dport 443 -j ACCEPT
iptables -P INPUT DROP

ip6tables -A INPUT -i lo -j ACCEPT
ip6tables -A INPUT -m state --state RELATED,ESTABLISHED -j ACCEPT
ip6tables -A INPUT -p ipv6-icmp -j ACCEPT
ip6tables -P INPUT DROP

Check that you can still access the server with these rules before you make them permanent:

1
2
3
exit

ssh root@<SERVER-IP-ADDRESS>

Make the iptables rules permanent:

1
apt install iptables-persistent

Enable BBR congestion control algorithm

Copy and paste these three commands into your SSH session to enable the Bottleneck Bandwidth and Round-trip propagation time (BBR) congestion control algorithm:

1
2
3
echo "net.core.default_qdisc=fq" >> /etc/sysctl.conf
echo "net.ipv4.tcp_congestion_control=bbr" >> /etc/sysctl.conf
sysctl -p

Compile and install caddy2 + naive

Install Go language:

1
apt install golang-go

Get the latest source from GitHub:

1
go install github.com/caddyserver/xcaddy/cmd/xcaddy@latest

Build caddy2 with naive as the forward proxy:

1
~/go/bin/xcaddy build --with github.com/caddyserver/forwardproxy@caddy2=github.com/klzgrad/forwardproxy@naive

Configure Caddyfile

Choose a user id and password.

Create a new text file named Caddyfile (no extension).

In the template below:

  • Replace demo10.cscot.buzz by your actual server hostname
  • Replace example@example.com by your own email address
  • Replace user by your chosen user id and pass by your chosen password
  • You can support multiple users by having multiple forward_proxy sections, each with its own user and pass
  • Replace https://demo.cloudreve.org by your choice of camouflage URL
1
2
3
4
5
6
7
8
9
10
11
12
13
14
:443, demo10.cscot.buzz
tls example@example.com
route {
forward_proxy {
basic_auth user pass
hide_ip
hide_via
probe_resistance
}
reverse_proxy https://demo.cloudreve.org {
header_up Host {upstream_hostport}
header_up X-Forwarded-Host {host}
}
}

Save the file.

Run caddy

Run caddy in the background:

1
./caddy start

It will automatically obtain a TLS certificate for you.

Download client

Get the client from https://github.com/klzgrad/naiveproxy/releases/latest.

Example: naiveproxy-v110.0.5481.100-1-win-x64.zip.

Unzip the zip file.

Configure client

Edit the file Downloads\naiveproxy-v110.0.5481.100-1-win-x64\naiveproxy-v110.0.5481.100-1-win-x64\config.json.

In the template below:

  • Replace demo10.cscot.buzz by your actual server hostname
  • Replace user by your chosen user id and pass by your chosen password
1
2
3
4
5
{
"listen": "socks://127.0.0.1:10808",
"proxy": "https://user:pass@demo10.cscot.buzz",
"padding": true
}

Open a terminal and change into the unzipped directory:

1
cd Downloads\naiveproxy-v110.0.5481.100-1-win-x64\naiveproxy-v110.0.5481.100-1-win-x64

Then run the client with the command:

1
.\naive.exe config.json

Configure your browser to use the SOCKS proxy that is now listening on 127.0.0.1 port 10808.

v2rayN

You can alternatively configure v2rayN to act as a client to a Naiveproxy server. You must rename config.json to naive.json and specify a custom server configuration. See the source tutorials for a demonstration of how to do this.

The sources of this post include:

Buy VPS

International lines out of China are congested. Therefore it is important to pay attention to the routing of traffic to your VPS. The most expensive option is IPLC/IEPL. Assuming you can’t or won’t go that far, the next most expensive is a VPS with CN2 GIA routing in Hong Kong. That service is offered by BandwagonHost. Again, it is still very expensive. A CN2 GIA server in Los Angeles is more affordable. To find all the CN2 GIA options on the BandwagonHost website, click CN2 GIA, read the description of the different possibilities, then scroll down and click All Services. Search the services page (Ctrl+f) for CN2 GIA.

Some other options for China are Vultr and Aliyun (Alibaba Cloud).

For Iran, the difficulty is in making payment. Try AlphaVPS, RackNerd, Noez, or Aeza.

Since IP addresses frequently get blocked, ask potential providers if you can change your server’s IP address whenever necessary.

For the VPS hardware, 1 GB of RAM is sufficient for a small number of users. Choose a recent version of Debian or Ubuntu as your operating system.

Get terminal app

You can use the terminal application in macOS or Linux to SSH into your server. Modern versions of Windows PowerShell also support SSH.

You may prefer to use a purpose-built SSH app such as PuTTY, XSHELL, or FinalShell.

Buy domain name

A cheap domain name registrar is NameSilo. You can search for top-level domains (TLDs) with a low cost for the first year. If necessary, you can just buy a new domain name when the first-year discounted domain name expires.

Add DNS record(s)

You can add your DNS record(s) at your domain name registrar, or you can switch your domain over to use Cloudflare DNS services. That gives you the option of proxying certain ports through Cloudflare. On the other hand, censors have sometimes started to block access to Cloudflare.

Once your DNS record(s) have propagated, ping your DNS name to both check DNS resolution and check access to your IP address.

Prepare server

SSH into your server using Windows PowerShell or the terminal app in Linux or macOS. Replace <SERVER-IP-ADDRESS> by your actual server IP address in the command below:

1
ssh root@<SERVER-IP-ADDRESS>

Suppress lengthy login messages:

1
touch .hushlogin

Get the existing package metadata up to date, and upgrade all existing packages:

1
apt update && apt upgrade

You may be prompted to reboot and then SSH back in again.

Protect your server with iptables, replacing <HOME-IP-ADDRESS> by your actual home IP address:

1
2
3
4
5
6
7
8
9
10
11
12
13
iptables -A INPUT -i lo -j ACCEPT
iptables -A INPUT -m conntrack --ctstate ESTABLISHED,RELATED -j ACCEPT
iptables -A INPUT -p icmp -j ACCEPT
iptables -A INPUT -p tcp --dport 22 -s <HOME-IP-ADDRESS> -j ACCEPT
iptables -A INPUT -p tcp --dport 22 -j DROP
iptables -A INPUT -p tcp --dport 80 -j ACCEPT
iptables -A INPUT -p tcp --dport 443 -j ACCEPT
iptables -P INPUT DROP

ip6tables -A INPUT -i lo -j ACCEPT
ip6tables -A INPUT -m state --state RELATED,ESTABLISHED -j ACCEPT
ip6tables -A INPUT -p ipv6-icmp -j ACCEPT
ip6tables -P INPUT DROP

Check that you can still access the server with these rules before you make them permanent:

1
2
3
exit

ssh root@<SERVER-IP-ADDRESS>

Make the iptables rules permanent:

1
apt install iptables-persistent

Enable BBR congestion control algorithm

Copy and paste these three commands into your SSH session to enable the Bottleneck Bandwidth and Round-trip propagation time (BBR) congestion control algorithm:

1
2
3
echo "net.core.default_qdisc=fq" >> /etc/sysctl.conf
echo "net.ipv4.tcp_congestion_control=bbr" >> /etc/sysctl.conf
sysctl -p

Install X-UI

For English-speaking users, use the following command to install the version that supports English:

1
bash <(curl -Ls https://raw.githubusercontent.com/FranzKafkaYu/x-ui/master/install_en.sh)
  1. When asked if you want to continue, put y for yes
  2. When asked for an admin user name, put anything you want, e.g. chief, but preferably not the old default of admin
  3. When asked for a password, put a temporary password. e.g. ChangeMe!
  4. When asked for a port number, put anything you want, e.g. 9999, but preferably not the old default of 54321

First-time login

Temporarily open port 9999:

1
iptables -I INPUT -p tcp --dport 9999 -j ACCEPT

Open a browser and log in over HTTP (no security yet) on the specified port:

1
http://<FULLY-QUALIFIED-DOMAIN-NAME>:9999

Enter the admin id and password you chose a moment ago, and click login.

If necessary, switch the version of xray to the latest version.

Change the settings:

  • Set the listening IP address to 127.0.0.1 only
  • Make a note of the panel root path, which we will call <XUI-PATH>

Press Save and Restart.

Close the browser.

In your SSH session, close port 9999:

1
iptables -D INPUT -p tcp --dport 9999 -j ACCEPT

Install Nginx

Next install Nginx:

1
apt install nginx

Note that we opened ports 80 and 443 in the original iptables rules.

Install ACME

Install the recommended prerequisite:

1
apt install socat

Download and run the Automatic Certificate Management Environment (ACME) script:

1
curl https://get.acme.sh | sh

Add a soft link in /usr/local/bin, which should be in your execution path:

1
ln -s /root/.acme.sh/acme.sh /usr/local/bin/acme.sh

Specify the certificate authority (CA) organization:

1
acme.sh --set-default-ca --server letsencrypt

Apply for a certificate, replacing <FULLY-QUALIFIED-DOMAIN-NAME> by your server’s hostname, as specified in its DNS record:

1
acme.sh --issue -d <FULLY-QUALIFIED-DOMAIN-NAME> -k ec-256 --webroot /var/www/html

Install the certificate, replacing <FULLY-QUALIFIED-DOMAIN-NAME> by your server’s hostname:

1
acme.sh --install-cert -d <FULLY-QUALIFIED-DOMAIN-NAME> --ecc --key-file /etc/x-ui/server.key --fullchain-file /etc/x-ui/server.crt --reloadcmd "systemctl force-reload nginx"

Search for camouflage URL

A plausible camouflage website has a large amount of traffic to and from it. For this reason, the original video recommends masquerading as a file-storage server. The video shows how to search for a Cloudreve subdomain accessible over plain HTTP on port 80.

Example of search: intext:登录 Cloudreve.

Let’s call your choice <CAMOUFLAGE-DOMAIN>.

Reconfigure Nginx

Edit the configuration file /etc/nginx/nginx.conf.

1
nano /etc/nginx/nginx.conf

Delete the existing contents and completely replace as follows. Substitute in your actual values instead of the placeholders in angle brackets. Nginx checks that the camouflage URL can be resolved. If not, it will give you an error [emerg] host not found in upstream.

1
2
3
4
5
6
7
8
9
10
11
12
13
14
15
16
17
18
19
20
21
22
23
24
25
26
27
28
29
30
31
32
33
34
35
36
37
38
39
40
41
42
43
44
45
46
47
48
49
50
51
52
53
54
55
56
57
58
59
60
61
62
63
64
65
66
67
68
69
70
71
72
73
74
75
76
77
78
user www-data;
worker_processes auto;
pid /run/nginx.pid;
include /etc/nginx/modules-enabled/*.conf;

events {
worker_connections 1024;
}

http {
sendfile on;
tcp_nopush on;
tcp_nodelay on;
keepalive_timeout 65;
types_hash_max_size 2048;

include /etc/nginx/mime.types;
default_type application/octet-stream;
gzip on;

server {
listen 443 ssl;

server_name <FULLY-QUALIFIED-DOMAIN-NAME>;
ssl_certificate /etc/x-ui/server.crt;
ssl_certificate_key /etc/x-ui/server.key;

ssl_session_timeout 1d;
ssl_session_cache shared:MozSSL:10m;
ssl_session_tickets off;
ssl_protocols TLSv1.2 TLSv1.3;
ssl_prefer_server_ciphers off;

location / {
proxy_pass http://CAMOUFLAGE-DOMAIN/;
proxy_redirect off;
proxy_ssl_server_name on;
sub_filter_once off;
sub_filter "CAMOUFLAGE-DOMAIN" $server_name;
proxy_set_header Host "CAMOUFLAGE-DOMAIN";
proxy_set_header Referer $http_referer;
proxy_set_header X-Real-IP $remote_addr;
proxy_set_header User-Agent $http_user_agent;
proxy_set_header X-Forwarded-For $proxy_add_x_forwarded_for;
proxy_set_header X-Forwarded-Proto https;
proxy_set_header Accept-Encoding "";
proxy_set_header Accept-Language "zh-CN";
}

location /ray {
proxy_redirect off;
proxy_pass http://127.0.0.1:10000;
proxy_http_version 1.1;
proxy_set_header Upgrade $http_upgrade;
proxy_set_header Connection "upgrade";
proxy_set_header Host $host;
proxy_set_header X-Real-IP $remote_addr;
proxy_set_header X-Forwarded-For $proxy_add_x_forwarded_for;
}

location /<XUI-PATH> {
proxy_redirect off;
proxy_pass http://127.0.0.1:9999;
proxy_http_version 1.1;
proxy_set_header Host $host;
}
}

server {
listen 80;
location /.well-known/ {
root /var/www/html;
}
location / {
rewrite ^(.*)$ https://$host$1 permanent;
}
}
}

Save the file.

Check the syntax:

1
nginx -t

Every time you modify the Nginx configuration file, you must use the command:

1
systemctl reload nginx

Second-time login

Log in over HTTPS:

1
https://<FULLY-QUALIFIED-DOMAIN-NAME>/<XUI-PATH>

Now that you are logged in over HTTPS, go to settings > User Setting, and change the password ChangeMe! to a stronger password. (This permanent password has never been transmitted over insecure HTTP.)

Add Inbound

Click on the inbounds. Click Add Inbound.

  1. Put any remark
  2. Create a vmess node
  3. Listening IP 127.0.0.1
  4. The port is set to 10000
  5. Change the network to ws
  6. Make the path /ray
  7. tls is not set (because Nginx takes care of TLS)
  8. Click the plus sign by add user to add User1
  9. Click add at the bottom of the dialog box

To get the VMess URL, click Operation then QR then copy.

Download v2rayN

Download the lastest version of v2rayN from https://github.com/2dust/v2rayN/releases. The file you want is v2rayN-With-Core.zip.

Unzip the zip file.

Start the v2rayN application. If necessary, click More info and Run anyway.

Click the v2rayN icon in the system tray.

In the menu, click the three dots, and choose language en for English. Close the v2rayN panel. Exit the program on the context menu in the system tray.

Restart to see v2rayN in English.

Right-click on the v2rayN icon in the system tray. Select Set system proxy. The icon turns red.

Configure v2rayN

Paste in the VLESS URL (Ctrl+v).

  1. Change the address to be your server hostname, <FULLY-QUALIFIED-DOMAIN-NAME>
  2. Change the port to be 443
  3. Security is zero
  4. Toggle TLS to on (because you deal with Nginx before you reach x-ui)
  5. Click Confirm

Here is a quick way to install Xray with Nginx in front with the VLESS + TCP + TLS + Nginx + WebSocket configuration.

Use the server-side script from https://github.com/wulabing/Xray_onekey.

Follow the instructions for Nginx in front in the README.md file under the subheading 安装/更新方式(Nginx 前置).

Reply to the prompts as follows:

  1. When the main menu appears, choose option 1 to install Xray.
  2. Enter your domain name information (e.g. www.wulabing.com).
  3. When asked if you want to configure camouflaged web pages [Y/N], put y for yes.
  4. When asked to enter a port number (default: 443), press Enter to select the default of port 443.
0%