Xray offers WireGuard as a outbound protocol possibility.
This feature is not intended for tunneling through a firewall. WireGuard is too easy to detect.
Rather it is intended to provide you with the possibility of diverting your outbound traffic through Cloudflare. By routing your traffic (in WireGuard protocol) to a free Cloudflare node, your traffic will reach its final destination from an IP address different from your server’s IP address.
This is especially important for traffic that returns to your own country. You do not want packets to go out and return directly from the same IP address. That would make it obvious that your server is a proxy server.
Rather you divert such packets through Cloudflare. That way they come back to your country from an anonymous-looking Cloudflare WARP IP address.
(WARP is Cloudflare’s VPN service. Using WARP, you connect to the Internet through Cloudflare’s servers, optimizing your traffic along the way.)
The stages in configuring Xray to divert traffic through Cloudflare WARP servers are:
Register for a Cloudflare WARP account, which in the process generates a Cloudflare WARP configuration.
Export your Cloudflare WARP configuration in sing-box format.
Use your WARP configuration to add a new outbound from your Xray server that routes traffic through Cloudflare WARP using the WireGuard protocol.
Add routing instructions that determine which packets are to be diverted through Cloudflare WARP.
There’s an old stock market adage, “If a system becomes too well known, it stops working.”
The same thing applies to tunneling. If everyone else is using a system, eventually it gets blocked. There’s a lot to be said for choosing a method different from everyone else’s.
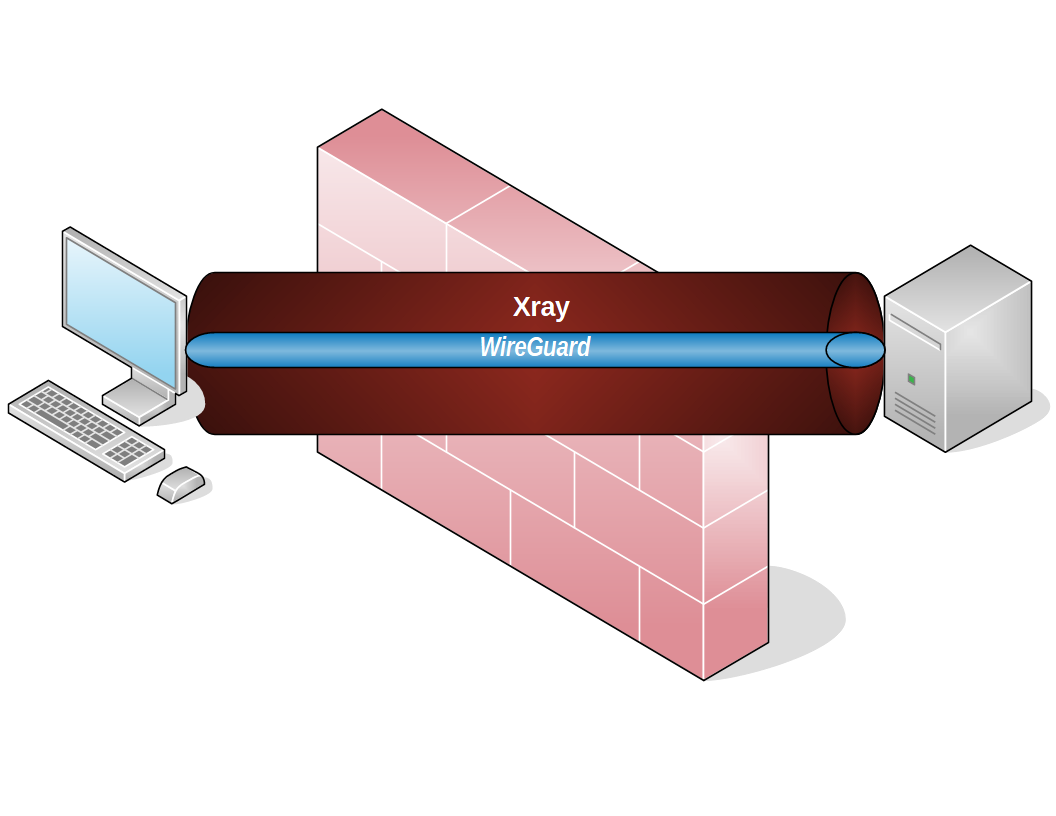
In this post, you’ll tunnel your traffic though WireGuard, then tunnel the WireGuard connection through Xray.
Both server and client in this tutorial run Ubuntu Linux 22.04.
Server
Domain name
Since we are using Xray Vision, your server will need a domain name and a DNS A record for this tutorial.
Our hostname (fully qualified domain name) in the examples will be:
1
charlie.cscot.buzz
We represent the server IP address as <SERVER-IP-ADDRESS>.
Prepare server
SSH into your server, replacing <SERVER-IP-ADDRESS> by your actual server IP address:
1
ssh root@<SERVER-IP-ADDRESS>
Suppress lengthy login messages:
1
touch .hushlogin
Get your existing package metadata up to date, and upgrade all existing packages:
1
apt update && apt upgrade
You may be prompted to reboot and SSH back in again.
Protect your server with iptables, replacing <HOME-IP-ADDRESS> by your actual home IP address:
1
2
3
4
5
6
7
8
9
10
11
12
13
iptables -A INPUT -i lo -j ACCEPT
iptables -A INPUT -m conntrack --ctstate ESTABLISHED,RELATED -j ACCEPT
iptables -A INPUT -p icmp -j ACCEPT
iptables -A INPUT -p tcp --dport 22 -s <HOME-IP-ADDRESS> -j ACCEPT
iptables -A INPUT -p tcp --dport 22 -j DROP
iptables -A INPUT -p tcp --dport 80 -j ACCEPT
iptables -A INPUT -p tcp --dport 443 -j ACCEPT
iptables -P INPUT DROP

ip6tables -A INPUT -i lo -j ACCEPT
ip6tables -A INPUT -m state --state RELATED,ESTABLISHED -j ACCEPT
ip6tables -A INPUT -p ipv6-icmp -j ACCEPT
ip6tables -P INPUT DROP
Notice that we opened ports 80/tcp and 443/tcp, but we did not open the WireGuard port 51820/udp. This is because the WireGuard traffic will pass through the Xray tunnel instead of arriving directly.
Check that you can still access the server with the above rules before you make them permanent:
1
exit
Reconnect:
1
ssh root@<SERVER-IP-ADDRESS>
Make the iptables rules permanent:
1
apt install iptables-persistent
Get an SSL certificate for the server
Use the Automatic Certificate Management Environment (ACME) script to request an SSL certificate for your server. In the commands that follow, replace both occurrences of charlie.cscot.buzz by your actual server hostname:
# When ACME uses standalone mode to request or renew a certificate, # it will listen on port 80. If port 80 is occupied, ACME will fail. # Therefore comment out the block that makes Nginx listen on port 80. #server { #listen 80; #return 301 https://$host$request_uri; #}
Review the status to make sure Nginx is active (running):
1
systemctl status nginx
If necessary, quit the status display by entering q for quit.
Install Xray on server
Install Xray version 1.8.0 on your server to run as root. If a more advanced release is available by the time you read this, you can omit --version 1.8.0 and just install the newest release.
Answer the questions as shown below. Note that you must manually input the WireGuard port (51820) and possibly also the server’s public IP address:
1 2 3 4 5 6 7 8 9 10
IPv4 or IPv6 public address: <SERVER-IP-ADDRESS> Public interface: <PUBLIC-INTERFACE> WireGuard interface name: wg0 Server WireGuard IPv4: 10.66.66.1 Server WireGuard IPv6: fd42:42:42::1 Server WireGuard port [1-65535]: 51820 First DNS resolver to use for the clients: 1.1.1.1 Second DNS resolver to use for the clients (optional): 1.0.0.1 WireGuard uses a parameter called AllowedIPs to determine what is routed over the VPN. Allowed IPs list for generated clients (leave default to route everything): 0.0.0.0/0,::/0
Generate WireGuard client configuration
After the server install has completed, the angristan script automatically generates a configuration file for the first client:
1 2 3 4
The client name must consist of alphanumeric character(s). It may also include underscores or dashes and can't exceed 15 chars. Client name: home Client WireGuard IPv4: 10.66.66.2 Client WireGuard IPv6: fd42:42:42::2
At the end of its run, the script displays a message:
1
Your client config file is in /root/wg0-client-home.conf
Here is an example of the client configuration file:
1 2 3 4 5 6 7 8 9
PrivateKey = 6FcyqKcFWPVUFW/mnbGgxx2JeTBlpJZSPFkDMvK7lEM= Address = 10.66.66.2/32,fd42:42:42::2/128 DNS = 1.1.1.1,1.0.0.1
This creates a folder ~/Downloads/Xray-linux-64 with the Xray application inside it.
Configure Xray client
Inside the folder ~/Downloads/Xray-linux-64, create a client configuration file config.json.
1
vi ~/Downloads/Xray-linux-64/config.json
Model your configuration on the one that follows. It simply routes WireGuard input straight to the proxy server. At a minimum, make these changes to the template:
Replace <SERVER-IP-ADDRESS> by your actual server IP address.
Replace charlie.cscot.buzz by the name on your SSL certificate (i.e. your server hostname)
The idea is that WireGuard should handle traffic for all IP addresses except the IP address of the Xray server. Traffic for the Xray server must be sent directly, otherwise you will get a routing loop.
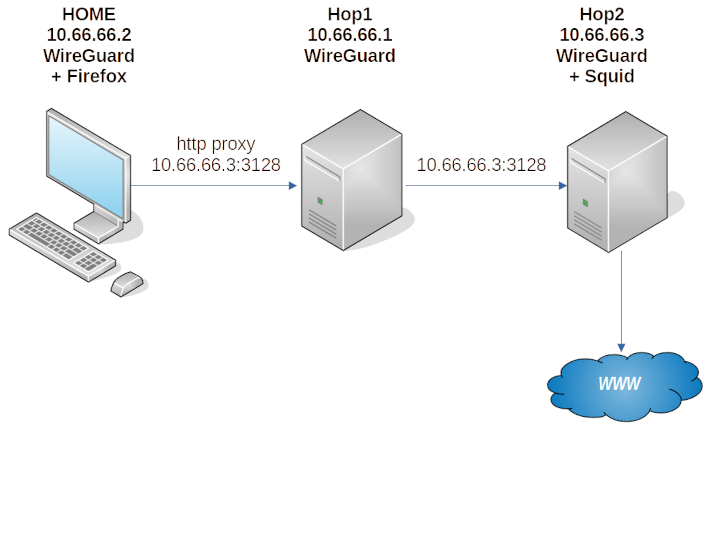
The scenario in this post is that you are browsing the web from a Windows PC at a location called HOME. You want your web traffic to emerge from a server we’ll call Hop2. However, to get to Hop2, you want your traffic to pass through a relay server we’ll call Hop1.
Hop1
Start by working on the server in the middle, which will act as a relay.
SSH from your HOME PC into Hop1. Replace XX.XX.XX.XX by the IP address of Hop1:
Answer the questions like this. Note that you must manually select the WireGuard port and possibly also the public IP address:
1 2 3 4 5 6 7 8 9 10
IPv4 or IPv6 public address: XX.XX.XX.XX Public interface: xxxx WireGuard interface name: wg0 Server WireGuard IPv4: 10.66.66.1 Server WireGuard IPv6: fd42:42:42::1 Server WireGuard port [1-65535]: 51820 First DNS resolver to use for the clients: 1.1.1.1 Second DNS resolver to use for the clients (optional): 1.0.0.1 WireGuard uses a parameter called AllowedIPs to determine what is routed over the VPN. Allowed IPs list for generated clients (leave default to route everything): 0.0.0.0/0,::/0
After the server install has completed, the script automatically continues by generating a configuration file for the first client:
1 2 3 4
The client name must consist of alphanumeric character(s). It may also include underscores or dashes and can't exceed 15 chars. Client name: home Client WireGuard IPv4: 10.66.66.2 Client WireGuard IPv6: fd42:42:42::2
At the end of the script, it displays a message to say:
1
Your client config file is in /root/wg0-client-home.conf
Here is an example of the client configuration file contents:
1 2 3 4 5 6 7 8 9 10
[Interface] PrivateKey = QEiKaWkKycxpxtv2M9Y382eReSFDSwAp7Wv+MjC3fmM= Address = 10.66.66.2/32,fd42:42:42::2/128 DNS = 1.1.1.1,1.0.0.1
Now run the script a second time to generate a WireGuard client configuration for Hop2:
1
./wireguard-install.sh
This time, answer the questions like this:
1 2 3 4 5 6 7 8 9 10 11
What do you want to do? 1) Add a new user 2) List all users 3) Revoke existing user 4) Uninstall WireGuard 5) Exit Select an option [1-5]:1 The client name must consist of alphanumeric character(s). It may also include underscores or dashes and can't exceed 15 chars. Client name: hop2 Client WireGuard IPv4: 10.66.66.3 Client WireGuard IPv6: fd42:42:42::3
At the end of the second run of the script, a message appears to say:
1
Your client config file is in /root/wg0-client-hop2.conf
Here is an example of the contents of the second client configuration file:
1 2 3 4 5 6 7 8 9 10
[Interface] PrivateKey = uC0bG25CbZ/HJkoJdjbR+HhOEALKt7FRejKNXnzFLmo= Address = 10.66.66.3/32,fd42:42:42::3/128 DNS = 1.1.1.1,1.0.0.1
CNN reports that @programthink has been sent to prison for 7 years. Having exposed corruption, he had made himself into a high-value target. Possibly he was caught by some kind of correlation attack. He used to reply to comments on his blog in real time.
Yes! You can host a Tor onion service (previously called a “hidden service”) on a Windows PC. Here’s how to create a blog without having to pay for hosting or a domain name.
Install Hugo on your PC
In this tutorial, you’ll build your blog using the Hugo static site generator.
In the section for the most recent release, scroll down until you reach the Assets subsection.
Download the archive for your chosen version, operating system, and processor. You want the “extended” version of Hugo, since it includes support for SCSS (a language that provides extra features for CSS). As an example, if the most recent release is 0.111.3, and if your PC runs Windows on a 64-bit processor, you would download:
1
hugo_extended_0.111.3_windows-amd64.zip
Extract the .zip file.
Make hugo executable like this:
Create a new directory named C:\hugo.
Copy the application Downloads\hugo_extended_0.111.3_windows-amd64\hugo.exe into the directory C:\hugo.
In the Windows search box, type env, and select Edit the system environment variables.
Click the button Environment Variables.
Select Path, and click Edit.
Click New, type C:\hugo, and click OK.
Click OK.
Click OK.
Now in the Windows search box, type cmd, and select the Command Prompt app.
Enter the command:
1
echo %PATH%
Make sure C:\hugo is listed as part of your execution path.
If all is okay, then enter the command:
1
hugo version
Make sure you see a version number referring to your installed version, e.g. hugo v0.111.3, etc.
Close the Command Prompt app.
Install Git on your PC
Git will be useful for installing Hugo themes and also if you ever want to back up your website content to a GitHub repository.
Download 64-bit Git for Windows Setup. The installer has a name such as Git-2.40.0-64-bit.exe.
Run the installer. Accept the defaults all the way through the installation.
When the installation is complete, go to the Windows search box, type cmd, and select the Command Prompt app.
Enter the command:
1
git --version
You should see a result such as:
1
git version 2.40.0.windows.1
Start a Hugo site
In the Command Prompt app, start a new Hugo site named myonionblog (or another name of your choosing) by issuing the command:
1
hugo new site myonionblog
Change into the directory for your onion blog:
1
cd myonionblog
Initialize it as a Git repository:
1
git init
Leave the Command Prompt app open, positioned in the myonionblog folder.
Add a Hugo theme to your site
Tor Browser users often disable JavaScript. Therefore for an onion site, you are recommended to use a Hugo theme that renders without JavaScript. Some possible choices are hugo-xmin (556 stars), hugo-notepadium (327 stars), smol (171 stars), no-js-hugo-theme (18 stars), or hugo-theme-sk1 (18 stars).
We will use no-js-hugo-theme. Add it to your Hugo site by entering this command:
Now use Windows Explorer to copy the entire contents of C:\Users\<YOUR-USER-NAME>\myonionblog\themes\no-js-hugo-theme\exampleSite up to myonionblog, replacing any existing contents that have the same name.
Test the site locally
In your Command Prompt app, still positioned in the myonionblog folder, issue the command:
1
hugo server
Open a browser, and navigate to localhost port 1313:
1
http://localhost:1313
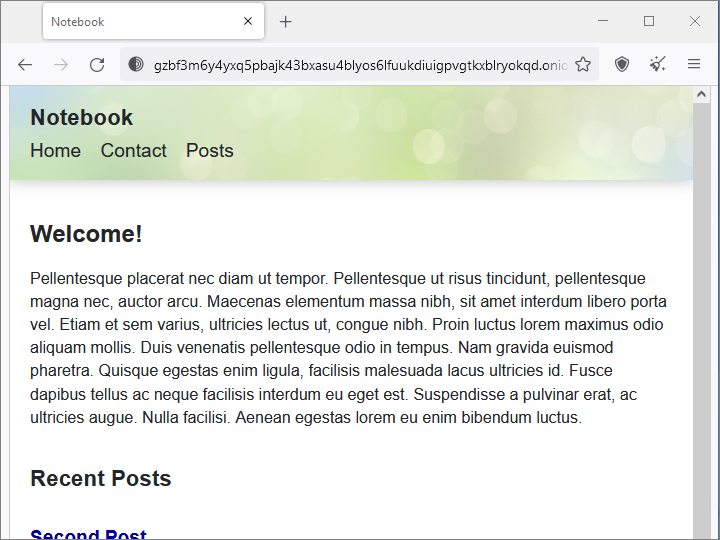
You should see the example site.
Close the browser.
Select the Command Prompt window, and press Ctrl+c on your computer keyboard to stop the Hugo server.
Execute Hugo with no arguments to generate the standalone public HTML:
1
hugo
This regenerates the contents of myonionblog\public.
Install a web server
So far, we’ve used the server that comes with Hugo. Now we’ll install the full-function Apache web server.
Open a browser, and visit https://www.apachefriends.org. Download XAMPP for Windows. At the time of writing it is version 8.2.0, which includes Apache 2.4.54. The installer has a name that looks like xampp-windows-x64-8.2.0-0-VS16-installer.exe.
XAMPP recommends that you disable User Account Control before running the installer. In your Command Prompt window, type:
1
msconfig
On the tab for Tools, select Change UAC Settings and click Launch.
Slide the slider all the way down to the lowest level, Never notify. Click OK. Click OK.
Now you can run the XAMPP installer, xampp-windows-x64-8.2.0-0-VS16-installer.exe.
On the Select Components screen, the only one that needs to remain checked is Apache.
Leave the installation folder at C:\xampp.
Configure Apache
On the XAMPP Control Panel, click the Config button for Apache.
In httpd.conf, change the document root to be your Hugo public HTML folder:
On the XAMPP Control Panel, click the Start button to start Apache.
Note that this adds Windows inbound firewall rules for the XAMPP program. If your PC is behind a home router, it will typically not be open for traffic from the outside world due to the router’s own firewall.
Test the site under XAMPP by opening a browser on your PC and visiting the site on localhost port 80 (which is the default anyway):
Download the installer for the 64-bit x64 version of 7-Zip for Windows. Run the installer. You’ll need 7-Zip in a moment to extract the Tor .tar.gz archive.
Download the Tor Expert Bundle for Windows (x86_64), placing the download in C:\tor. It will have a name such as tor-expert-bundle-12.0.4-windows-x86_64.tar.gz.
Right-click on tor-expert-bundle-12.0.4-windows-x86_64.tar.gz, and use 7-Zip to extract the archive.
Right-click on the inner archive tor-expert-bundle-12.0.4-windows-x86_64.tar, and again use 7-Zip to extract the archive.
Your folder C:\tor will now contain two additional directories: data and tor.
Run Tor
Open a Command Prompt window with the option Run as administrator.
Issue the command:
1
C:\tor\tor\tor.exe --service install
Configure Tor
Open Notepad with the option Run as administrator.
Save the file as C:\Windows\ServiceProfiles\LocalService\AppData\Roaming\tor\torrc (with no extension). You’ll need to have the option checked to view hidden items to see AppData folders. If Notepad saves your torrc file with .txt on the end, rename it so there is no.txt on the end of its name.
In the Windows search box type services, and open the Services app with the option Run as administrator.
Select the service Tor Win32 Service.
Stop and then Start the service.
Find your onion URL
Your folder C:\Windows\ServiceProfiles\LocalService\AppData\Roaming\tor now contains a folder myonionblog.
Inside this new folder is a file called hostname.
Open the file hostname with Notepad. It will look like this:
Before you read this post, familiarize yourself with the basics of running a proxy server on a home PC. These basics are explained in Helping friends in foreign countries. Most of that post applies to all home proxy servers, even if the clients are in the same country as you.
You can then proceed to install Shadowsocks as a server on your PC.
We use Windows as a sample client in the last part of this tutorial.
Decisions
Decide whether your clients will access your PC by IP address or by DNS name.
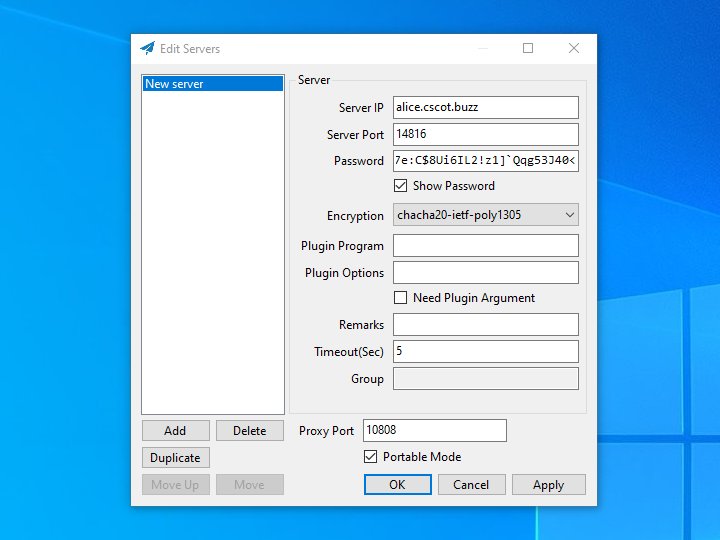
In the examples in this post, we have used the DNS name alice.cscot.buzz.
Decide on the protocol(s) your server will support. Shadowsocks can support both TCP and UDP.
We will support both TCP and UDP in our examples.
Decide which port number clients will use to connect to your Shadowsocks server as follows. Open Windows PowerShell and issue the command:
Now call the function to generate a random password of 32 characters:
1
Get-RandomPassword -PasswordLength 32
If you get a result with a double-quote in it (ASCII code 34), then try again, as double-quote would mean end-of-field when it appears in the JSON configuration file.
Our example will be:
1
@oyTFb7e:C$8Ui6IL2!z1]`Qqg53J40<
Close Windows PowerShell.
Open your PC’s firewall
We are using tcp/14816 and udp/14816 for client input.
You should have already opened these protocols and ports on your router and forwarded them to your PC, as explained in the article on the basics.
Now open these port for input in your Windows PC firewall like this:
In the Windows search box, type firewall.
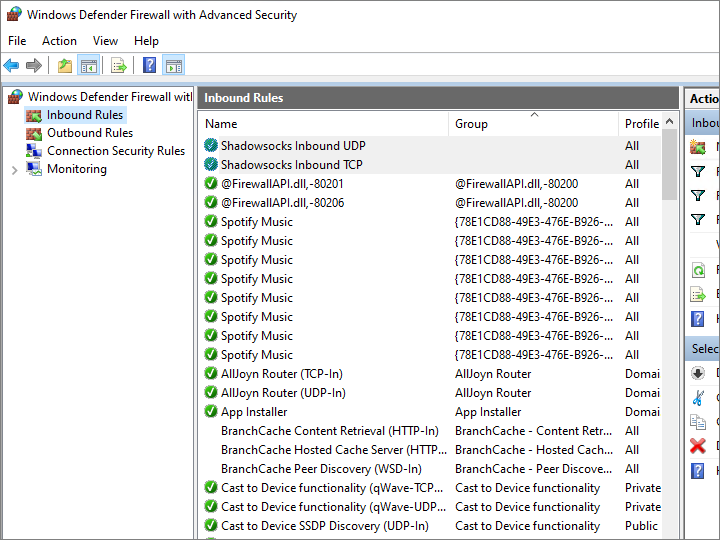
Select Windows Defender Firewall with Advanced Security.
In the left pane, select Inbound Rules.
In the right pane, select New Rule.
Type is Port. Click Next.
Type is TCP, and specific local port as 14816. Click Next.
Action is Allow. Click Next.
Leave all domains checked. Click Next.
Set the Name to Shadowsocks Inbound TCP.
Click Finish.
Repeat the above process to open for udp/14816, and name the new rule Shadowsocks Inbound UDP.
When you are done, close Windows Defender Firewall with Advanced Security.
Download the Rust version of Shadowsocks for Windows
Download the latest release of the Rust version of Shadowsocks, compiled for Windows with the Microsoft Visual Studio compiler. Example:
1
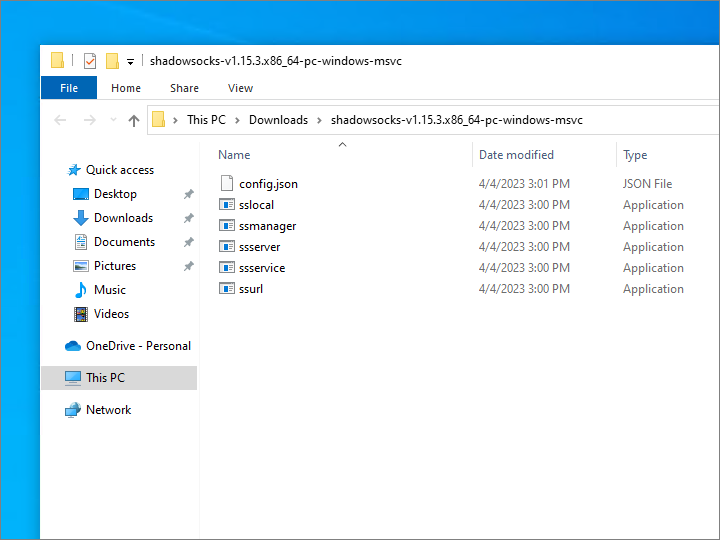
shadowsocks-v1.15.3.x86_64-pc-windows-msvc.zip
Unzip the .zip file. This gives you a folder named Downloads\shadowsocks-v1.15.3.x86_64-pc-windows-msvc with the Shadowsocks executables in it.
Create configuration file for Shadowsocks server
Use Windows Notepad to create the server configuration file config.json. Below is the recommended configuration for a Shadowsocks server, adapted from the blog post at https://gfw.report/blog/ss_tutorial/en/:
Save this file with the name config.json (with no .txt at the end of its name) in the same folder as the Shadowsocks executables. In our example, that folder is Downloads\shadowsocks-v1.15.3.x86_64-pc-windows-msvc.
Run Shadowsocks as a server
Open a Command Prompt window.
Navigate to your Shadowsocks folder:
1
cd Downloads\shadowsocks-v1.15.3.x86_64-pc-windows-msvc
Run Shadowsocks server:
1
ssserver.exe
Optionally add Shadowsocks as a startup program
Right-click on ssserver.exe and create a Shortcut to it, ssserver - Shortcut.
Open a Run command box by pressing Win+r.
Type shell:startup and press the Enter key to open the Startup folder.
Before you read this post, familiarize yourself with the basics of running a VPN server on a home PC. These basics are explained in Helping friends in foreign countries. Most of that post applies to all home VPN servers, even if the clients are actually in the same country as you.
You can then proceed to install OpenVPN as a server on your PC.
We use Windows as a sample client at the end of this tutorial, but OpenVPN client software also exists for Linux, macOS, Android, and iOS.
Decisions
Decide whether your clients will access your PC by IP address or by DNS name.
In the examples in this post, we have used the DNS name alice.cscot.buzz.
Decide on a protocol and port for your clients to reach your PC. OpenVPN supports both TCP and UDP. TCP is more reliable, whereas UDP is faster. If clients are subject to censorship, you may have heard about the old trick of using TCP on port 443. This rarely works against modern firewalls.
We will use UDP on port 1194 in our examples.
Open your PC’s firewall
We are using udp/1194 for client input. You should have already opened that port on your router and forwarded it to your PC. Now open that port for input in the Windows firewall like this:
In the Windows search box, type firewall.
Select Windows Defender Firewall with Advanced Security.
In the left pane, select Inbound Rules.
In the right pane, select New Rule.
Type is Port. Click Next.
Type is UDP, and specific local port as 1194. Click Next.
Action is Allow. Click Next.
Leave all domains checked. Click Next.
Set the Name to OpenVPN Inbound.
Click Finish.
When you are done, close Windows Defender Firewall with Advanced Security.
Download the Windows 64-bit MSI installer. Run the installer.
Don’t install immediately. Make sure you click the Customize button first.
Deselect the OpenVPN GUI, but make sure the OpenVPN Service remains selected
Select the EasyRSA 3 Certificate Management Scripts
Click Install now.
When the installation is complete, click Close.
Initialize public key infrastructure
The installer has placed the EasyRSA 3 Certificate Management Scripts in C:\Program Files\OpenVPN\easy-rsa.
In the Windows search box, type cmd. Right-click on the Command Prompt app, and select Run as administrator.
Enter the command:
1
cd C:\Program Files\OpenVPN\easy-rsa
Open an Easy-RSA shell:
1
EasyRSA-Start.bat
Initialize your public key infrastructure by entering the command:
1
./easyrsa init-pki
Your newly created public key infrastructure directory is C:\Program Files\OpenVPN\easy-rsa\pki. It has a variables file named vars inside it.
Optionally, launch Notepad with the Run as administrator option, and edit C:\Program Files\OpenVPN\easy-rsa\pki\vars to your liking. Save the file if you edited it.
Create Certification Authority
Create your CA. Inside the Easy-RSA shell enter the command:
1
./easyrsa build-ca nopass
You are promoted for a Common Name. If you just press Enter, the Common Name defaults to Easy-RSA CA.
Your new CA certificate file is created at C:/Program Files/OpenVPN/easy-rsa/pki/ca.crt.
Build server certificate and key
Build a server certificate and key. In our example, the server will be named alice.
1
./easyrsa build-server-full alice nopass
You are asked to type the word yes to confirm the details.
The certificate is created at C:/Program Files/OpenVPN/easy-rsa/pki/issued/alice.crt. The inline file, which we will not use in this tutorial, is created at C:/Program Files/OpenVPN/easy-rsa/pki/inline/alice.inline.
Build client certificate(s) and key(s)
For each client, build a client certificate and key. In our example, the first client will be named bob:
1
./easyrsa build-client-full bob nopass
You are asked to type the word yes to confirm the details.
The certificate is created at C:/Program Files/OpenVPN/easy-rsa/pki/issued/bob.crt. In this tutorial, we will use the automatically generated inline file to make it easier to construct a client .ovpn file. The inline file is created at C:/Program Files/OpenVPN/easy-rsa/pki/inline/bob.inline.
Build Diffie-Hellman parameters
The Diffie-Hellman parameters are used only by an OpenVPN server. They are not needed on the client(s).
1
./easyrsa gen-dh
After the generation process, the Diffie-Hellman parameters of size 2048 are created at C:/Program Files/OpenVPN/easy-rsa/pki/dh.pem.
Copy the file easytls into C:\Program Files\OpenVPN\easy-rsa. You need administrator permissions to do this.
Back inside the Easy-RSA shell in the Command Prompt window, initialize Easy-TLS:
1
./easytls init-tls
Build a TLS crypt v1 key:
1
./easytls build-tls-crypt
The TLS crypt v1 key is created at C:/Program Files/OpenVPN/easy-rsa/pki/easytls/tls-crypt.key.
Exit the Easy-RSA shell:
1
exit
Close the Command Prompt window for now.
Create server configuration file
Launch Notepad running as administrator.
Using the following as a model for your configuration. Of course, you must change values such as protocol (udp), port (1194), and server name (alice) to match your choices.
dev tun proto udp port 1194 ca "C:\\Program Files\\OpenVPN\\easy-rsa\\pki\\ca.crt" cert "C:\\Program Files\\OpenVPN\\easy-rsa\\pki\\issued\\alice.crt" key "C:\\Program Files\\OpenVPN\\easy-rsa\\pki\\private\\alice.key" dh "C:\\Program Files\\OpenVPN\\easy-rsa\\pki\\dh.pem" tls-crypt "C:\\Program Files\\OpenVPN\\easy-rsa\\pki\\easytls\\tls-crypt.key" cipher AES-256-GCM server 10.8.0.0 255.255.255.0 ifconfig-pool-persist ipp.txt push "redirect-gateway def1" push "dhcp-option DNS 1.1.1.1" push "dhcp-option DNS 1.0.0.1" push "block-outside-dns" keepalive 10 60 persist-key persist-tun explicit-exit-notify 1 verb 3
When you are done editing, save the file as C:\Program Files\OpenVPN\config-auto\alice.ovpn. Make sure you use the directory name config-auto and that Notepad does not add .txt to the end of the file name.
Close Notepad.
Enable forwarding
Open Control Panel > Network and Internet > Network and Sharing Center > Change adapter settings.
You will see that the installation has created a new network adapter described as TAP-Windows Adapter V9. It will have a name such as OpenVPN TAP-Windows 6.
Now open a Command Prompt window running as administrator. Determine the interface number of OpenVPN TAP-Windows 6 (or whatever name applies in your case) as follows. Issue the command:
1
netsh int ipv4 show int
Note down the interface index number of OpenVPN TAP-Windows 6 (in our example). In our example, the interface index number was 11.
See if forwarding is enabled. For example, if your interface index is 11:
1
netsh int ipv4 show int 11 | findstr "Forwarding"
If forwarding is disabled, then enable forwarding by issuing the command:
1
netsh int ipv4 set int 11 Forwarding="enabled"
Double-check the results show Forwarding is enabled:
1
netsh int ipv4 show int 11 | findstr "Forwarding"
Close the Command Prompt window for now.
Close the Control Panel for now.
Enable routing
In the Windows search box, type regedit, right-click Registry Editor, and select Run as administrator. In the left pane, navigate to HKEY_LOCAL_MACHINE\SYSTEM\CurrentControlSet\Services\Tcpip\Parameters.
Find IPEnableRouter of type REG_DWORD.
Set its value to 1.
Click OK.
Close Registry Editor.
Start services
In the Windows search box, type services, right-click the Services app, and select Run as administrator.
Find the row for Routing and Remote Access.
Right-click on it, and select Properties.
Set the Startup type to Automatic.
Click Apply.
Click Start.
Click OK.
Locate the row for OpenVPN Interactive service.
Right-click, and select Properties.
Click Stop.
Change its Startup type to Manual.
Click Apply.
Click OK.
Locate the row for OpenVPNService.
Stop the service.
Start the service.
Close the Services app.
Open Windows File Explorer. Navigate to C:\Program Files\OpenVPN\log. Check the log file alice.log for any error messages. It should show Initialization Sequence Completed.
Share Internet adapter
Go to Windows Control Panel > Network and Internet > Network and Sharing Center > Change adapter settings.
On your main Internet network adapter (i.e. Ethernet or wireless), right-click, and select Properties.
Select the Sharing tab.
Check the box for Allow other network users to connect through this computer’s internet connection.
Select OpenVPN TAP-Windows 6.
Click OK.
Disable and enable TAP-Windows Adapter V9
On the OpenVPN TAP-Windows 6 adapter (or whatever your TAP-Windows Adapter V9 is named), right-click, then disable and re-enable the adapter.
Close the Network Connections window.
Close the Control Panel windows.
Create client configuration
In Notepad, create a configuration file for the client. Model it on the following.
You will need to change the remote DNS name or IP address to match your situation.
Copy and paste in your inline certificates and keys from C:/Program Files/OpenVPN/easy-rsa/pki/inline/bob.inline.
Copy and paste in your TLS encryption key from C:/Program Files/OpenVPN/easy-rsa/pki/easytls/tls-crypt.key
Run the installer. On the client, you need the OpenVPN GUI component, but you do not need the EasyRSA 3 Certificatre Management scripts. These are the defaults.
The installer places an OpenVPN GUI shortcut icon on your desktop.
Double-click the OpenVPN GUI shortcut icon on your desktop.
A message appears to say that there are as yet no readable connection profiles (i.e., configurations). Click OK.
Import bob.ovpn as follows:
Right-click on the OpenVPN icon in the system tray.
Select Import file.
Select the bob.ovpn file from your Downloads folder.
You should see a message indicating that the file was imported successfully.
Click OK.
Right-click on the OpenVPN icon in the system tray, and select Connect. If problems occur, check C:\Users\<YOUR-USER-NAME>\OpenVPN\log\bob.log for any error messages.
On successful connect, a notification appears to say you are now connected.
You may want to help a friend in a foreign country by hosting a proxy server for them.
Hosting the proxy in your home has the advantage that your residential IP address is highly unlikely to be on a block list.
Here are the preconditions you must meet:
Hosting a proxy server for your friend will not work if you have Carrier Grade NAT (CGNAT) at home. This is where an ISP allocates a single IP address to an entire building or block. It is common in some countries.
You need to either have a relatively static IP address, or else subscribe to a dynamic DNS service.
You need to have access to your home router, and enough knowledge to open port(s) and forward them to the computer you’ll be using to host your proxy server.
If you’ve never done anything like this before, you’ll need to know how to use a search engine to find solutions to any problems you encounter.
If you meet all these preconditions, you need to determine which protocol(s) will work for your friend. Ten or fifteen years ago, it was easy to solve this problem with suggestions like “Use TCP on port 443” or “Use Shadowsocks.” Unfortunately censorship is rapidly evolving. Nowadays you need to get up-to-date information about recent conditions in your friend’s country. You can get this by reading forums like NTC, GitHub, or the various Telegram groups, e.g. projectXray or v2fly_chat.
Now for the choice of hardware platform:
A Raspberry Pi dedicated to hosting your proxy server gives you the most flexibility and the widest range of choices. You need to be comfortable enough with Linux and the command line to follow along with tutorials and videos.
You can alternatively host a proxy server on an ordinary Windows PC. You need to leave the PC on all the time, and adjust the PC’s power settings so the PC never goes to sleep.
Once you’ve decided on a protocol that will work, you can build your proxy server. Examples of appropriate software would be SoftEther, the Rust version of Shadowsocks, OpenVPN, V2Ray, or Xray. You can alternatively host a WireGuard server on a Raspberry Pi. WireGuard as a server is not officially supported on Windows.
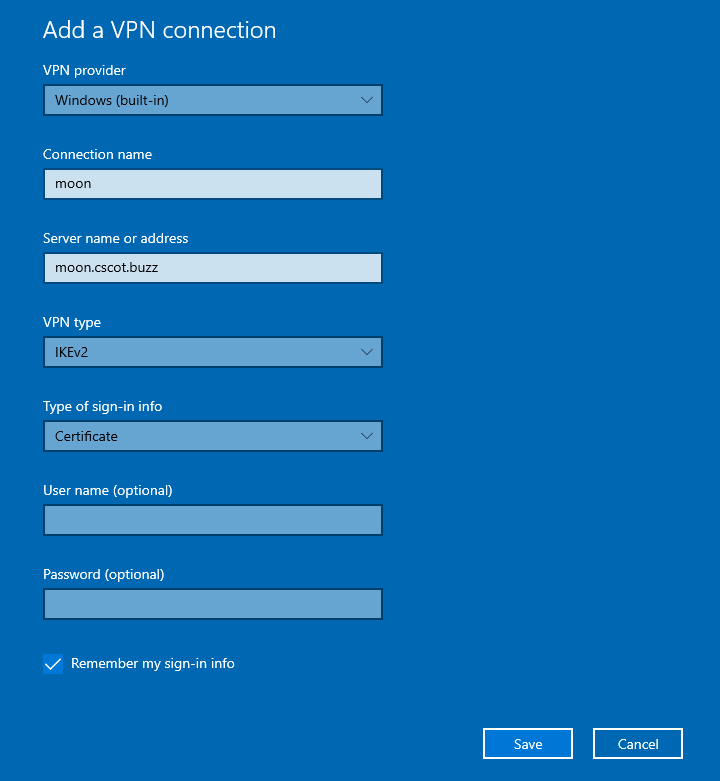
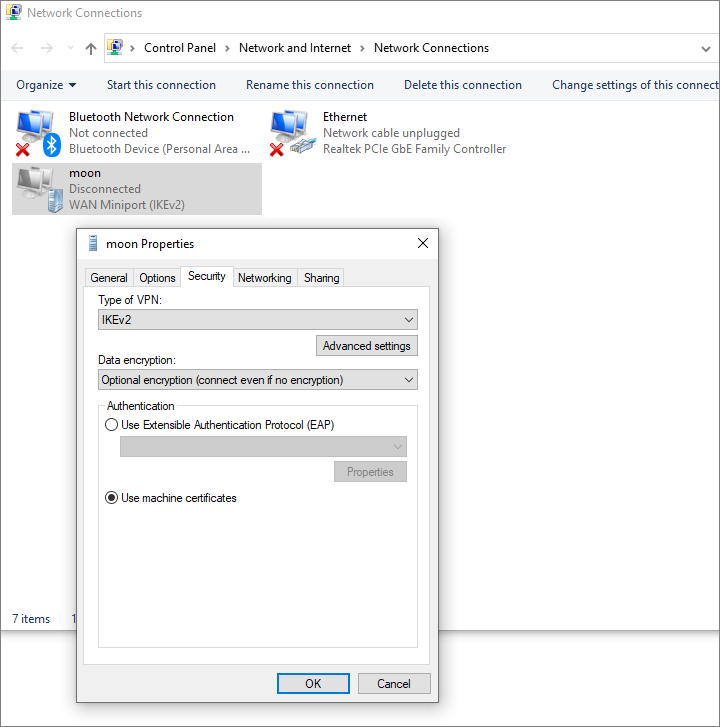
This post shows you how to manually create an IKEv2 IPsec VPN server using the strongSwan package on an Ubuntu 22.04 server. It also outlines the process for setting up the corresponding client on a Windows PC, a Linux PC, and an Android device. Since IPsec is a standards-based protocol, client devices often support IPsec natively. You can reach your server without installing additional software on the client.
VPS and domain name
You will need a Linux server running Ubuntu 22.04 with 1 GB of RAM.
You also need to buy a domain name and create a DNS A record pointing from your server hostname (moon.cscot.buzz in our examples) to the your server IP address.
Prepare server
SSH into your server using a terminal emulator app or Windows PowerShell. In the SSH command below, replace moon.cscot.buzz by your actual server hostname:
1
ssh root@moon.cscot.buzz
Suppress lengthy login messages:
1
touch .hushlogin
Get the existing package metadata up to date, and upgrade all existing packages:
1
apt update && apt upgrade
You may be prompted to reboot and then SSH back in again.
Protect your server with iptables, replacing <HOME-IP-ADDRESS> by your actual home IP address. We need to open the firewall for UDP input on ports 500 and 4500, and also for protocols AH and ESP. We masquerade the source IP address on outbound packets to set it to the IP address of the server, not the original client.
1 2 3 4 5 6 7 8 9 10 11 12 13 14 15 16 17
iptables -A INPUT -i lo -j ACCEPT iptables -A INPUT -m conntrack --ctstate ESTABLISHED,RELATED -j ACCEPT iptables -A INPUT -p icmp -j ACCEPT iptables -A INPUT -p tcp --dport 22 -s <HOME-IP-ADDRESS> -j ACCEPT iptables -A INPUT -p tcp --dport 22 -j DROP iptables -A INPUT -p ah -j ACCEPT iptables -A INPUT -p esp -j ACCEPT iptables -A INPUT -p udp --dport 500 -j ACCEPT iptables -A INPUT -p udp --dport 4500 -j ACCEPT iptables -P INPUT DROP
ip6tables -A INPUT -i lo -j ACCEPT ip6tables -A INPUT -m state --state RELATED,ESTABLISHED -j ACCEPT ip6tables -A INPUT -p ipv6-icmp -j ACCEPT ip6tables -P INPUT DROP
Check that you can still access the server with these rules before you make them permanent:
1 2 3
exit
ssh root@moon.cscot.buzz
Make the iptables rules permanent:
1
apt install iptables-persistent
Enable forwarding
Enable packet forwarding in the Linux kernel. Create a new configuration file in the /etc/sysctl.d directory, with a single line in it:
Generate a self-signed CA certificate with a lifetime of 10 years (3652 days). Replace country CH, organization strongSwan, and common name strongSwan Root CA with your own choice of values.
From Settings > Network & Internet > VPN, select your VPN moon.
Press Connect.
Linux IKEv2 client
Securely copy the client certificate and key files, and the CA certificate file, to your Linux workstation by opening your terminal emulator and running the scp commands:
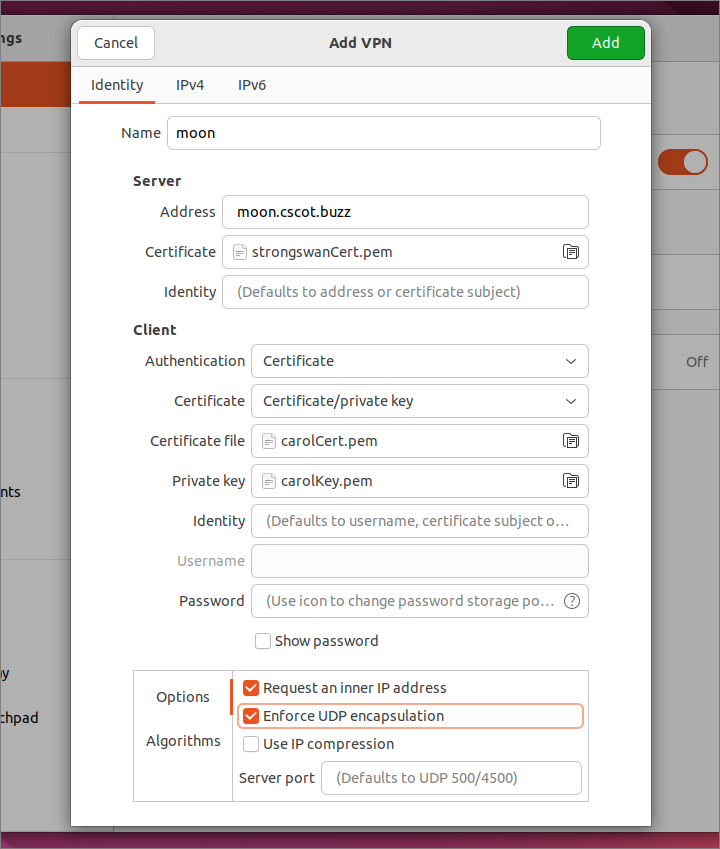
In the GNOME Settings app, go to the Network page. In the VPN section, click the plus sign + to add a new VPN client configuration.
Select type IPsec/IKEv2 (strongswan).
Fill in the fields as illustrated.
Name is a name of your choice, e.g. moon
Server Address is your server’s DNS name, e.g. moon.cscot.buzz
Server Certificate is the CA certificate you downloaded
Server Identity can be left blank
Client Authentication is Certificate
Client Certificate is Certificate/private key
Client Certificate file is the one you downloaded
Client Private key is the one you downloaded
Client Identity can be left blank
Client Username can be left blank
Client Password can be left blank
Check the box for Request an inner IP address
Check the box for Enforce UDP encapsulation
Click Add.
Connect the client to the server by toggling the VPN switch to the on position.
Android IKEv2 client
You need to securely copy the legacy-format .p12 file from the server to your client. You also need to copy the CA certificate, though this need not be transmitted securely.
The easiest way to do all this is to copy the files to a PC first, then copy them over a USB cable from your PC to your Android device. For an alternative method using a local web server, see the section below titled “Securely transfer a certificate from a PC to a mobile device.”
Securely copy the legacy-format client .p12 file from the server to your PC:
Now connect your PC to your Android device with a USB cable. Copy the two downloaded files from your PC to your Android device’s Download directory.
Next install the client .p12 certificate and the CA certificate on your Android device. The exact menu path for doing this varies depending on which version of Android you are running. It will be something like Settings > Lock screen and security > Other security settings > Install from device storage.
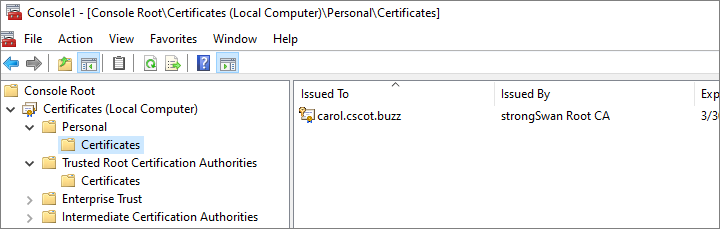
Select strongswanCert.pem from the list. Enter your device PIN. Choose a certificate name such as strongSwan. Click OK.
Now repeat the process, but this time select carolCertLegacy.p12 from the list. Enter the export password. Choose a certificate name such as carol. Enter your device PIN. Click OK.
On recent versions of Android, you have a choice of clients:
the Android native IPSec IKEv2 RSA client
the strongSwan app from Google’s Play Store
We will describe here the process for configuring the Android native client.
Go to Settings > Connections > More connection settings > VPN.
Tap ADD VPN.
Give it a name, e.g. moon.
Type is IPSec IKEv2 RSA.
Server address is moon.cscot.buzz in our example.
IPSec user certificate is carol.
IPSec CA certificate was named strongSwan.
IPSec server certificate is received from the server.
Tap SAVE.
Tap the row for the VPN configuration. Click CONNECT.
Apple IKEv2 clients
Both macOS and iOS allow you to configure IKEv2 clients from their respective graphical user interfaces.
Additionally, if you have a macOS computer, you can create a .mobileconfig file for a VPN client using the Apple Configurator from the App Store.
Securely transfer a certificate from a PC to a mobile device
One way to securely copy a .p12 file from your PC to an Android, iOS, or iPadOS device is to build a small website on your PC that serves up the file to mobile devices.
If all communication takes place over your LAN, and if your LAN is behind a firewalled router, then all your transfers are secure.
To host a website on a Windows 10 computer, first enable Internet Information Services (IIS):
Search for and launch the Control Panel app.
Go to the Programs page.
Click Turn Windows features on or off.
Check the box for Internet Information Services.
Click OK.
Wait while Windows searches for the required files and applies the changes.
When the install has completed, click Close.
Close the Control Panel app.
Copy your certificate file, carolCertLegacy.p12 in our example, into the folder C:\inetpub\wwwroot. This needs administrator permissions.
In your Documents folder, create a simple HTML page named index.html.
gRPC is Google’s Remote Procedure Call framework. It is based around the idea of defining a service and specifying methods that can be called remotely. Services may handle either a one-time request or a streaming request. gRPC uses HTTP/2 for transport.
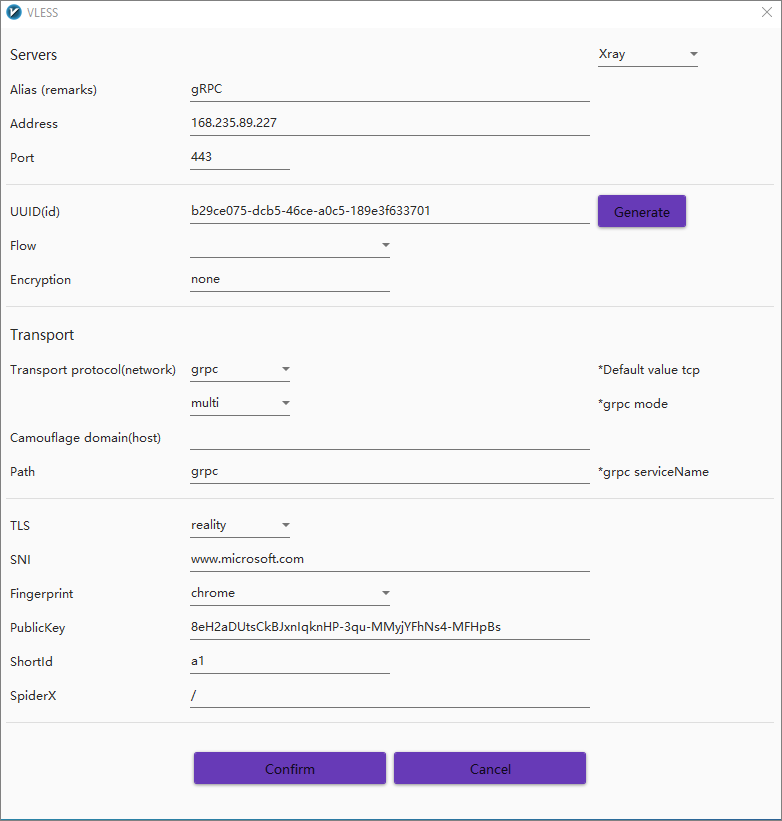
This post describes the procedure used to test gRPC HTTP/2 on Xray REALITY for a Linux server and a Windows client. The test server had 1 GB of RAM and ran Ubuntu 22.04. The test client ran Windows 10. Server and client configurations are based on https://github.com/chika0801/Xray-examples/tree/main/VLESS-gRPC-uTLS-REALITY.
Prepare server
SSH into your server using Windows PowerShell. In the command below, replace <SERVER-IP-ADDRESS> by your actual server IP address:
1
ssh root@<SERVER-IP-ADDRESS>
Suppress lengthy login messages:
1
touch .hushlogin
Get the existing package metadata up to date, and upgrade all existing packages:
1
apt update && apt upgrade
You may be prompted to reboot and then SSH back in again.
Protect your server with iptables, replacing <HOME-IP-ADDRESS> by your actual home IP address:
1 2 3 4 5 6 7 8 9 10 11 12 13
iptables -A INPUT -i lo -j ACCEPT iptables -A INPUT -m conntrack --ctstate ESTABLISHED,RELATED -j ACCEPT iptables -A INPUT -p icmp -j ACCEPT iptables -A INPUT -p tcp --dport 22 -s <HOME-IP-ADDRESS> -j ACCEPT iptables -A INPUT -p tcp --dport 22 -j DROP iptables -A INPUT -p tcp --dport 80 -j ACCEPT iptables -A INPUT -p tcp --dport 443 -j ACCEPT iptables -P INPUT DROP
ip6tables -A INPUT -i lo -j ACCEPT ip6tables -A INPUT -m state --state RELATED,ESTABLISHED -j ACCEPT ip6tables -A INPUT -p ipv6-icmp -j ACCEPT ip6tables -P INPUT DROP
Check that you can still access the server with these rules before you make them permanent:
1 2 3
exit
ssh root@<SERVER-IP-ADDRESS>
Make the iptables rules permanent:
1
apt install iptables-persistent
Enable BBR congestion control algorithm
Copy and paste these three commands into your SSH session to enable the Bottleneck Bandwidth and Round-trip propagation time (BBR) congestion control algorithm:
On the Linux server, generate a universally unique id with xray uuid. Example of output:
1
b29ce075-dcb5-46ce-a0c5-189e3f633701
Plug the id into both the server and the client configuration files.
Generate a public-private key pair with xray x25519. Example of output:
1
2
Private key: uJTbBa9Wt4GfTWHkSBv4e9ph_rljUhGfTgV4Gx9JZWo
Public key: 8eH2aDUtsCkBJxnIqknHP-3qu-MMyjYFhNs4-MFHpBs
Plug the private key into the server configuration file, and the public key into the client configuration file.
Choose a shortId of up to 16 hexadecimal characters. Example:
1
b1
Plug this into the server and client configuration files.
Determine camouflage website
The minimum standard of the camouflage website is that it be a foreign website, support TLSv1.3 and HTTP/2, and have a URL that is not redirected elsewhere (though the apex domain name may be redirected to www).
Bonus points if it has a similar IP to your server, the handshake messages after the “Server Hello” are encrypted together (such as for dl.google.com), and the server implements Online Certificate Status Protocol (OCSP) stapling.
Plug your camouflage website into both the server and the client configuration files.
Our example: www.microsoft.com.
Xray configuration on the server
Edit /usr/local/etc/xray/config.json. The template used for testing was like this: