This post discusses possible solutions for Iranians wanting to circumvent Internet censorship.

On May 22, 2023, a user published on GitHub a long report on the state of Internet censorship in Iran. He wrote that restrictions are implemented ISP by ISP. Blocking techniques are different between MCI Hamrah Aval and MTN Irancell. As well as TCP blocking, UDP is commonly throttled, making audio and video calling impractical. In some cases the “GFW Iran” applies a blanket block to entire server IP address ranges. This makes circumvention techniques useless. No proxy server will work on such an IP.

The best protocol this user had found was Xray REALITY. Even here, apart from IP address blocks, you must also pay attention to blocks on certain SNIs. Courtesy of SasukeFreestyle, here is a list of SNIs believed to work in Iran:

1
2
3
4
5
6
7
8
9
www.google-analytics.com
www.speedtest.net
www.samsung.com
www.googletagmanager.com
www.asus.com
www.amd.com
www.cisco.com
www.linksys.com
www.nvidia.com

The GFW Iran is rapidly implementing new blocking and throttling strategies. A more recent SNI suggestion to reduce throttling:

1
www.speedtest.net

In order to set up Xray REALITY, you will need a virtual private server (VPS). Acquiring a VPS can be a problem. On September 23, 2022, Anthony J. Blinken, U.S. Secretary of State, announced a relaxation of sanctions to allow Iranians to purchase anti-censorship technology. “As a result of this expanded General License,” he wrote, “technology firms will be able to provide more digital services to people in Iran, from access to cloud computing services to better tools to enhance their online security and privacy.” Unfortunately I have heard of few tangible outcomes from the General License. Some VPS providers you might try are AlphaVPS, RackNerd, Noez, or Aeza.

You’ll also need computer knowledge. Although using an installation script makes server set-up easier, administering a Linux server is not a job for beginners.

Manual configuration

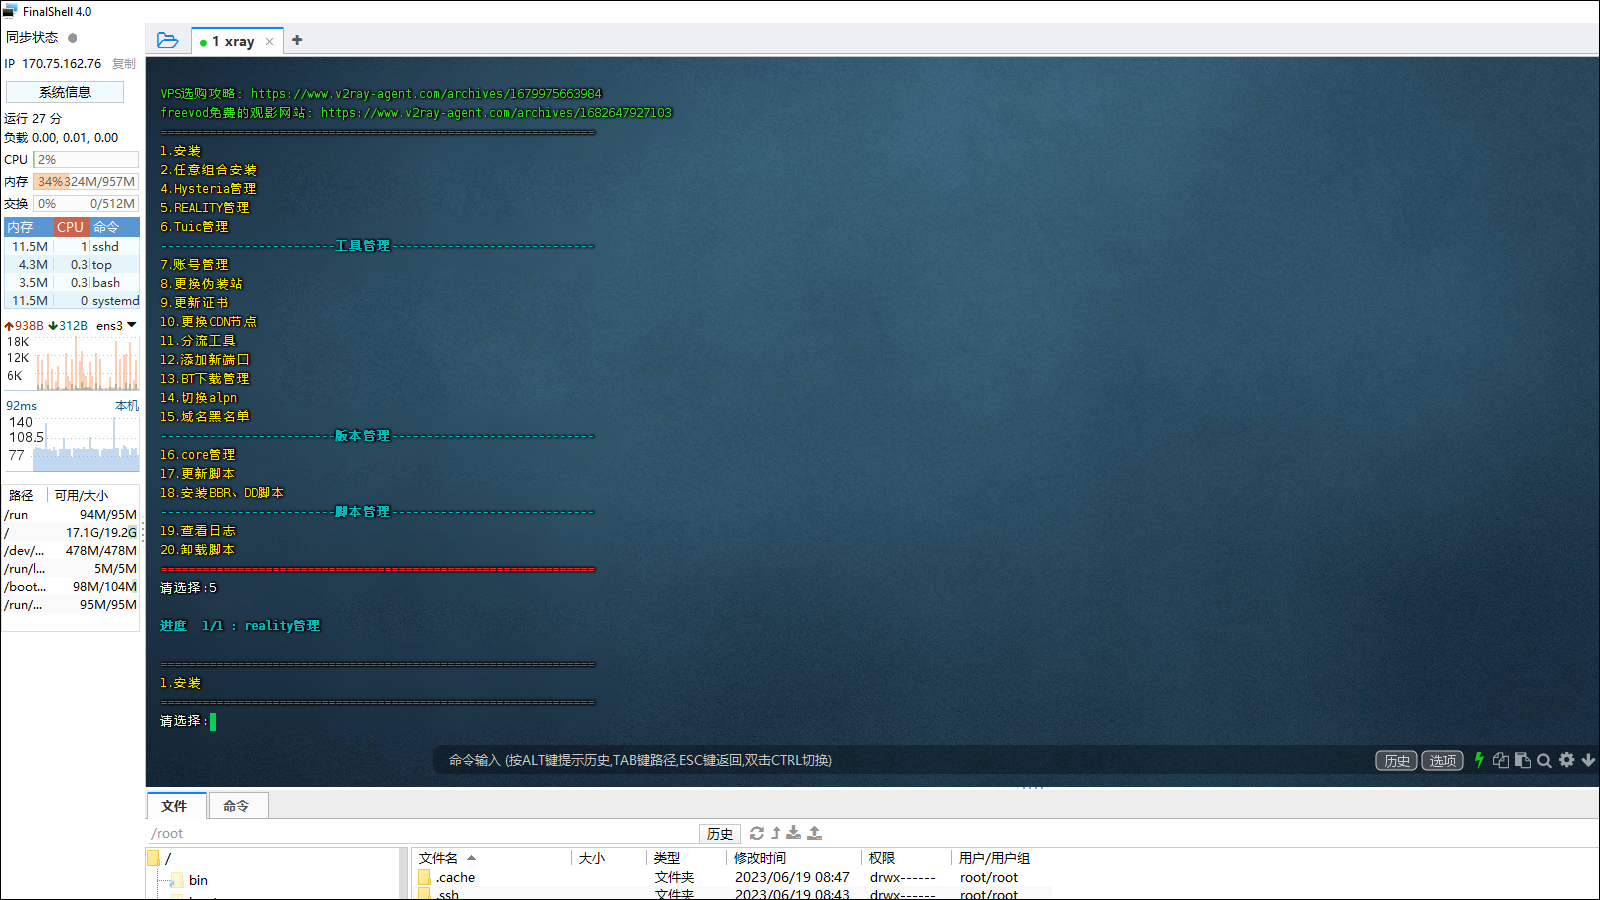
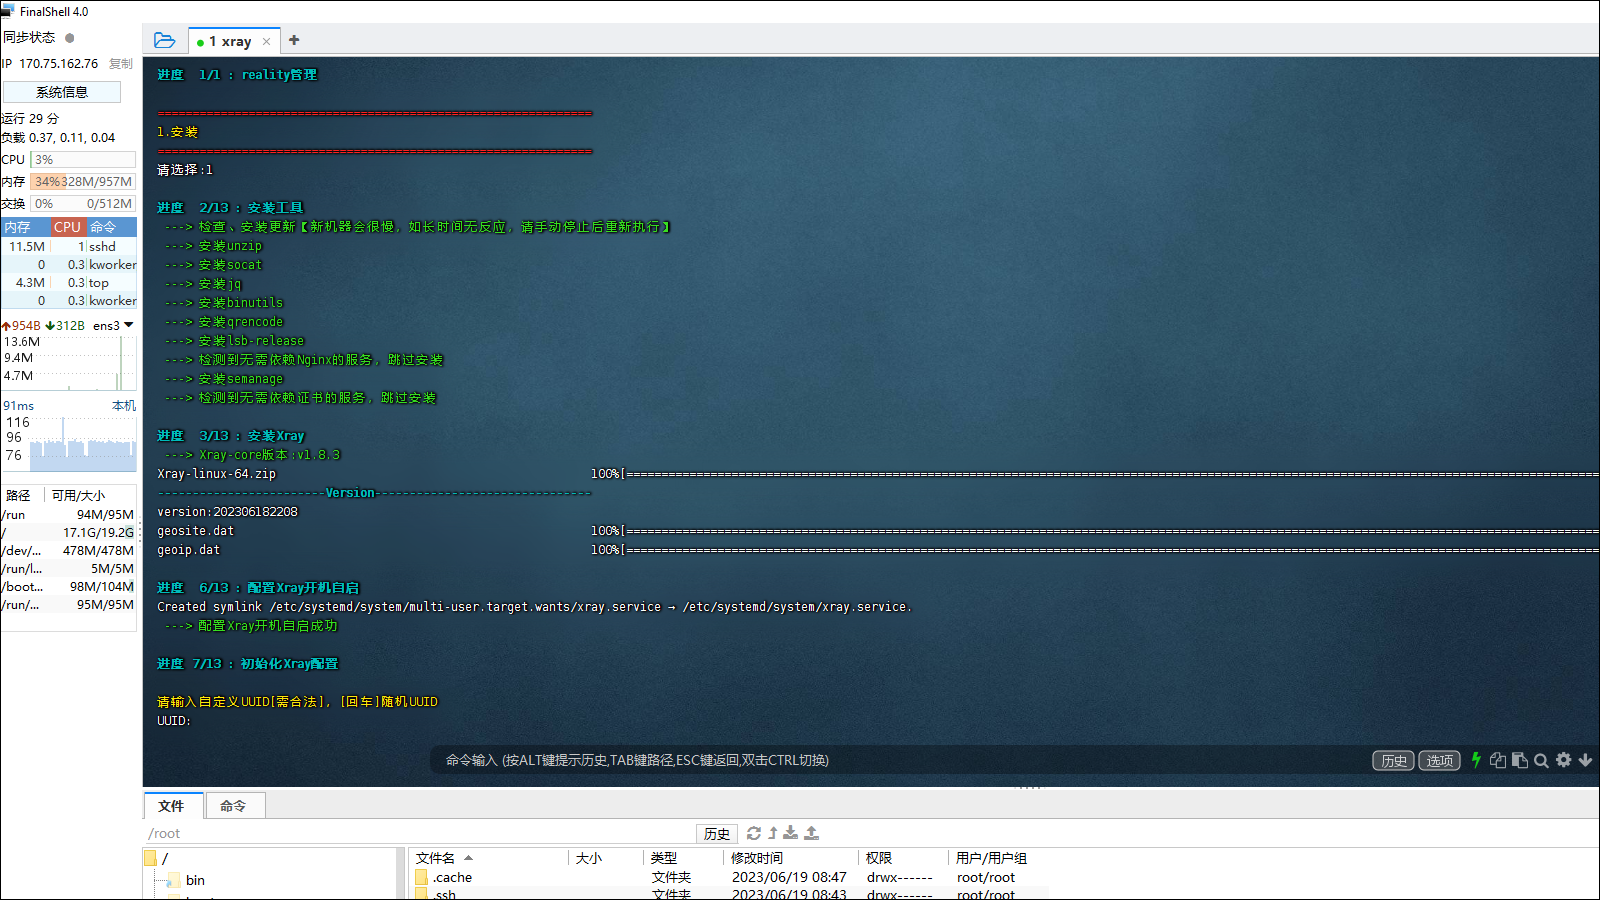
Various articles on this blog demonstrate setting up an Xray REALITY server and client:

Scripted configuration

The above tutorials assume you want to set up your server manually, step by step. There are also various scripts on GitHub. Here is one such script:

FastReality script

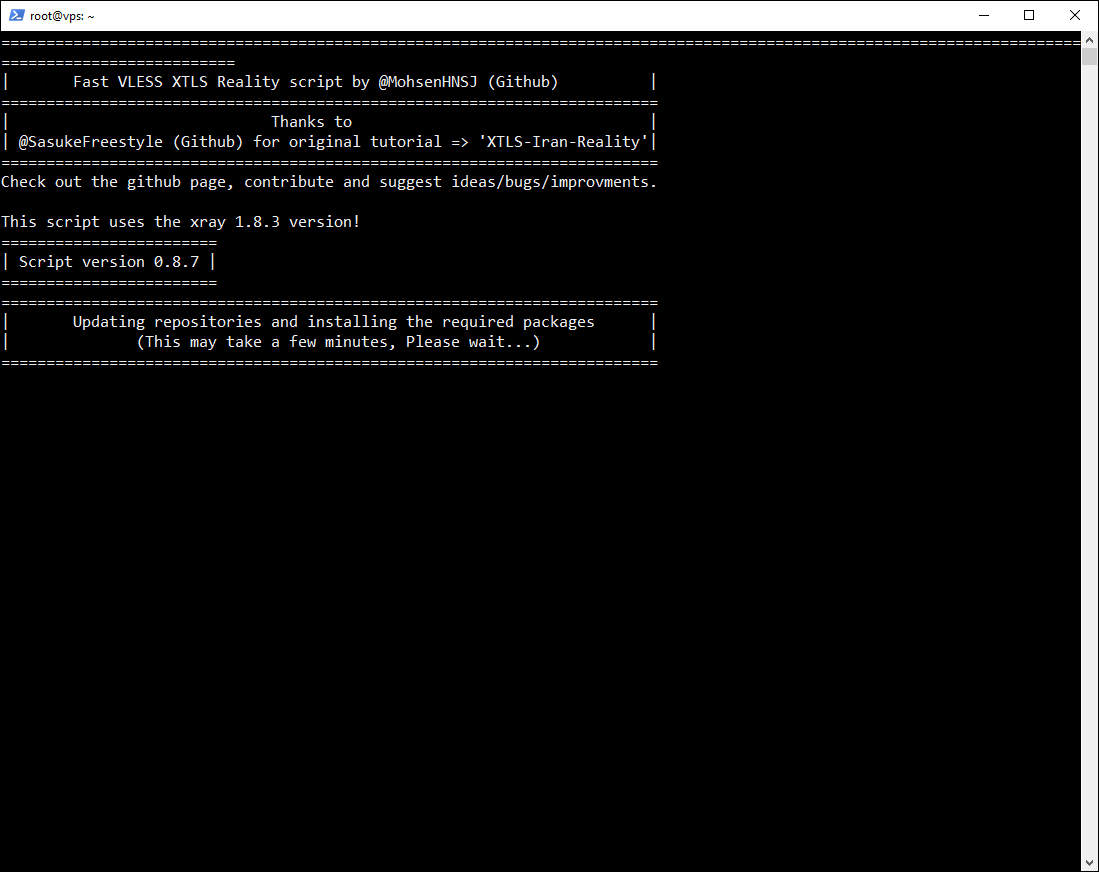
I also tried another script, the FastReality script. I found this only worked where my user was set up to authenticate with a password. I could not get the script to work on a server that used SSH key authentication. Also, contrary to the instructions in the README, I found it was necessary to run bash as root:

1
sudo curl -s https://raw.githubusercontent.com/MohsenHNSJ/FastReality/master/Reality.sh | sudo bash

You then wait a few minutes for the script to run.

Wait a few minutes for the script to run

At the end of the run, the script displays a QR code.

At the end of the run, the script displays a QR code

You can check the status of the xray service with:

1
systemctl status xray

You can check the logs for the xray service with:

1
journalctl -u xray

For the client, I used https://github.com/2dust/v2rayN/releases/download/6.27/v2rayN-With-Core.zip and substituted in the latest xray.exe version 1.8.3 from https://github.com/XTLS/Xray-core/releases/download/v1.8.3/Xray-windows-64.zip. (Copy Xray-windows-64\xray.exe into v2rayN-With-Core\v2rayN-With-Core\bin\Xray replacing the existing xray.exe.)

You can change the v2rayN panel language to English or Farsi if you prefer. If you have never done this before, watch the video demonstration How to change v2rayN to English.

To allow you to use any browser, find the v2rayN icon in the system tray, right-click on the icon to bring up the context menu, then select Set system proxy.

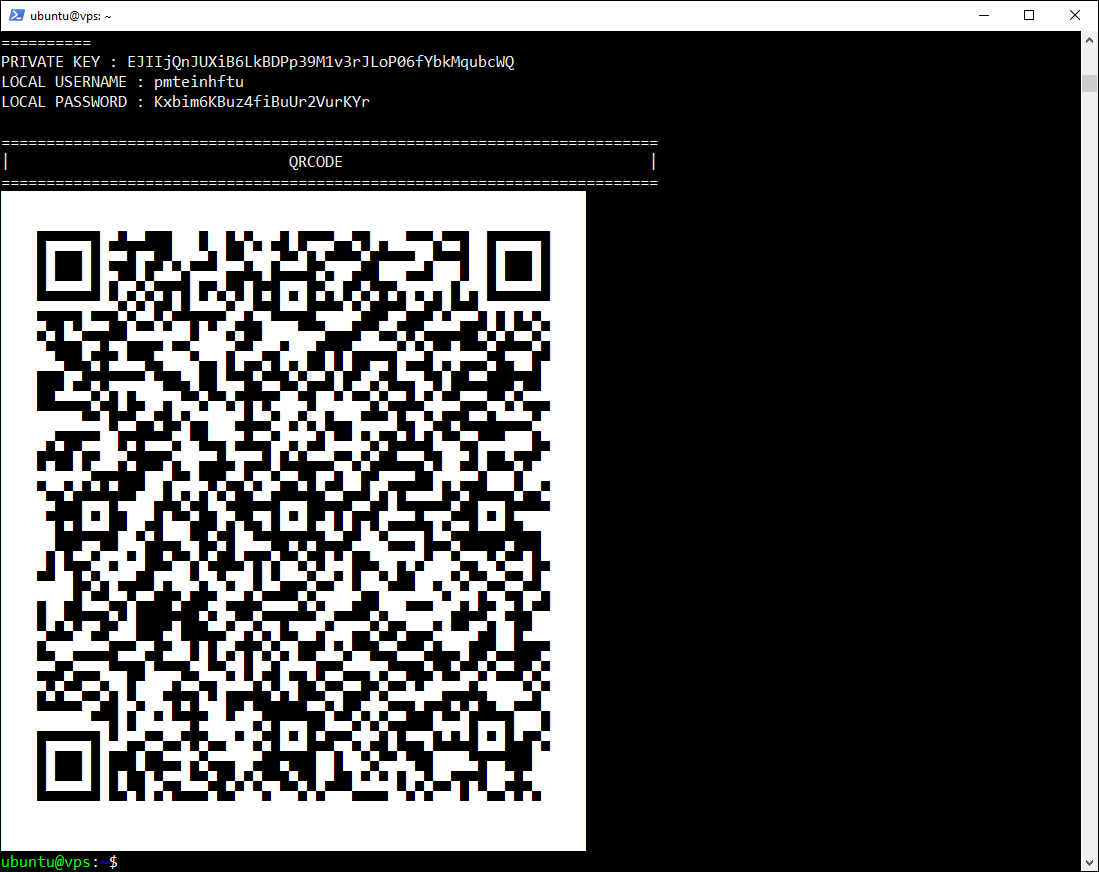
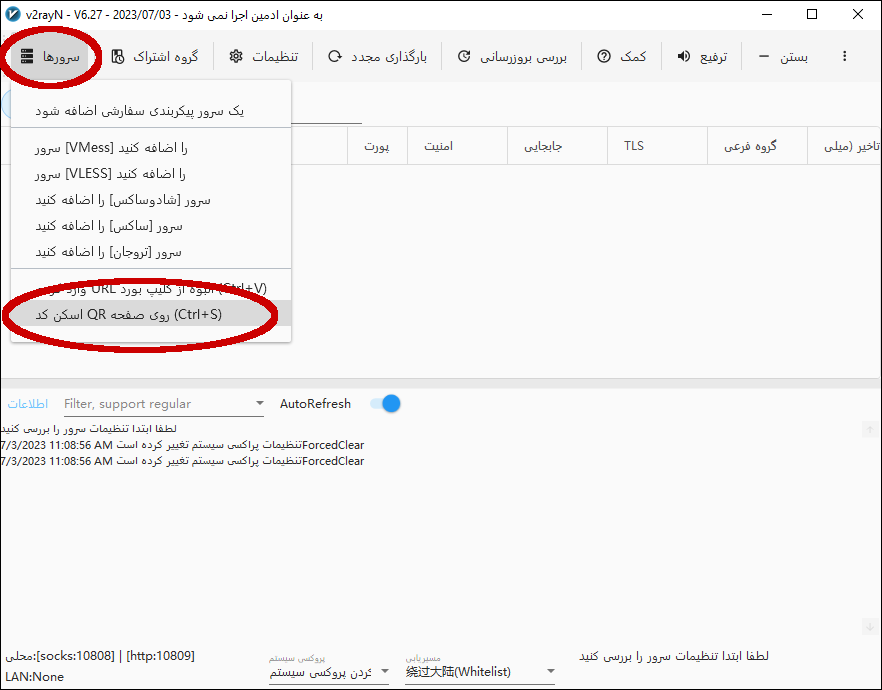
Now use the menu option to add a server by the method Scan QR code on the screen. Make sure your QR code is visible when you click this button.

v2rayN menu option to add server by scanning the QR code on the screen

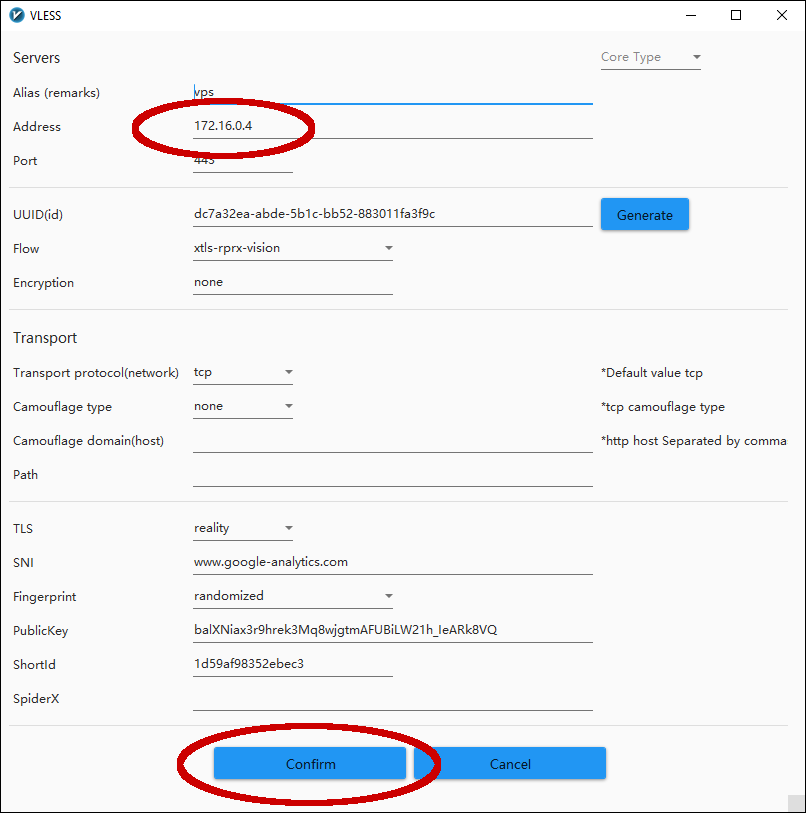
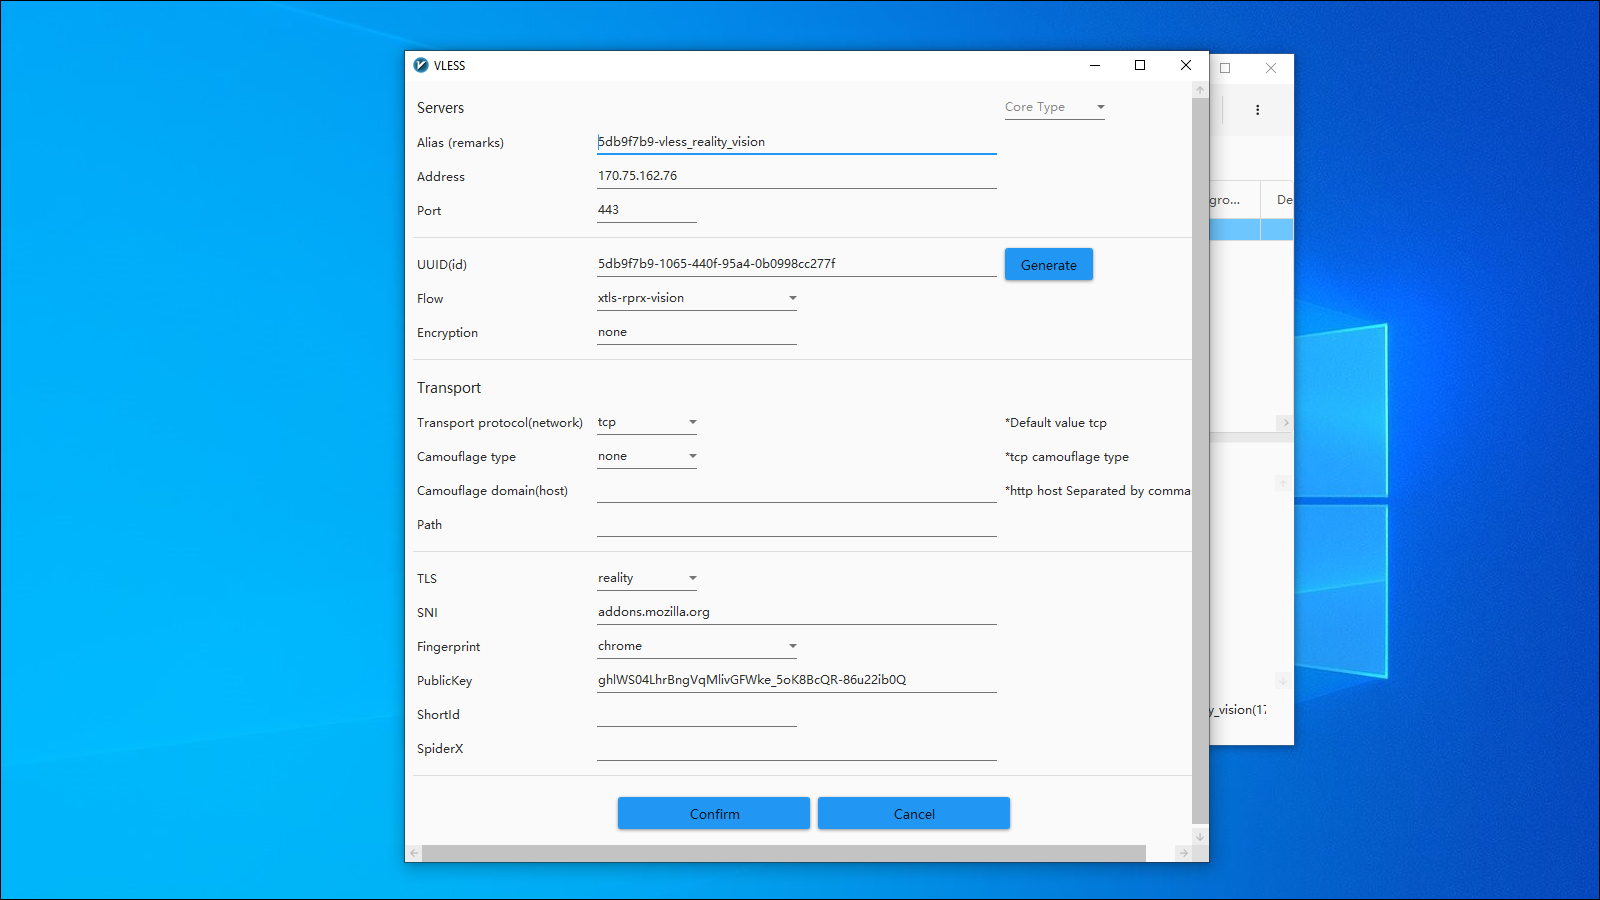
You may need to adjust the parameters. For example, in the screenshot the IP address is an internal IP address. It must be changed to the public IP address of the server.

Internal IP address must be changed to the public IP address of the server

Click Confirm.

Visit a site outside the firewall to see if you can connect. For example, visit https://www.bbc.com/persian.

BBC News Persian

Server

You will need a small virtual private server (VPS).

Install Xray-core on your server using https://github.com/XTLS/Xray-install. For example, to get the latest beta and configure it to run as root:

1
bash -c "$(curl -L https://github.com/XTLS/Xray-install/raw/main/install-release.sh)" @ install --beta -u root

Configure the server using the example from https://github.com/chika0801/Xray-examples/blob/main/VLESS-H2-uTLS-REALITY/config_server.json.

The example provides comments on certain attributes in the JSON configuration file for the Xray server:

Attribute Value
id Do xray uuid to generate an id, or use any 1-30 byte string
flow Leave blank
show If set to true, the program will output debug information
dest The minimum standard of the destination website is that it be a foreign website, support TLSv1.3, X25519, and H2, and the domain name not be redirected (although the main domain name may be redirected to the www subdomain).
serverNames 
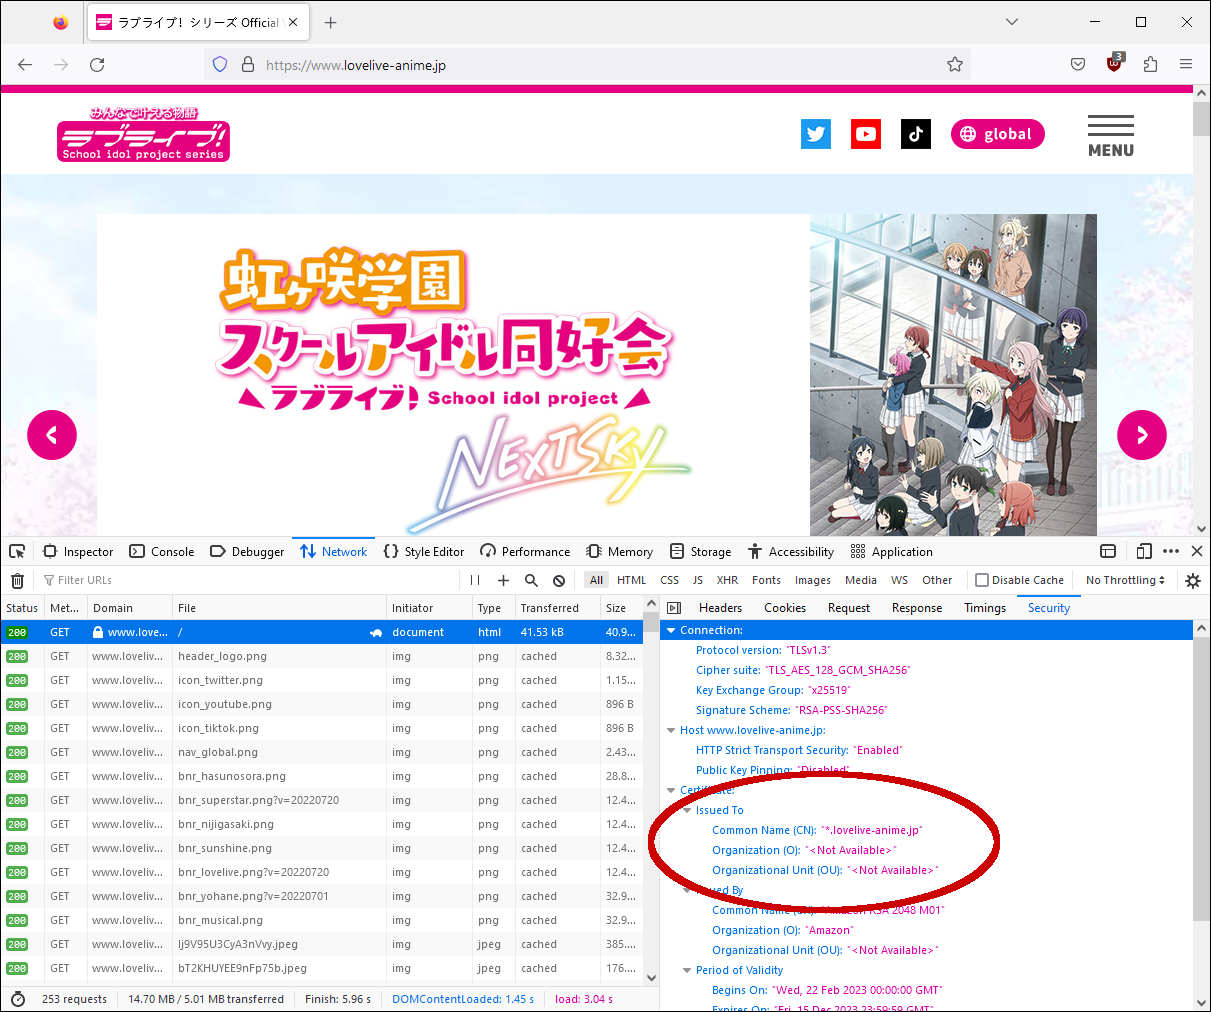
The serverName list available to the client. Wildcards * are not supported yet. The server name must match the name on the site’s SSL certificate. You can check the destination site’s SSL certificate details in the developer tools section of your browser.
privateKey Execute xray x25519 for generation, and fill in the value of Private key here
shortIds A list of the shortId available to clients, which can be used to distinguish different clients. Each shortId consists of hexadecimal characters 0 through f. The length is a multiple of 2. The upper limit of the length is 16. The value can be left blank, or execute openssl rand -hex 8 to generate a value.

Example of id generation:

1
xray uuid

Results:

1
3b5390c5-52a2-472d-8dc2-103ef508be6c

Example of checking destination site’s SSL certificate details in the developer tools section of a browser:

SSL certificate details in the developer tools section of Firefox

Example of public key generation:

1
xray x25519

Results:

1
2
Private key: QNraK6EdxPNOzfbL2G1BTl_OeMSxm49H5vps2qzQ3E0
Public key: eZfl07Tg9UII29GaS23QXqB15aqrJ4Khm0vKJIcaMCo

Example of shortId generation:

1
openssl rand -hex 8

Results:

1
77c2358dc476ae9e

Example of a completed server configuration file /usr/local/etc/xray/config.json:

1
2
3
4
5
6
7
8
9
10
11
12
13
14
15
16
17
18
19
20
21
22
23
24
25
26
27
28
29
30
31
32
33
34
35
36
37
38
39
40
41
42
43
44
45
46
47
48
49
50
51
52
53
54
55
56
57
58
59
60
{
"log": {
"loglevel": "warning"
},
"routing": {
"domainStrategy": "IPIfNonMatch",
"rules": [
{
"type": "field",
"ip": [
"geoip:cn",
"geoip:private"
],
"outboundTag": "block"
}
]
},
"inbounds": [
{
"listen": "0.0.0.0",
"port": 443,
"protocol": "vless",
"settings": {
"clients": [
{
"id": "3b5390c5-52a2-472d-8dc2-103ef508be6c",
"flow": ""
}
],
"decryption": "none"
},
"streamSettings": {
"network": "h2",
"security": "reality",
"realitySettings": {
"show": false,
"dest": "www.lovelive-anime.jp:443",
"xver": 0,
"serverNames": [
"www.lovelive-anime.jp"
],
"privateKey": "QNraK6EdxPNOzfbL2G1BTl_OeMSxm49H5vps2qzQ3E0",
"shortIds": [
"77c2358dc476ae9e"
]
}
}
}
],
"outbounds": [
{
"protocol": "freedom",
"tag": "direct"
},
{
"protocol": "blackhole",
"tag": "block"
}
]
}

Restart xray systemd service with your final configuration file:

1
2
systemctl restart xray
systemctl status xray

Results:

1
2
3
4
5
6
7
8
9
10
11
12
13
14
15
16
17
18
xray.service - Xray Service
Loaded: loaded (/etc/systemd/system/xray.service; enabled; vendor preset: enabled)
Drop-In: /etc/systemd/system/xray.service.d
└─10-donot_touch_single_conf.conf
Active: active (running) since Sun 2023-07-02 18:11:56 UTC; 5s ago
Docs: https://github.com/xtls
Main PID: 1701 (xray)
Tasks: 7 (limit: 1100)
Memory: 6.5M
CPU: 98ms
CGroup: /system.slice/xray.service
└─1701 /usr/local/bin/xray run -config /usr/local/etc/xray/config.json

Jul 02 18:11:56 reality systemd[1]: Started Xray Service.
Jul 02 18:11:56 reality xray[1701]: Xray 1.8.3 (Xray, Penetrates Everything.) Custom (go1.20.5 linux/amd64)
Jul 02 18:11:56 reality xray[1701]: A unified platform for anti-censorship.
Jul 02 18:11:56 reality xray[1701]: 2023/07/02 18:11:56 [Info] infra/conf/serial: Reading config: /usr/local/etc/xray/c>
Jul 02 18:11:56 reality xray[1701]: 2023/07/02 18:11:56 [Warning] core: Xray 1.8.3 started

Client using CLI

You can get command-line interface clients from https://github.com/XTLS/Xray-core/releases.

You can configure the CLI client using the example from https://github.com/chika0801/Xray-examples/blob/main/VLESS-H2-uTLS-REALITY/config_client.json.

The example provides comments on certain attributes in the client configuration:

Attribute Value
address IP of the server
id Consistent with the server
flow Leave blank
fingerprint Emulate client-side TLS fingerprinting using the uTLS library
serverName Consistent with the server
publicKey On the server execute xray x25519 to generate the public key and private key, and then on the client fill in the value of Public key here
shortId Consistent with the server
spiderX The initial path and parameters of the crawler are recommended to be different for each client

Example of a completed client configuration file config.json:

1
2
3
4
5
6
7
8
9
10
11
12
13
14
15
16
17
18
19
20
21
22
23
24
25
26
27
28
29
30
31
32
33
34
35
36
37
38
39
40
41
42
43
44
45
46
47
48
49
50
51
52
53
54
55
56
57
58
59
60
61
62
63
64
65
66
67
68
69
70
71
72
73
74
75
76
77
78
79
80
81
82
83
84
85
86
87
88
89
{
"log": {
"loglevel": "warning"
},
"routing": {
"domainStrategy": "IPIfNonMatch",
"rules": [
{
"type": "field",
"domain": [
"geosite:category-ads-all"
],
"outboundTag": "block"
},
{
"type": "field",
"domain": [
"geosite:geolocation-!cn"
],
"outboundTag": "proxy"
},
{
"type": "field",
"domain": [
"geosite:cn",
"geosite:private"
],
"outboundTag": "direct"
},
{
"type": "field",
"ip": [
"geoip:cn",
"geoip:private"
],
"outboundTag": "direct"
}
]
},
"inbounds": [
{
"listen": "127.0.0.1",
"port": 10808,
"protocol": "socks"
},
{
"listen": "127.0.0.1",
"port": 10809,
"protocol": "http"
}
],
"outbounds": [
{
"protocol": "vless",
"settings": {
"vnext": [
{
"address": "YOUR.SERVER.IP.ADDRESS",
"port": 443,
"users": [
{
"id": "3b5390c5-52a2-472d-8dc2-103ef508be6c",
"encryption": "none",
"flow": ""
}
]
}
]
},
"streamSettings": {
"network": "h2",
"security": "reality",
"realitySettings": {
"show": false,
"fingerprint": "chrome",
"serverName": "www.lovelive-anime.jp",
"publicKey": "eZfl07Tg9UII29GaS23QXqB15aqrJ4Khm0vKJIcaMCo",
"shortId": "77c2358dc476ae9e",
"spiderX": ""
}
},
"tag": "proxy"
},
{
"protocol": "freedom",
"tag": "direct"
}
]
}

Run the CLI client with the above configuration file.

Client using GUI

Get your Windows client software from https://github.com/2dust/v2rayN.

The latest version is https://github.com/2dust/v2rayN/releases/download/6.27/v2rayN-With-Core.zip.

Unzip the zip file.

If you want to be sure of having the very latest Xray core, then download the Xray core for Windows 64-bit from https://github.com/XTLS/Xray-core/releases, unzip it, and copy xray.exe into Downloads\v2rayN-With-Core\v2rayN-With-Core\bin\Xray replacing the existing xray.exe.

You can check which version you have by opening a command prompt in that folder and issuing the command:

1
xray --version

Example of results:

1
2
Xray 1.8.3 (Xray, Penetrates Everything.) Custom (go1.20.5 windows/amd64)
A unified platform for anti-censorship.

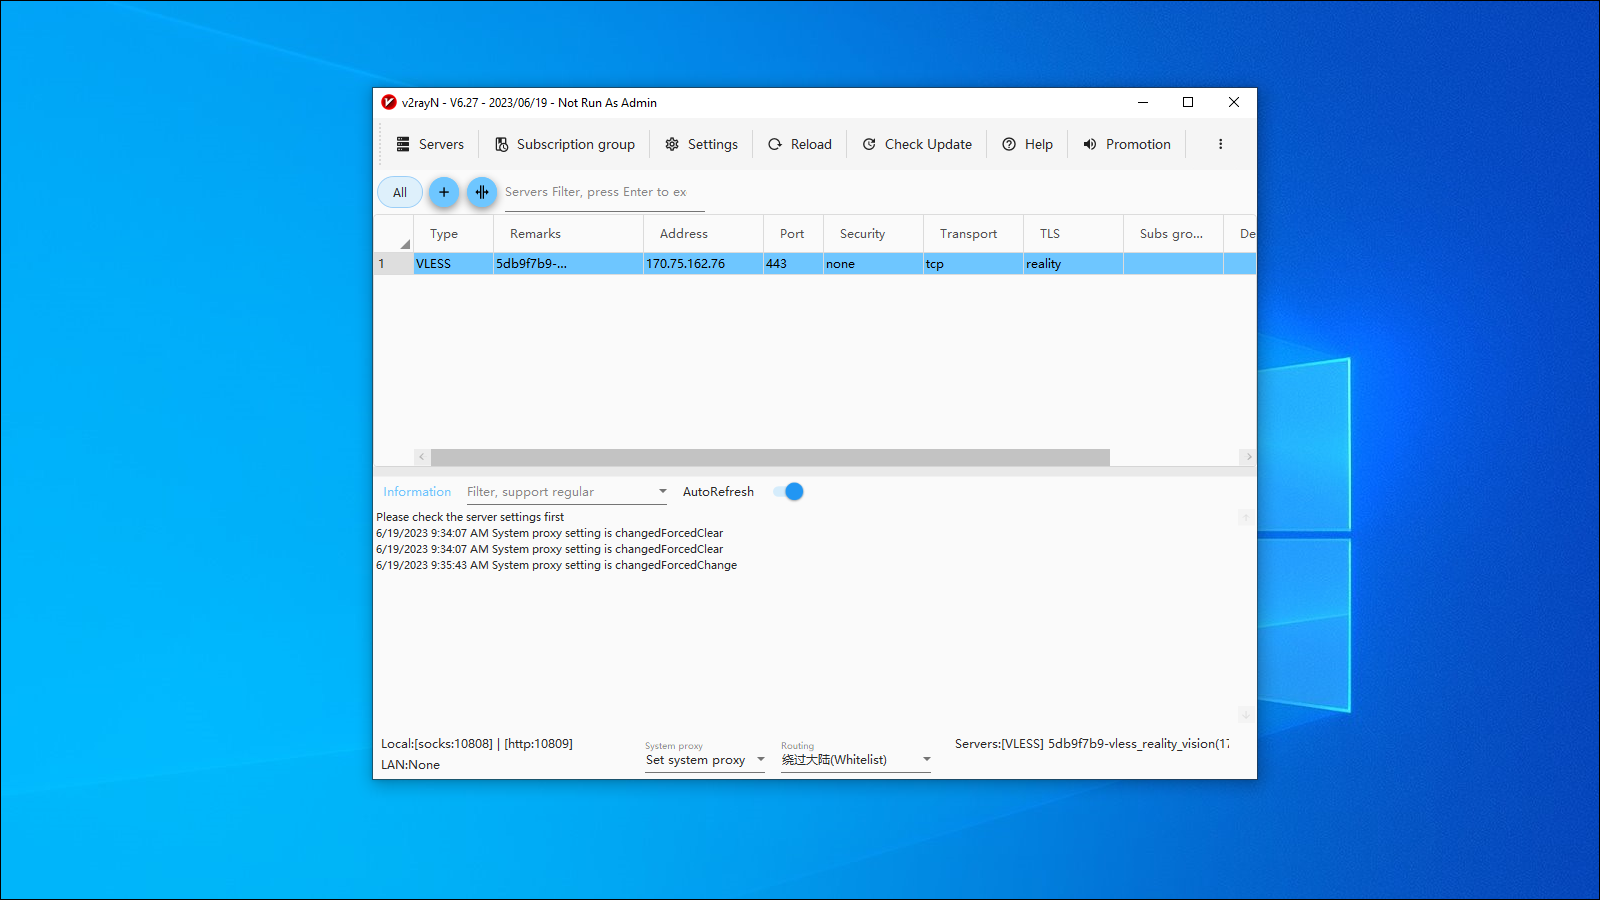
Launch the v2rayN application.

Click the v2rayN icon in the Windows system tray to bring up the GUI.

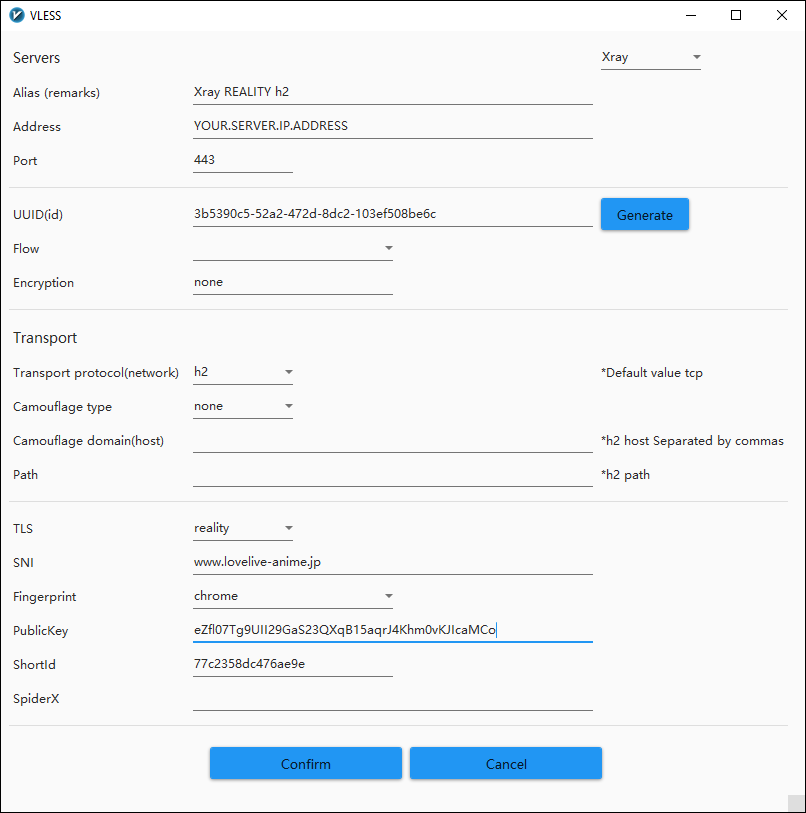
Configure the v2rayN GUI for a new VLESS server, using the same values as went in the configuration JSON file for the CLI client:

v2rayN GUI in Windows configured for VLESS Xray REALITY h2 server

Here is an overview of how to create an Xray REALITY server using the mack-a script from GitHub.

SSH into your server as root, and update your existing software:

1
apt update && apt upgrade -y

Updating the existing software

Download the mack-a script, make it executable, and run the script:

1
wget -P /root -N --no-check-certificate "https://raw.githubusercontent.com/mack-a/v2ray-agent/master/install.sh" && chmod 700 /root/install.sh && /root/install.sh

Download the mack-a script, make it executable, and run the script

At the end of the script’s run, the main menu is displayed.

Enter option 5 for REALITY

Enter option 5 for REALITY.

Enter option 1 for install

Enter option 1 for install.

Enter UUID

Enter a specific UUID, or just press Enter for a UUID to be generated by the script.

Enter port 443

Enter port 443 or just press Enter for a random port in the range 10000-30000.

Enter camouflage domain and port

Just press Enter for the default camouflage domain and port (addons.mozilla.org:443), or enter another choice, e.g.:

  • gateway.icloud.com:443
  • itunes.apple.com:443
  • download-installer.cdn.mozilla.net:443
  • www.microsoft.com:443
  • www.lovelive-anime.jp:443

When the script completes the installation, it displays client configuration URLs in common format, plain text format, and QR code format:

Client configuration URLs

At this stage, copy the client configuration URL to your PC clipboard.

Just out of interest, the script has divided the server configuration into separate files in the directory /etc/v2ray-agent/xray/conf:

  • 00_log.json
  • 07_VLESS_vision_reality_inbounds.json
  • 08_VLESS_reality_fallback_grpc_inbounds.json
  • 09_routing.json
  • 10_ipv4_outbounds.json
  • 11_dns.json
  • 12_policy.json

Displaying the concatenated files /etc/v2ray-agent/xray/conf/*.json shows an Xray server configuration that looks like this:

1
2
3
4
5
6
7
8
9
10
11
12
13
14
15
16
17
18
19
20
21
22
23
24
25
26
27
28
29
30
31
32
33
34
35
36
37
38
39
40
41
42
43
44
45
46
47
48
49
50
51
52
53
54
55
56
57
58
59
60
61
62
63
64
65
66
67
68
69
70
71
72
73
74
75
76
77
78
79
80
81
82
83
84
85
86
87
88
89
90
91
92
93
94
95
96
97
98
99
100
101
102
103
104
105
106
107
108
109
110
111
112
113
114
115
116
117
118
119
120
121
122
123
124
125
126
127
128
129
130
131
132
133
134
135
136
137
138
139
140
141
142
143
144
145
146
147
148
149
150
{
"log": {
"error": "/etc/v2ray-agent/xray/error.log",
"loglevel": "warning"
}
}
{
"inbounds": [
{
"port": 443,
"protocol": "vless",
"tag": "VLESSReality",
"settings": {
"clients": [
{
"id": "5db9f7b9-1065-440f-95a4-0b0998cc277f",
"email": "5db9f7b9-vless_reality_vision",
"flow": "xtls-rprx-vision"
}
],
"decryption": "none",
"fallbacks": [
{
"dest": "31305",
"xver": 1
}
]
},
"streamSettings": {
"network": "tcp",
"security": "reality",
"realitySettings": {
"show": false,
"dest": "addons.mozilla.org:443",
"xver": 0,
"serverNames": [
"addons.mozilla.org"
],
"privateKey": "WDc7k0peBdceXYHm12jhou8URCZXCFIsDMEZTJWQdk4",
"publicKey": "ghlWS04LhrBngVqMlivGFWke_5oK8BcQR-86u22ib0Q",
"maxTimeDiff": 70000,
"shortIds": [
""
]
}
},
"sniffing": {
"enabled": true,
"destOverride": [
"http",
"tls"
]
}
}
]
}
{
"inbounds": [
{
"port": 31305,
"listen": "127.0.0.1",
"protocol": "vless",
"tag": "VLESSRealityGRPC",
"settings": {
"clients": [
{
"id": "5db9f7b9-1065-440f-95a4-0b0998cc277f",
"email": "5db9f7b9-vless_reality_grpc",
"flow": ""
}
],
"decryption": "none"
},
"streamSettings": {
"network": "grpc",
"grpcSettings": {
"serviceName": "grpc",
"multiMode": true
},
"sockopt": {
"acceptProxyProtocol": true
}
},
"sniffing": {
"enabled": true,
"destOverride": [
"http",
"tls"
]
}
}
]
}
{
"routing": {
"rules": [
{
"type": "field",
"domain": [
"domain:gstatic.com"
],
"outboundTag": "direct"
}
]
}
}
{
"outbounds":[
{
"protocol":"freedom",
"settings":{
"domainStrategy":"UseIPv4"
},
"tag":"IPv4-out"
},
{
"protocol":"freedom",
"settings":{
"domainStrategy":"UseIPv6"
},
"tag":"IPv6-out"
},
{
"protocol":"freedom",
"settings": {},
"tag":"direct"
},
{
"protocol":"blackhole",
"tag":"blackhole-out"
}
]
}
{
"dns": {
"servers": [
"localhost"
]
}
}
{
"policy": {
"levels": {
"0": {
"handshake": 3,
"connIdle": 259
}
}
}
}

Now exit your SSH session with the server in order to work on your client.

Paste the client configuration URL into your client. For example, you can just do Ctrl+v in v2rayN:

Server configuration URL

Confirm the server configuration, and connect your client to the server:

Client configuration URLs

Open iptables firewall for input on 51413/tcp and 51413/udp:

1
2
3
iptables -A INPUT -p tcp --dport 51413 -j ACCEPT
iptables -A INPUT -p udp --dport 51413 -j ACCEPT
dpkg-reconfigure iptables-persistent

Install the Transmission command-line interface and the Transmission systemd daemon:

1
2
apt update && apt upgrade
apt install transmission-cli transmission-daemon

Stop the Transmission daemon prior to changing the Transmission settings:

1
systemctl stop transmission-daemon

Edit the Transmission daemon settings file:

1
vi /etc/transmission-daemon/settings.json

Allow the transmission-remote command to be issued from localhost only:

1
2
"rpc-authentication-required": false,
"rpc-bind-address": "127.0.0.1",

Limit the upload speed and the download speed to 1,000 kBytes per second in each case:

1
2
3
4
"speed-limit-down": 1000,
"speed-limit-down-enabled": true,
"speed-limit-up": 1000,
"speed-limit-up-enabled": true,

Save the settings file, then restart the Transmission daemon with the new settings:

1
systemctl start transmission-daemon

Check that the transmission-remote command now works by using it with the -l for “list” option:

1
transmission-remote -l

When you start torrenting, your downloads will appear in the /var/lib/transmission-daemon/downloads directory.

Download Tor Browser for Linux from the official Tor Project website:

https://www.torproject.org

You can alternatively download it from one of the official Tor Project mirrors. Do not download Tor Browser from any other site, as there have been incidents of malware in unofficial imitations of Tor Browser. Do not use scripts or loaders you find on the internet. Use only the official Tor Project site or one of its mirrors.

It is a large download of over 100 MB.

On a typical Linux desktop, your download goes into your ~/Downloads folder. It will have a name that looks like tor-browser-linux64-12.0.6_ALL.tar.xz.

Open a terminal emulator. Change into your ~/Downloads directory:

1
cd ~/Downloads

Extract the archive:

1
tar -xvf tor-browser-linux64-*.tar.xz

Change into the extracted directory:

1
cd tor-browser

From inside the Tor Browser directory, register Tor Browser as a desktop application:

1
./start-tor-browser.desktop --register-app

(If this produces an error message, try running the script as just ‪./start-tor-browser.desktop, close Tor Browser if it is open, then re-try ./start-tor-browser.desktop --register-app.)

Registering the app adds Tor Browser to ~/.local/share/applications. From now on, Tor Browser shows up in your list of desktop applications.

Tor Browser shows up in your list of desktop applications

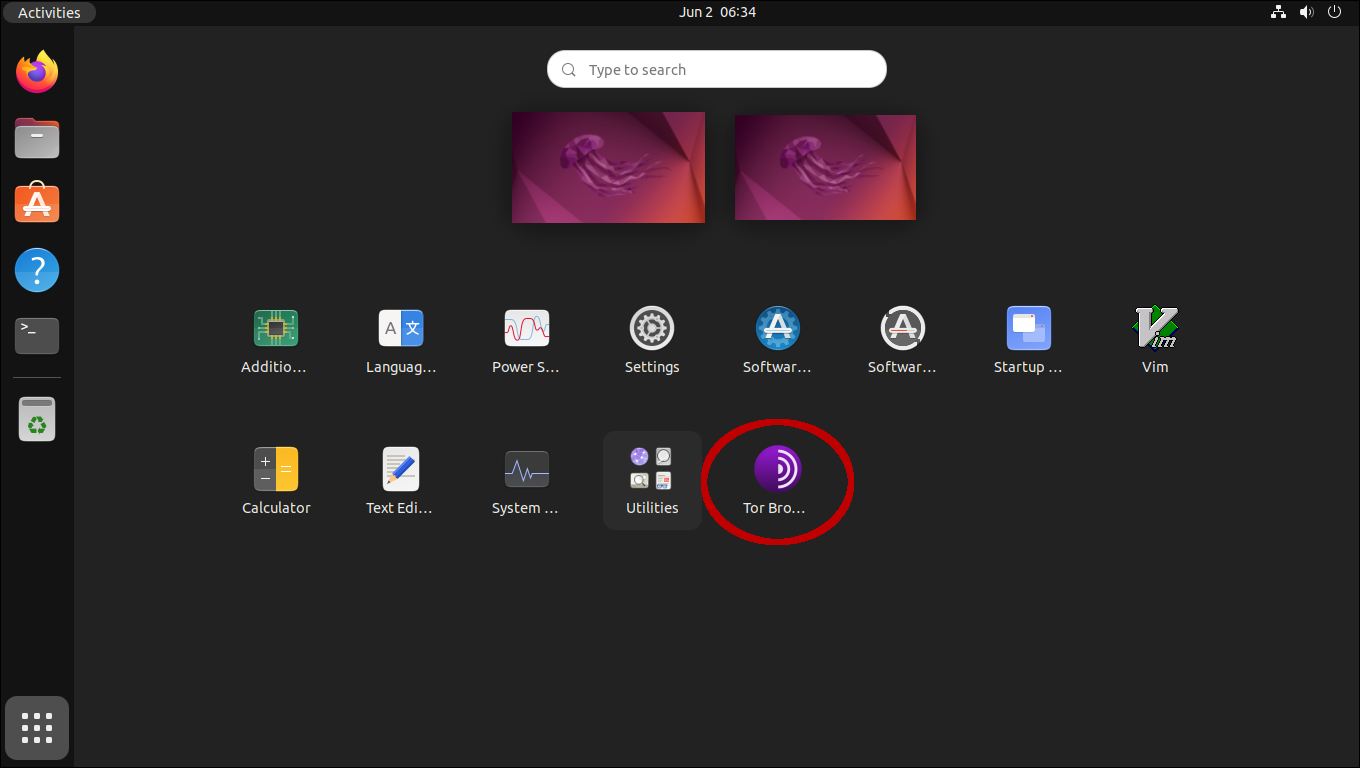
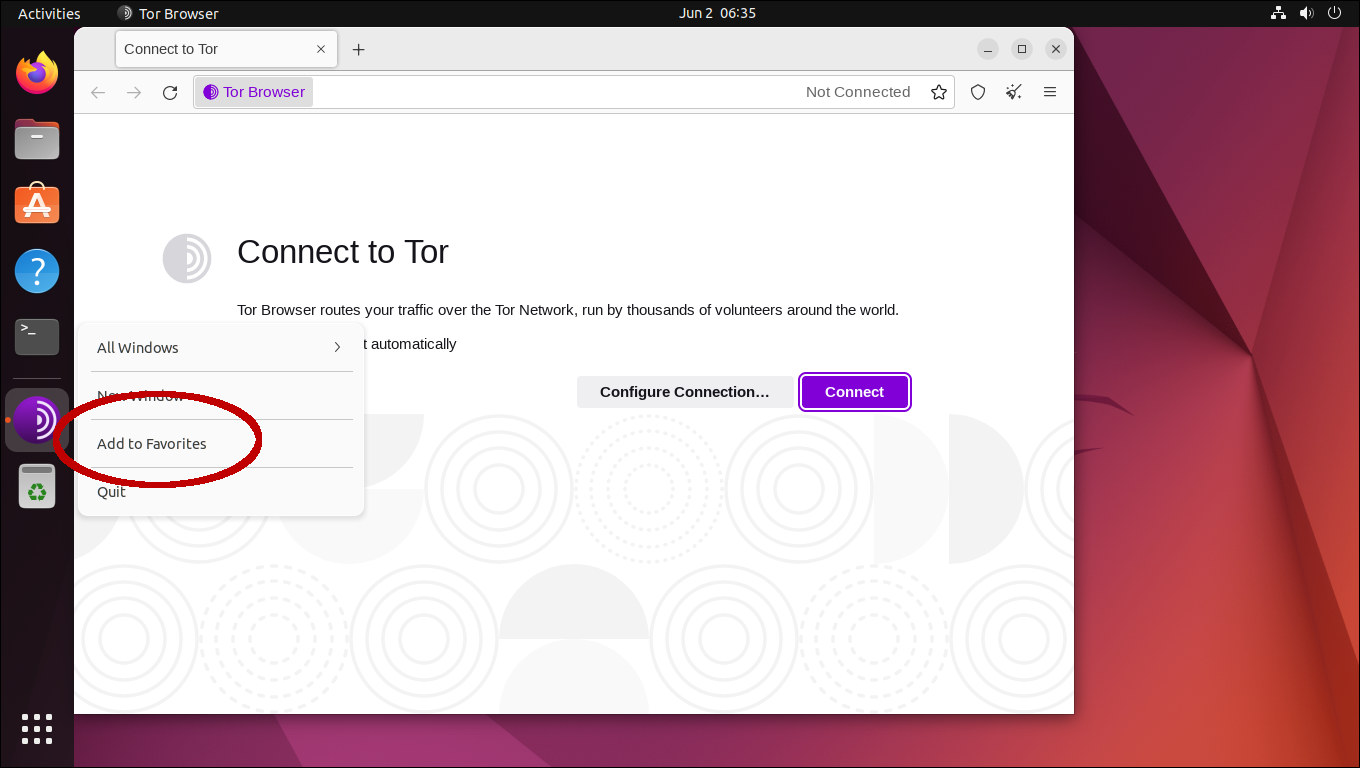
Launch Tor Brower from your list of desktop applications.

In Ubuntu Linux, you can right-click on the Tor Browser icon in the launcher and add it to your favorites.

Adding Tor Browser to your Ubuntu Linux launcher favorites

Click the Connect button to connect to the Tor network.

If you need support or more information, consult the offical Tor Browser manual:

https://support.torproject.org/tbb

These are methods people have used to penetrate the Great Firewall (GFW) of China. Be aware that we don’t live in a static universe. The GFW fights back. It will attempt to block more and more of these methods as time goes by.

Free methods

Commercial VPNs

Gaming accelerators

机场

Hong Kong SIM card

Self-hosted methods

“Last resort” methods

V2Ray version 5.7.0 introduces the possibility of using meek transport protocol.

Meek is a censorship-resistant protocol that encodes traffic as plain HTTP requests and responses. This allows traffic to penetrate environments where it would otherwise be blocked.

The performance of meek is low. It is not intended for situations where you want a speedy ping or to transfer gigabytes and gigabytes of data. Meek is intended for situations where most other protocols are blocked and you need a last resort.

This post gives an example of configuring V2Ray with meek.

With thanks to @xiaokangwang and to David Fifield, the developer of the original implementation of meek.

VPS

You will need your own virtual private server or VPS.

We will run Ubuntu 22.04 on the demonstration VPS. This server has 1 GB of RAM.

Domain name

You will need your own domain name. Our examples will use the domain name:

1
cscot.buzz

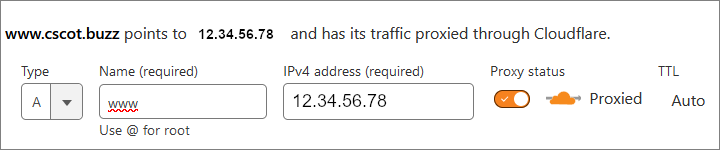
Create a DNS A record pointing from the hostname of the server to the IP address of the server. Our example:

1
www.cscot.buzz

DNS A record pointing from the hostname of the server to the IP address of the server

Universally unique id

On Linux servers, you can generate a UUID with the command:

1
uuidgen

Alternatively, generate a UUID on the web by visiting https://www.uuidgenerator.net.

Example:

1
f48fd3ae-0c24-433e-af3b-e87338b74705

Path

Generate a secret path:

1
< /dev/urandom tr -dc a-z | head -c${1:-8};echo;

Example:

1
vrezdxop

Linux server

If your server is protected by a firewall or your cloud provider’s security groups, open ports 80/tcp and 443/tcpfor input.

Switch to the root user.

Install a web server:

1
2
apt update && apt upgrade
apt install nginx

Edit the web server’s default site configuration file /etc/nginx/sites-available/default.

Insert the real hostname.

Also insert a proxy_pass line for the secret path.

Example of completed default site configuration file:

1
2
3
4
5
6
7
8
9
10
11
12
13
14
15
16
17
18
19
server {
listen 80 default_server;
listen [::]:80 default_server;

root /var/www/html;

index index.html index.htm index.nginx-debian.html;

server_name www.cscot.buzz;

location / {
try_files $uri $uri/ =404;
}

location /vrezdxop {
proxy_pass http://127.0.0.1:17773;
}

}

Restart the web server with this configuration:

1
systemctl restart nginx

Install snapd if it is not already installed:

1
apt install snapd

Ensure that your version of snapd is up to date:

1
snap install core; snap refresh core

Run the following command on the command line to install certbot:

1
snap install --classic certbot

Execute the following instruction to ensure that the certbot command can be run:

1
ln -s /snap/bin/certbot /usr/bin/certbot

Run the next command to get an SSL certificate and have Certbot edit your Nginx configuration automatically to serve the HTTPS version of your site:

1
certbot --nginx --register-unsafely-without-email --agree-tos

The certbot packages on your system come with a cron job or systemd timer that will renew your certificate automatically before it expires. You can test automatic renewal by running the command below:

1
certbot renew --dry-run

If you are using Cloudflare CDN, visit the SSL/TLS page for your domain. Make sure your SSL/TLS encryption mode is set to Full (strict).

To confirm that your site is set up properly, visit:

1
https://www.cscot.buzz

in your browser and look for the padlock icon in the address bar.

Now you can install version v5.7.0 of V2Ray:

1
bash <(curl -L https://raw.githubusercontent.com/v2fly/fhs-install-v2ray/master/install-release.sh) --version v5.7.0

Meek is only supported in JSON5 configuration format.

Therefore edit the server configuration file /usr/local/etc/v2ray/config.json based on the example below:

1
2
3
4
5
6
7
8
9
10
11
12
13
14
15
16
17
18
19
20
21
22
23
24
25
26
27
28
29
30
31
32
33
34
35
36
37
{
"log": {
"error": {
"level": "Info",
"type": "Console"
},
"access": {
"type": "None"
}
},
"outbounds": [
{
"protocol": "freedom"
}
],
"inbounds": [
{
"listen": "127.0.0.1",
"port": 17773,
"protocol": "vmess",
"settings": {
"users": [
"f48fd3ae-0c24-433e-af3b-e87338b74705"
]
},
"streamSettings": {
"transport": "meek",
"transportSettings": {
"url": "http://127.0.0.1:17773"
},
"security": "none",
"securitySettings": {
}
}
}
]
}

Edit the systemd service unit /etc/systemd/system/v2ray.service.

Make the ExecStart line look like this:

1
ExecStart=/usr/local/bin/v2ray run -format jsonv5 -c /usr/local/etc/v2ray/config.json

Save the file. Reload the systemd daemon:

1
2
rm -rf /etc/systemd/system/v2ray.service.d/10-donot_touch_single_conf.conf
systemctl daemon-reload

Start V2Ray with the new configuration file:

1
2
systemctl enable v2ray
systemctl start v2ray

Windows client

Download the v5.7.0 zip file for Windows, v2ray-windows-64.zip, from https://github.com/v2fly/v2ray-core/releases/tag/v5.7.0.

Unzip the zip file.

User Notepad to edit the client configuration file, Downloads\v2ray-windows-64\config.json, based on the example below:

1
2
3
4
5
6
7
8
9
10
11
12
13
14
15
16
17
18
19
20
21
22
23
24
25
26
27
28
29
30
31
32
33
34
35
36
37
38
39
40
41
42
43
44
45
46
47
48
49
{
"log": {
"error": {
"level": "Info",
"type": "Console"
},
"access": {
"type": "None"
}
},
"outbounds": [
{
"protocol": "vmess",
"settings": {
"address": "www.cscot.buzz",
"port": 443,
"uuid": "f48fd3ae-0c24-433e-af3b-e87338b74705"
},
"streamSettings": {
"transport": "meek",
"transportSettings": {
"url": "https://www.cscot.buzz/vrezdxop"
},
"security": "tls",
"securitySettings": {
}
}
}
],
"inbounds": [
{
"protocol": "socks",
"settings": {
"udpEnabled": true,
"address": "127.0.0.1",
"packetEncoding": "Packet"
},
"port": 10808,
"listen": "127.0.0.1"
},
{
"protocol": "http",
"settings": {
},
"port": 10809,
"listen": "127.0.0.1"
}
]
}

Open a Command Prompt window.

Run the V2Ray client with your configuration:

1
2
cd Downloads\v2ray-windows-64
v2ray.exe run -format jsonv5 -c config.json

You should see messages that look like this:

1
2
3
4
5
6
V2Ray 5.7.0 (V2Fly, a community-driven edition of V2Ray.) Custom (go1.20.4 windows/amd64)
A unified platform for anti-censorship.
2023/05/31 18:06:26 [Info] transport/internet/tcp: listening TCP on 127.0.0.1:10808
2023/05/31 18:06:26 [Info] transport/internet/udp: listening UDP on 127.0.0.1:10808
2023/05/31 18:06:26 [Info] transport/internet/tcp: listening TCP on 127.0.0.1:10809
2023/05/31 18:06:26 [Warning] V2Ray 5.7.0 started

Leave the Command Prompt window open with V2Ray running in it.

The most convenient browser to use with a proxy server is Firefox. Therefore install Firefox now if you do not already have Firefox on your PC.

Open Firefox Settings.

On the General page, scroll down to Network Settings.

Configure Firefox so that the browser uses the V2Ray proxy:

  1. Select the radio button for Manual proxy configuration
  2. Set the SOCKS Host to 127.0.0.1
  3. Set the Port to 10808
  4. Select the version SOCKS v5
  5. Check the box for Proxy DNS when using SOCKS v5

About 7 years ago, Astrill sent out an email accusing its customers of belonging to “dumbclub.” Ever since then, the subreddit for penetrating the GFW has celebrated this incident by calling itself “dumbclub.” In r/China user u/kanevast explained: “I don’t mean using a VPN is being part of a dumb club, I mean using Astrill means you’re part of the ‘dumb club’ as per their message to all of their clients a month or so ago.” From the Astrill communication of December 2015:

Due to increased censorship, use of VPN from China may not be possible at this time. We believe the situation will be back to normal after the holidays. While our engineers worked tirelessly to fix “issue” with our iOS app, some users were not that smart and helping Chinese censors by spreading news about new Astrill software all over the web. It appears some of the customers show no appreciation for our efforts nor they want open internet. Now you got what you asked for… It’s not working anymore. We can invent new technologies, we can defeat GFW but we don’t have a solution for stupidity. Dear “journalists” please spread this message as usual, all over the web and join DUMB CLUB.

Dumbclub FAQ #1

Q: I’m going to China to visit family for around a month and a half. How can I use things that are blocked in China, like YouTube and Google?

A: Astrill, Wannaflix, LetsVPN, Hong Kong SIM card, or self-hosted (e.g. Xray on VPS).

For useful links, see the summary of methods.

Dumbclub FAQ #2

Q: How can I watch videos that are geo-restricted to China from outside China?

A: Type into a search engine 回国vpn

Example of a search: https://duckduckgo.com/?q=回国vpn

VPN FAQ #3

Q: I installed a VPN, but now my device doesn’t work without the VPN. Why is that?

A: Probably your VPN installed some kind of kill-switch, or made a DNS server change, that hasn’t been cleared properly. Unless you have computer skills, you’ll need to contact your VPN provider for a solution. As a last resort, some operating systems (e.g. Windows) allow you to completely reset your networking.

VPN FAQ #4

Q: How do websites or streaming services know I’m using a VPN and block me?

A: Websites that don’t want you using a VPN block known VPN node IP addresses. Your only solution is to find a VPN provider with IP addresses your destination site doesn’t know about. Even so, it’ll only work until the site or streaming service updates its list of IP addresses.

Yes, it is possible to host a Tor obfs4 bridge on a Windows PC. Here’s how.

Decisions

You have a couple of decisions to make before you set up an obfs4 bridge.

  1. Is this intended to be a public bridge or a private bridge? A public bridge can be used by strangers all over the world, whereas a private bridge is just for you and your friends or co-workers.
  2. Which port numbers will you use? You’ll need two ports, one for communicating with the rest of the Tor network (the ORPort), and one for accepting input from your obfs4 bridge users (the ServerTransportListenAddr).

In the rest of this article, we’ll use as our examples:

  • 9167 as the ORPort
  • 9168 as the ServerTransportListenAddr

Home PC considerations

To be useful to users over the long term, you’ll need a more or less static IP address from your Internet service provider (ISP). It doesn’t have to be technically a “static” IP, but it does need to remain unchanged for months or years at a time.

Your ISP must not provide you with Internet service over Carrier-Grade NAT. CGNAT is a variant of Network Address Translation that is used by internet service providers (ISPs). CGNAT allows multiple customers to share a single, public IP address. You, on the contrary, must have your own IP address that is just for your household.

You must also have control over your home router. On that router, you need to know how to open ports and how to set up port forwarding. Your ORPort and your ServerTransportListenAddr need to be open and forwarded to the PC that’s going to host your obfs4 bridge. In both cases, the protocol to forward is TCP only. Consult the manual for your router to learn how to do this.

Finally, you must leave your PC permanently switched on, and you must configure Windows Settings so that your PC never goes to sleep.

Open Windows Firewall

  1. In the Windows search box, type firewall.
  2. Open Windows Defender Firewall with Advanced Security.
  3. In the left pane, click Inbound Rules.
  4. In the right pane, click New Rule.
  5. Add a Port rule to open port 9167/tcp, and name it Tor Bridge ORPort.
  6. Add a Port rule to open port 9168/tcp, and name it Tor Bridge ServerTransportListenAddr.
  7. Close Windows Defender Firewall with Advanced Security.

Get set up for signature verification

Download the GPG for Windows installer from https://www.gpg4win.org.

Right-click on the installer, select Properties, then select the Digital Signatures tab. Check the signature against the one displayed on the page https://www.gpg4win.org/package-integrity.html.

If the signatures match, run the installer. Accept the installer’s defaults. This includes the installation of the Kleopatra graphical user interface for Gpg4win.

Run Kleopatra.

Click Lookup on server. Search for the key with fingerprint 0xEF6E286DDA85EA2A4BA7DE684E2C6E8793298290. Kleopatra should find the Tor Browser Developers (signing key) for email address torbrowser@torproject.org. Select and import the Tor Browser Developers (signing key).

Note: If Kleopatra cannot find the key, then you can manually download it from https://keys.openpgp.org/vks/v1/by-fingerprint/EF6E286DDA85EA2A4BA7DE684E2C6E8793298290 and Import it yourself.

After successful import, right-click on Tor Browser Developers (signing key), and select Certify.

You will be prompted to create your own OpenPGP certificate. Follow the instructions to Create a certificate for yourself.

After doing that, you can click Certify for the Tor Browser Developers (signing key).

Download Tor Expert Bundle

Create a new directory, C:\tor.

In your browser, visit https://www.torproject.org/download/tor.

Download the latest Tor Expert Bundle for Windows (x86_64) and the corresponding signing key. Here are some examples of the file names you will see:

  • tor-expert-bundle-12.0.4-windows-x86_64.tar.gz
  • tor-expert-bundle-12.0.4-windows-x86_64.tar.gz.asc

In Kleopatra, click Decrypt/Verify.

Select the signature file (the one with .asc on the end of its name).

You should see the result Valid signature by torbrowser@torproject.org.

Download the 7-Zip installer from https://7-zip.org. Run the installer to install 7-Zip.

Right-click on tor-expert-bundle-12.0.4-windows-x86_64.tar.gz and use 7-Zip to extract it.

Now right-click on the inner archive, tor-expert-bundle-12.0.4-windows-x86_64.tar, and again use 7-Zip to extract it.

This creates folders data and tor.

Now copy the entire folders data and tor and all their contents into C:\tor.

Download obfs4proxy

In your browser, visit https://www.torproject.org/download/languages.

Download the 64-bit Windows installer and the corresponding signature file. Here are some examples of the file names you will see:

  • torbrowser-install-win64-12.0.4_ALL.exe
  • torbrowser-install-win64-12.0.4_ALL.exe.asc

In Kleopatra, click Decrypt/Verify.

Select the signature file (e.g. torbrowser-install-win64-12.0.4_ALL.exe.asc with .asc on the end of its name).

You should see the result Valid signature by torbrowser@torproject.org.

Now run the installer. In our example, that is the application named torbrowser-install-win64-12.0.4_ALL.exe.

You can uncheck the box to run Tor Browser.

After the install is complete, the folder on your desktop Tor Browser\Browser\TorBrowser\Tor\PluggableTransports contains an application named obfs4proxy.exe.

Copy obfs4proxy.exe into C:\tor\tor (i.e., the same folder as your main tor.exe application).

Update July 2, 2023

tor2: Hi, I’m attempting to follow the instructions for setting up a obfs4 bridge on Windows. In my instance, it is Windows 10. The instructions say to copy out the obfs4proxy.exe from: C:\Users\Desktop\Tor Browser\Browser\TorBrowser\Tor\PluggableTransports. However, there is no obfs4 file in this location or anywhere else within the tor browser bundle. In this location, there are only a snowflake exe and a lyrebird exe. I also checked the tor expert bundle and there is no obfs4 exe there. Any suggestions as to where I may find the obfs4 exe for Windows?

trinity-1686a: Hi, For reasons not totally clear to me (something related to meek and uTLS I think?) TorProject forked obfs4. To disambiguate with Yawning’s obfs4, the project was renamed to lyrebird. It should work the same as obfs4.exe for your use case. Would you mind creating a ticket in The Tor Project / Web / community · GitLab, or possibly a Merge Request, to update the documentation?

Install Tor as a service

Open a Command Prompt window with the option Run as administrator.

Issue the command:

1
C:\tor\tor\tor.exe --service install

You should see messages:

1
2
3
4
5
6
7
8
9
Running on a Post-Win2K OS, so we'll assume that the LocalService account exists.
IMPORTANT NOTE:
The Tor service will run under the account "NT AUTHORITY\LocalService". This means
that Tor will look for its configuration file under that
account's Application Data directory, which is probably not
the same as yours.
Done with CreateService.
Service installed successfully
Service started successfully

Configure Tor

Open Notepad with the option Run as administrator.

Create a torrc file, modeling the contents on the samples below.

Save the finished torrc file as C:\Windows\ServiceProfiles\LocalService\AppData\Roaming\tor\torrc (with no extension). You’ll need to have the option checked to view hidden items to see AppData folders.

In Windows File Explorer, check the box to view file extensions. See if Notepad has saved your torrc with .txt on the end. If so, rename the file so that there is no .txt on the end. It should be just torrc with no extension.

Sample torrc for public obfs4 bridge

1
2
3
4
5
6
7
8
9
10
11
12
13
14
Log notice file C:\tor\tor\log.txt
GeoIPFile C:\tor\data\geoip
GeoIPv6File C:\tor\data\geoip6
ORPort 9167
ExtORPort auto
BridgeRelay 1
PublishServerDescriptor bridge
ExitPolicy reject *:*
ServerTransportPlugin obfs4 exec C:\tor\tor\obfs4proxy.exe
ServerTransportListenAddr obfs4 0.0.0.0:9168
ContactInfo youremail[]yourdomain.com
Nickname ChooseNameHere
ControlPort 9051
CookieAuthentication 1

Sample torrc for private obfs4 bridge

1
2
3
4
5
6
7
8
9
10
11
12
13
14
15
Log notice file C:\tor\tor\log.txt
GeoIPFile C:\tor\data\geoip
GeoIPv6File C:\tor\data\geoip6
ORPort 9167
ExtORPort auto
BridgeRelay 1
PublishServerDescriptor 0
BridgeDistribution none
ExitPolicy reject *:*
ServerTransportPlugin obfs4 exec C:\tor\tor\obfs4proxy.exe
ServerTransportListenAddr obfs4 0.0.0.0:9168
ContactInfo youremail[]yourdomain.com
Nickname ChooseNameHere
ControlPort 9051
CookieAuthentication 1

Restart Tor with new torrc

In the Windows search box type services, and open the Services app with the option Run as administrator.

Select the service Tor Win32 Service.

Stop and then Start the service.

Find your obfs4 bridge line

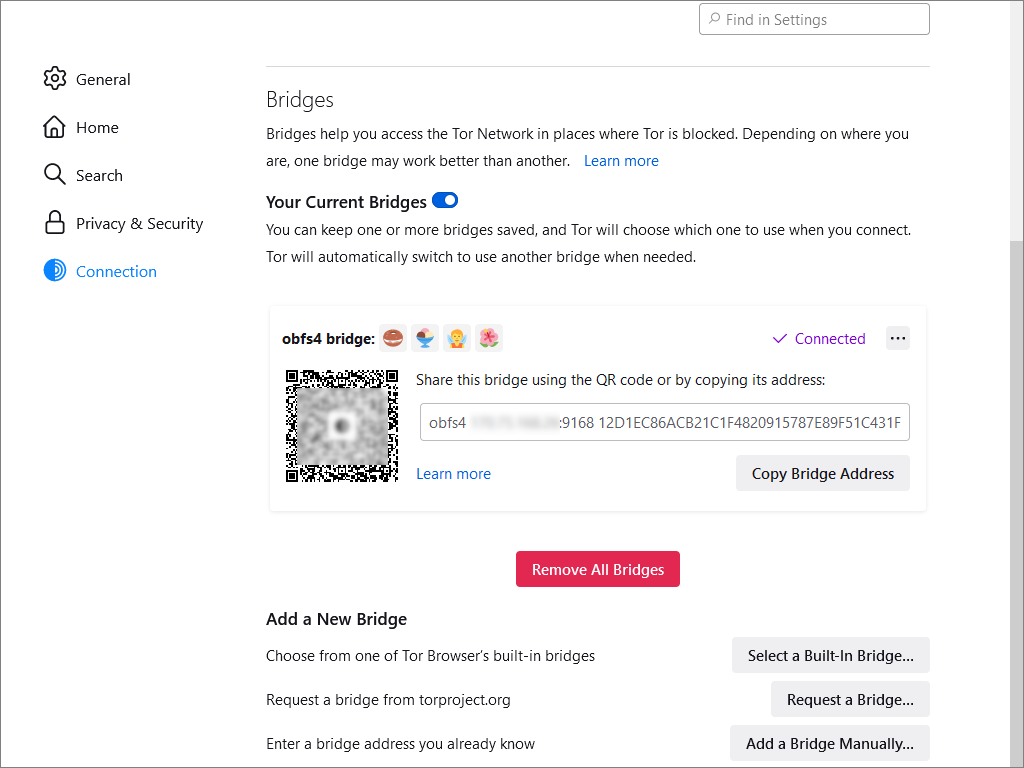
Your folder C:\Windows\ServiceProfiles\LocalService\AppData\Roaming\tor should contain a folder pt_state. Within that is a file obfs4_bridgeline.txt that shows your obfs4 bridge line.

Example before substituting in values for placeholders:

1
Bridge obfs4 <IP ADDRESS>:<PORT> <FINGERPRINT> cert=Umj6a5ICzeNEHHx11MDeGk4fqnLM5I4EJHCmXv+T6LwwpryqAfWf7+tx8e/Fz0ktZUZXJw iat-mode=0

The <IP ADDRESS> is the public IP address of your PC, which in a typical home set-up is actually the public IP address of your home router.

The <PORT> in our example is 9168.

The <FINGERPRINT> (e.g. 12D1EC86ACB21C1F4820915787E89F51C431F284) is shown in the log file C:\tor\tor\log.txt. Example:

1
Your Tor server's identity key  fingerprint is 'ChooseNameHere 12D1EC86ACB21C1F4820915787E89F51C431F284'

Test your bridge

Test your access to the Tor network, using your bridge, from a PC outside your home network.

Add a bridge manually in Tor Browser

If you have any problems, see if you can telnet to your bridge IP address and port.

Also check the log file C:\tor\tor\log.txt for messages.

Publicize bridge

A public bridge is automatically distributed to anonymous users by the Tor Project.

For a private bridge, you must manually distribute the obfs4 bridge line to your friends or co-workers. You must also explain to them how to configure their Tor Browser to use your obfs4 bridge line.

0%