Linux server

You will need a server, a domain name, and a hostname DNS A record (or AAAA or IPv6). Our example domain name will be example.com, and our example hostname will be vps5.example.com.

Open ports tcp/80, tcp/443, and udp/443 in the server firewall. Note that Hysteria uses UDP.

Update server:

1
apt update && apt upgrade -y

Download the OpenVPN install script from https://github.com/angristan/openvpn-install:

1
2
curl -O https://raw.githubusercontent.com/angristan/openvpn-install/master/openvpn-install.sh
chmod +x openvpn-install.sh

Then run it:

1
./openvpn-install.sh

When prompted, specify your server public IP address. You can use the default port of udp/1194. This need not be open in your server firewall, since traffic arrives via Hysteria.

Give your first client a name, e.g. windows. The client configuration file is written to /root/windows.ovpn (in this example).

The OpenVPN install script opens port udp/1194 in iptables. If you want to further conceal your server, close this port by manually editing /etc/iptables/add-openvpn-rules.sh and /etc/iptables/rm-openvpn-rules.sh. Remove the lines for udp/1194 in both files. Then reboot.

Install Hysteria on the server using the script provided by the Hysteria developers:

1
bash <(curl -fsSL https://get.hy2.sh)

Edit the server configuration file at /etc/hysteria/config.yaml using an editor such as vi or nano. Specify your server hostname, your email, and your choice of password (or use the default generated by the install script). Optionally you can also change the masquerade URL. See the Hysteria2 documentation.

1
2
3
4
5
6
7
8
9
10
11
12
13
14
15
16
# listen: :443

acme:
domains:
- vps5.example.com
email: cscot@example.com

auth:
type: password
password: me4asbXgfACRHnJv7z6SPrhW

masquerade:
type: proxy
proxy:
url: https://news.ycombinator.com/
rewriteHost: true

Save the file.

Optionally set the log level by editing the file /etc/systemd/system/hysteria-server.service:

1
Environment=HYSTERIA_LOG_LEVEL=debug

If you make this change, then after saving the file also do:

1
systemctl daemon-reload

Start your Hysteria server with:

1
systemctl start hysteria-server

Configure Hysteria to start on system boot with:

1
systemctl enable hysteria-server

You can view the server log at any time with:

1
journalctl -u hysteria-server

Windows client

Download the latest Hysteria for Windows from https://github.com/apernet/hysteria/releases. The file you need for most Windows PCs will be hysteria-windows-amd64.exe.

Create a configuration file config.yaml in the same directory as hysteria-windows-amd64.exe, which by default will be Downloads.

Make the client config.yaml match your server address and password, and your bandwidth capabilities. For example:

1
2
3
4
5
6
7
8
9
10
11
12
13
14
15
16
17
18
server: vps5.example.com:443 

auth: me4asbXgfACRHnJv7z6SPrhW

bandwidth:
up: 10 mbps
down: 20 mbps

socks5:
listen: 127.0.0.1:10808

http:
listen: 127.0.0.1:10809

udpForwarding:
- listen: 127.0.0.1:1194
remote: 127.0.0.1:1194
timeout: 20s

See the documentation for details of the client configuration file.

Open a Command Prompt window and change into your Downloads directory.

1
cd Downloads

Optionally set the log level:

1
set HYSTERIA_LOG_LEVEL=debug

Start the program with the configuration file config.yaml:

1
.\hysteria-windows-amd64.exe

Leave the Command Prompt window open with Hysteria running in it.

You can view the client log at any time by looking at the Command Prompt window.

Open a PowerShell window. Securely download the generated client configuration file from the server, e.g.:

1
scp root@vps5.example.com:/root/windows.ovpn Downloads

Edit the file Downloads/windows.ovpn in an editor such as Notepad or Notepad++.

Make it look as if the remote server is on localhost by changing the remote line to read:

1
remote 127.0.0.1 1194

Also insert these two lines, replacing YOUR.SERVER.IP.ADDRESS by your actual server IP address:

1
2
route YOUR.SERVER.IP.ADDRESS 255.255.255.255 net_gateway
block-outside-dns

Save the file.

If you have not already done so, install the OpenVPN GUI client for Windows from https://openvpn.net/community-downloads.

Import the amended client configuration file Downloads/windows.ovpn into the OpenVPN GUI.

Connect the OpenVPN client to the OpenVPN server.
Now that Hysteria2 is officially released, there is a Hysteria2 install script. This post demonstrates the install process using the official script.

Hysteria2 uses a custom version of the QUIC (Quick UDP Internet Connections) protocol to deliver unparalleled performance over unreliable or lossy networks. The protocol is designed to masquerade as standard HTTP/3 traffic, making it difficult to detect and block without widespread collateral damage. Hysteria2 is almost a complete rewrite of the original Hysteria, with a new protocol and new features. Version 2 documentation is at https://v2.hysteria.network. Hysteria2 is not compatible with the original Hysteria, so users must choose either version 1 or version 2 for both client and server.

Hysteria 是暴力多倍发包吗?

Linux server

You will need a server, a domain name, and a hostname DNS A record (or AAAA or IPv6).

Open ports tcp/80, tcp/443, and udp/443 in the server firewall. Note that Hysteria uses UDP.

Install Hysteria on the server using script provided by the Hysteria developers:

1
bash <(curl -fsSL https://get.hy2.sh)

Edit the server configuration file at /etc/hysteria/config.yaml using an editor such as vi or nano. Specify your server hostname, your email, and your choice of password (or use the default generated by the install script). Optionally you can also change the masquerade URL. See the Hysteria2 documentation.

1
2
3
4
5
6
7
8
9
10
11
12
13
14
15
16
# listen: :443

acme:
domains:
- vps4.example.com
email: cscot@example.com

auth:
type: password
password: DwrfLQxpFprtwqUbkZOEDKiw

masquerade:
type: proxy
proxy:
url: https://news.ycombinator.com/
rewriteHost: true

Save the file.

Start your Hysteria server with:

1
systemctl start hysteria-server

Configure Hysteria to start on system boot with:

1
systemctl enable hysteria-server

Windows client

Download the latest Hysteria for Windows from https://github.com/apernet/hysteria/releases. The file you need for most Windows PCs will be hysteria-windows-amd64.exe.

Create a configuration file config.yaml in the same directory as hysteria-windows-amd64.exe, which by default will be Downloads.

Make the client config.yaml match your server address and password, and your bandwidth capabilities. For example:

1
2
3
4
5
6
7
8
9
10
11
12
13
server: vps4.example.com:443 

auth: DwrfLQxpFprtwqUbkZOEDKiw

bandwidth:
up: 10 mbps
down: 20 mbps

socks5:
listen: 127.0.0.1:10808

http:
listen: 127.0.0.1:10809

See the documentation for details of the client configuration file.

Open a Command Prompt window and change into your Downloads directory.

1
cd Downloads

Optionally set the log level:

1
set HYSTERIA_LOG_LEVEL=debug

Start the program with the configuration file config.yaml:

1
.\hysteria-windows-amd64.exe

Leave the Command Prompt window open with Hysteria running in it.

Now either proxy an individual browser to 127.0.0.1 port 10808 or set the Windows system proxy (Settings > Network & Internet > Proxy > Manual proxy setup).

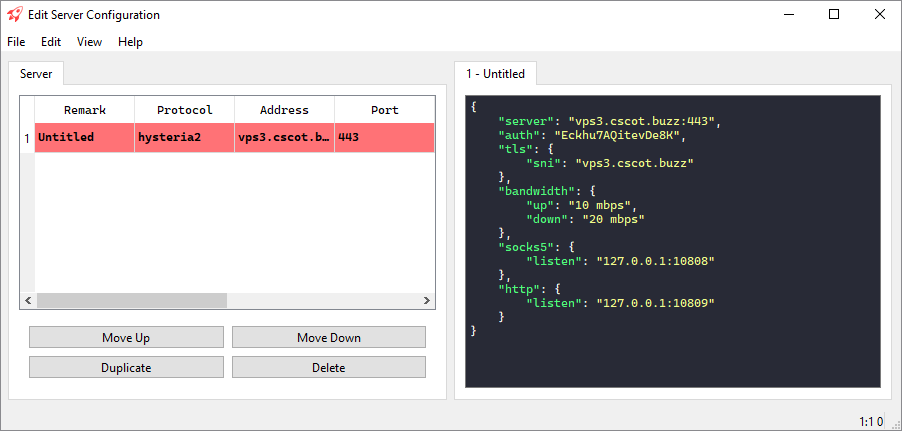
Furious edit server screen

Hysteria2 uses a custom version of the QUIC (Quick UDP Internet Connections) protocol to deliver unparalleled performance over unreliable or lossy networks. The protocol is designed to masquerade as standard HTTP/3 traffic, making it difficult to detect and block without widespread collateral damage. Hysteria2 is almost a complete rewrite of the original Hysteria, with a new protocol and new features. Version 2 documentation is at https://v2.hysteria.network. Hysteria2 is not compatible with the original Hysteria, so users must choose either version 1 or version 2 for both client and server.

Furious is a cross-platform GUI client that supports Xray-core and hysteria.

This post documents a procedure for using Hysteria2 on a Linux server and accessing it from a Furious client on Windows.

If you need support:

  • For Hysteria problems, see the Troubleshooting page, and if you still need support, go to the GitHub Issues page.
  • For Furious, see the wiki and the Issues page.

Hysteria2 server

The main installation instructions for Hysteria2 are at https://v2.hysteria.network/docs/getting-started/Installation. This demonstration uses material from https://github.com/chika0801/hysteria-install.

The server in this scenario has 1 GB of RAM and runs Ubuntu 22.04. It is assumed that you SSH into your server as root.

You will need a domain name and a DNS record pointing from your hostname to your server IP address. Our examples use vps3.example.com as the sample hostname.

When using standalone mode to apply for or renew a certificate, the script will listen on port tcp/80. If port tcp/80 is occupied, the script will fail. Therefore nothing else should be listening on port tcp/80.

As well as opening port tcp/80 in your firewall, you will also need to open port udp/443 for the Hysteria server. Note that Hysteria uses UDP.

Set up the ACME script ready to request a free SSL certificate and private key from Let’s Encrypt:

1
apt install -y socat
1
curl https://get.acme.sh | sh
1
alias acme.sh=~/.acme.sh/acme.sh
1
acme.sh --upgrade --auto-upgrade
1
acme.sh --set-default-ca --server letsencrypt

Request a free Elliptic Curve Cryptography certificate for your hostname in standalone mode. Change vps3.example.com to your real hostname in this command:

1
acme.sh --issue -d vps3.example.com --standalone --keylength ec-256

Install the SSL certificate and key to the /etc/ssl/private directory. Change vps3.example.com to your real hostname in this command:

1
acme.sh --install-cert -d vps3.example.com --ecc --fullchain-file /etc/ssl/private/fullchain.cer --key-file /etc/ssl/private/private.key

Force certificate renewal. Change vps3.example.com to your real hostname in this command:

1
acme.sh --renew -d vps3.example.com --force --ecc

Install the Hysteria program on your server:

1
curl -Lo /root/hysteria https://github.com/apernet/hysteria/releases/latest/download/hysteria-linux-amd64 && chmod +x /root/hysteria && mv -f /root/hysteria /usr/local/bin

Check the installation of Hysteria2 has worked:

1
hysteria version

Download the configuration template:

1
curl -Lo /root/hysteria_config.yaml https://raw.githubusercontent.com/chika0801/hysteria-install/main/config_server.yaml

Edit the configuration file. If you prefer the vi editor:

1
vi ~/hysteria_config.yaml

If you prefer the nano editor:

1
nano ~/hysteria_config.yaml

Change at least the TLS locations and the password. Here is an example. For explanations see the Hysteria2 documentation.

1
2
3
4
5
6
7
8
9
10
11
12
13
14
15
16
17
18
19
listen: :443

tls:
cert: /etc/ssl/private/fullchain.cer
key: /etc/ssl/private/private.key

auth:
type: password
password: Eckhu7AQitevDe8K

resolver:
type: https
https:
addr: 1.1.1.1:443
timeout: 10s

acl:
inline:
- reject(geoip:cn)

Save the file.

Download the systemd service file:

1
curl -Lo /etc/systemd/system/hysteria.service https://raw.githubusercontent.com/chika0801/hysteria-install/main/hysteria.service && systemctl daemon-reload

Start the service:

1
systemctl enable hysteria
1
systemctl start hysteria

Check that Hysteria is active (running) on the server:

1
systemctl status hysteria

If necessary, check the log:

1
journalctl -u hysteria

Check that Hysteria is listening on port udp/443:

1
ss -tulpn

Exit your SSH session with the server:

1
exit

Furious client

Now go to work on the PC that will be your client.

Prepare a JSON client configuration that matches your server. For example:

1
2
3
4
5
6
7
8
9
10
11
12
13
14
15
16
17
{
"server": "vps3.example.com:443",
"auth": "Eckhu7AQitevDe8K",
"tls": {
"sni": "vps3.example.com"
},
"bandwidth": {
"up": "10 mbps",
"down": "20 mbps"
},
"socks5": {
"listen": "127.0.0.1:10808"
},
"http": {
"listen": "127.0.0.1:10809"
}
}

Copy the client JSON configuration to your PC clipboard.

Open a browser, and go to the Furious releases page on GitHub.

Download the latest version for Windows, e.g. Furious-0.2.6-windows-x86_64.zip.

Extract the archive.

Launch the application Furious.exe.

If Windows Defender SmartScreen appears, click Run anyway.

Right-click the Furious icon in the Windows system tray to bring up the context menu.

Select Import > Import JSON Configuration from Clipboard.

You should see a message, Import JSON confuguration success.

Right-click the Furious icon in the Windows system tray again to once more bring up the context menu.

Select Connect.

Now you can either proxy an individual browser, or set the Windows system proxy, to use the SOCKS5 proxy server on localhost port 10808 (in our example).

This architecture is a result of discussion #2530 on GitHub.

1
2
3
4
5
6
7
8
9
10
11
12
13
14
15
16
17
18
19
20
21
22
23
24
+-------------------+
| Client device |
| |
| WireGuard peer |
| |
+---------+---------+
|
|
V
+-------------------+
| Relay server |
| |
| Xray client |
| |
+---------+---------+
|
|
V
+-------------------+
| Final server |
| |
| Xray server |
| WireGuard peer |
+-------------------+

Final server

Install WireGuard using https://github.com/angristan/wireguard-install:

1
2
3
curl -O https://raw.githubusercontent.com/angristan/wireguard-install/master/wireguard-install.sh
chmod +x wireguard-install.sh
./wireguard-install.sh

The generated server configuration file /etc/wireguard/wg0.conf looks like this:

1
2
3
4
5
6
7
8
9
10
11
12
13
14
15
16
17
18
19
20
21
22
[Interface]
Address = 10.66.66.1/24,fd42:42:42::1/64
ListenPort = 51820
PrivateKey = mNsFzYlqLAbgo5CiD3PUuhziLTq/huHJSa2GHfQd2nA=
PostUp = iptables -I INPUT -p udp --dport 51820 -j ACCEPT
PostUp = iptables -I FORWARD -i ens3 -o wg0 -j ACCEPT
PostUp = iptables -I FORWARD -i wg0 -j ACCEPT
PostUp = iptables -t nat -A POSTROUTING -o ens3 -j MASQUERADE
PostUp = ip6tables -I FORWARD -i wg0 -j ACCEPT
PostUp = ip6tables -t nat -A POSTROUTING -o ens3 -j MASQUERADE
PostDown = iptables -D INPUT -p udp --dport 51820 -j ACCEPT
PostDown = iptables -D FORWARD -i ens3 -o wg0 -j ACCEPT
PostDown = iptables -D FORWARD -i wg0 -j ACCEPT
PostDown = iptables -t nat -D POSTROUTING -o ens3 -j MASQUERADE
PostDown = ip6tables -D FORWARD -i wg0 -j ACCEPT
PostDown = ip6tables -t nat -D POSTROUTING -o ens3 -j MASQUERADE

### Client ipad
[Peer]
PublicKey = x3gUQWXY/xwDpnwYWnY74YaHiSedwpq8PO6JUkWKzCA=
PresharedKey = a9gptxKx6tpSlBHJp26jGBgbCbwjJewXTQByq1gjuHo=
AllowedIPs = 10.66.66.2/32,fd42:42:42::2/128

The generated client configuration file /root/wg0-client-ipad.conf, original and unaltered, looks like this:

1
2
3
4
5
6
7
8
9
10
[Interface]
PrivateKey = cJ+nZUGp83hV/KSysP91YpahDJ293wiiQ6TZRrDiT3k=
Address = 10.66.66.2/32,fd42:42:42::2/128
DNS = 1.1.1.1,1.0.0.1

[Peer]
PublicKey = t6JhTWXw2HXVgiY8NW2AZfugQd5KYZmq18d3AFwcECs=
PresharedKey = a9gptxKx6tpSlBHJp26jGBgbCbwjJewXTQByq1gjuHo=
Endpoint = FINAL.SERVER.IP.ADDRESS:51820
AllowedIPs = 0.0.0.0/0,::/0

Install Xray from https://github.com/XTLS/Xray-install:

1
bash -c "$(curl -L https://github.com/XTLS/Xray-install/raw/main/install-release.sh)" @ install --beta -u root

Generate UUID:

1
xray uuid

Example:

1
6a0ce07a-6e2c-43a1-9e46-db287f74d34a

Generate public-private key pair:

1
xray x25519

Example:

1
2
Private key: 4JLxQQ9axlmz5sRAGvxwV4zSOiA-uwUfLc0HuGT6RH4
Public key: JglJK7YsfQYWfGFqIs9r9Uz8WPxjReiqYFFeISielg4

Generate short id:

1
openssl rand -hex 8

Example:

1
2f35d1c3636c2b2e

Edit the Xray server configuration file /usr/local/etc/xray/config.json and make it look like this:

1
2
3
4
5
6
7
8
9
10
11
12
13
14
15
16
17
18
19
20
21
22
23
24
25
26
27
28
29
30
31
32
33
34
35
36
37
38
39
40
41
42
43
44
{
"log": {
"loglevel": "warning"
},
"inbounds": [
{
"listen": "0.0.0.0",
"port": 443,
"protocol": "vless",
"settings": {
"clients": [
{
"id": "6a0ce07a-6e2c-43a1-9e46-db287f74d34a",
"flow": ""
}
],
"decryption": "none"
},
"streamSettings": {
"network": "h2",
"security": "reality",
"realitySettings": {
"show": false,
"dest": "www.cisco.com:443",
"xver": 0,
"serverNames": [
"www.cisco.com"
],
"privateKey": "4JLxQQ9axlmz5sRAGvxwV4zSOiA-uwUfLc0HuGT6RH4",
"shortIds": [
"2f35d1c3636c2b2e"
]
}
}
}
],
"outbounds": [
{
"protocol": "freedom",
"tag": "direct",
"redirect": "127.0.0.1:51820"
}
]
}

Restart the Xray systemd service with this configuration file:

1
systemctl restart xray

Open port tcp/443 in this server’s firewall.

You now have Xray listening on tcp/443 and WireGuard listening on udp/51820 (which need not be open in this server’s firewall).

Relay server

Install Xray from https://github.com/XTLS/Xray-install:

1
bash -c "$(curl -L https://github.com/XTLS/Xray-install/raw/main/install-release.sh)" @ install --beta -u root

Edit the Xray server configuration file /usr/local/etc/xray/config.json and make it look like this. Note that the Xray client will accept dokodemo-door input on port udp/51820.

1
2
3
4
5
6
7
8
9
10
11
12
13
14
15
16
17
18
19
20
21
22
23
24
25
26
27
28
29
30
31
32
33
34
35
36
37
38
39
40
41
42
43
44
45
46
47
48
49
50
{
"log": {
"loglevel": "warning"
},
"inbounds": [
{
"tag":"wireguard",
"port": 51820,
"protocol":"dokodemo-door",
"settings":{
"address":"0.0.0.0",
"port":51820,
"network":"udp"
}
}
],
"outbounds": [
{
"protocol": "vless",
"settings": {
"vnext": [
{
"address": "FINAL.SERVER.IP.ADDRESS",
"port": 443,
"users": [
{
"id": "6a0ce07a-6e2c-43a1-9e46-db287f74d34a",
"encryption": "none",
"flow": ""
}
]
}
]
},
"streamSettings": {
"network": "h2",
"security": "reality",
"realitySettings": {
"show": false,
"fingerprint": "chrome",
"serverName": "www.cisco.com",
"publicKey": "JglJK7YsfQYWfGFqIs9r9Uz8WPxjReiqYFFeISielg4",
"shortId": "2f35d1c3636c2b2e",
"spiderX": ""
}
},
"tag": "proxy"
}
]
}

Restart the Xray systemd service with this configuration file:

1
systemctl restart xray

Open port udp/51820 in this server’s firewall.

This server is now listening for public input on udp/51820, and whatever it gets will be sent by dokodemo-door to the Xray server.

Client device

Securely download the generated client configuration file from the final server.

Edit the apparent destination to be your relay server IP address, not your final server IP address:

1
2
3
4
5
6
7
8
9
10
[Interface]
PrivateKey = cJ+nZUGp83hV/KSysP91YpahDJ293wiiQ6TZRrDiT3k=
Address = 10.66.66.2/32,fd42:42:42::2/128
DNS = 1.1.1.1,1.0.0.1

[Peer]
PublicKey = t6JhTWXw2HXVgiY8NW2AZfugQd5KYZmq18d3AFwcECs=
PresharedKey = a9gptxKx6tpSlBHJp26jGBgbCbwjJewXTQByq1gjuHo=
Endpoint = RELAY.SERVER.IP.ADDRESS:51820
AllowedIPs = 0.0.0.0/0,::/0

If you have not already done so, install WireGuard on the client as per https://www.wireguard.com/install.

Add a tunnel (i.e., your edited configuration file).

Connect your client to the relay server, which will in turn whisk your traffic over Xray to the final server.

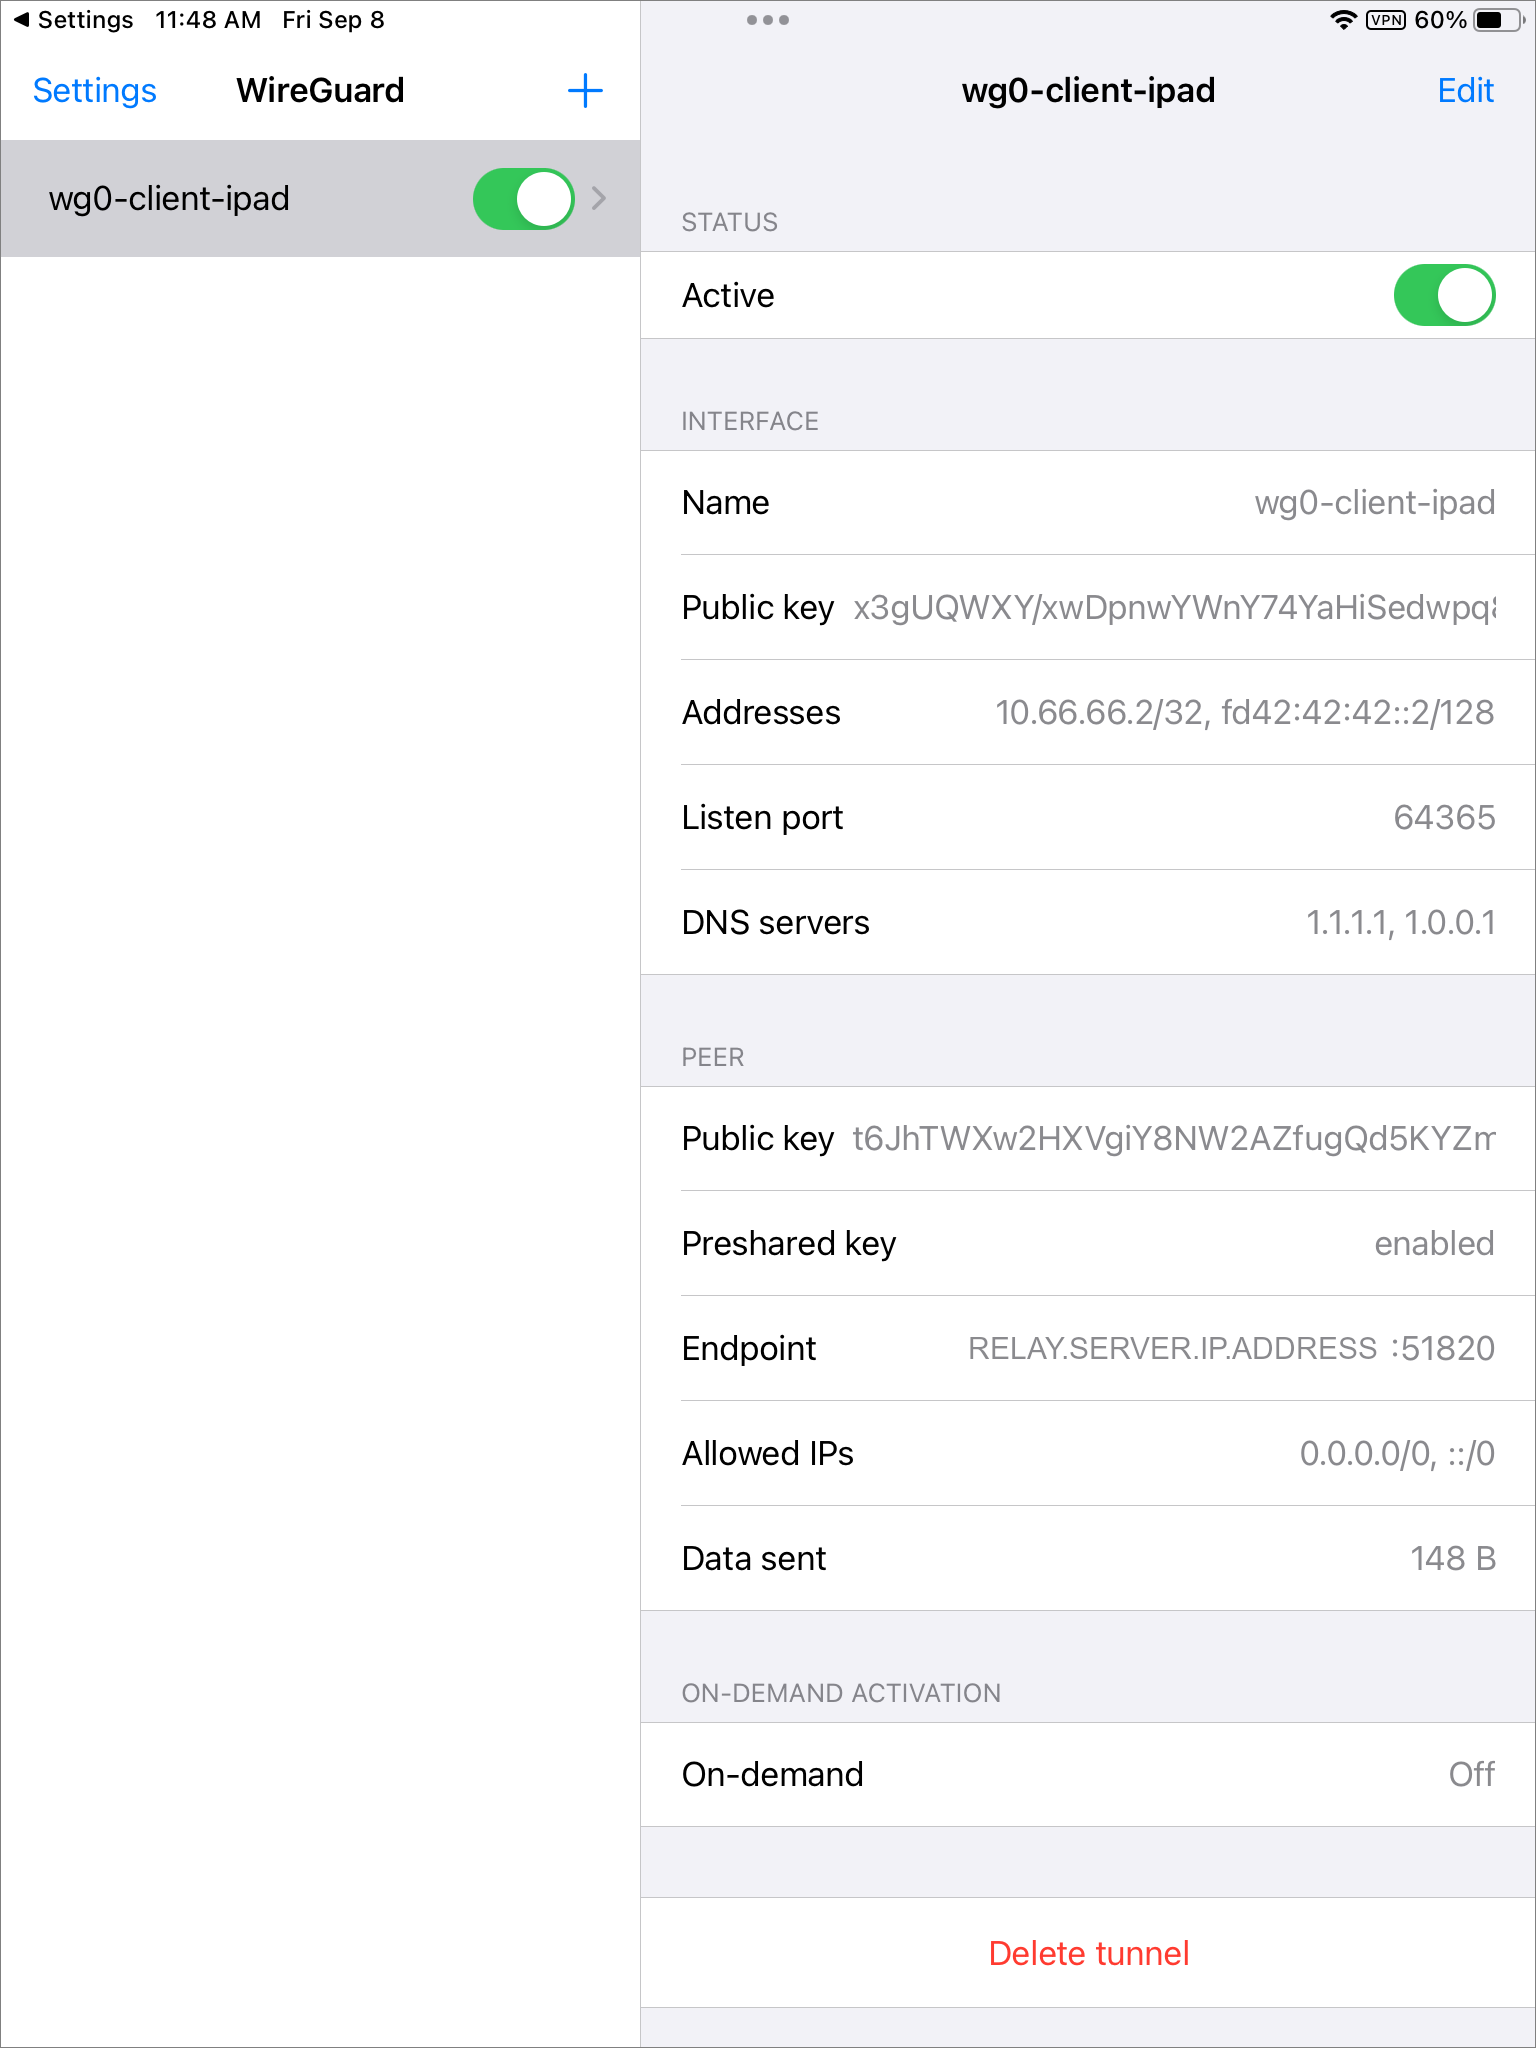
WireGuard client on an iPad

NekoRay version 3.20 adds support for Hysteria2.

NekoRay is a cross-platform GUI for managing connections to proxy servers. It is built on the Qt development framework for cross-platform applications. NekoRay currently supports Windows and Linux. Older versions supported macOS, but this was removed due to lack of a maintainer. If you are willing to fix and update the code, you are welcome to submit your Pull Request.

Hysteria2 uses a custom version of the QUIC (Quick UDP Internet Connections) protocol to deliver unparalleled performance over unreliable or lossy networks. The protocol is designed to masquerade as standard HTTP/3 traffic, making it difficult to detect and block without widespread collateral damage. Hysteria2 is almost a complete rewrite of the original Hysteria, with a new protocol and new features. Version 2 documentation is at https://v2.hysteria.network. Hysteria2 is not compatible with the original Hysteria, so users must choose either version 1 or version 2 for both client and server.

This post documents a procedure for using Hysteria2 on a Linux server and accessing it from a NekoRay client on Windows.

If you experience problems:

  • For NekoRay problems, set the log level to debug (in Basic Settings) and create an issue on the GitHub Issues page.
  • For Hysteria problems, see the Troubleshooting page, and if you still need support, go to the GitHub Issues page.

Hysteria2 server

The main installation instructions for Hysteria2 are at https://v2.hysteria.network/docs/getting-started/Installation. This demonstration uses material from https://github.com/chika0801/hysteria-install.

The server in this scenario has 1 GB of RAM and runs Ubuntu 22.04. It is assumed that you SSH into your server as root.

You will need a domain name and a DNS record pointing from your hostname to your server IP address. Our examples use vps.example.com as the sample hostname.

When using standalone mode to apply for or renew a certificate, the script will listen on port tcp/80. If port tcp/80 is occupied, the script will fail. Therefore nothing else should be listening on port tcp/80.

As well as opening port tcp/80 in your firewall, you will also need to open port udp/443 for the Hysteria server. Note that Hysteria uses UDP.

Set up the ACME script ready to request a free SSL certificate and private key from Let’s Encrypt:

1
apt install -y socat
1
curl https://get.acme.sh | sh
1
alias acme.sh=~/.acme.sh/acme.sh
1
acme.sh --upgrade --auto-upgrade
1
acme.sh --set-default-ca --server letsencrypt

Request a free Elliptic Curve Cryptography certificate for your hostname in standalone mode. Change vps.example.com to your real hostname in this command:

1
acme.sh --issue -d vps.example.com --standalone --keylength ec-256

Install the SSL certificate and key to the /etc/ssl/private directory. Change vps.example.com to your real hostname in this command:

1
acme.sh --install-cert -d vps.example.com --ecc --fullchain-file /etc/ssl/private/fullchain.cer --key-file /etc/ssl/private/private.key

Force certificate renewal. Change vps.example.com to your real hostname in this command:

1
acme.sh --renew -d vps.example.com --force --ecc

Install the Hysteria program on your server:

1
curl -Lo /root/hysteria https://github.com/apernet/hysteria/releases/latest/download/hysteria-linux-amd64 && chmod +x /root/hysteria && mv -f /root/hysteria /usr/local/bin

Check the installation of Hysteria2 has worked:

1
hysteria version

Download the configuration template:

1
curl -Lo /root/hysteria_config.yaml https://raw.githubusercontent.com/chika0801/hysteria-install/main/config_server.yaml

Edit the configuration file. If you use the vi editor:

1
vi ~/hysteria_config.yaml

If you use the nano editor:

1
nano ~/hysteria_config.yaml

Change at least the TLS locations and the password. For example:

1
2
3
4
5
6
7
8
9
10
11
12
13
14
15
16
17
18
19
listen: :443

tls:
cert: /etc/ssl/private/fullchain.cer
key: /etc/ssl/private/private.key

auth:
type: password
password: gnxMEu8zV5XMPTv9

resolver:
type: https
https:
addr: 1.1.1.1:443
timeout: 10s

acl:
inline:
- reject(all, udp/443)

Save the file.

Download the systemd service file:

1
curl -Lo /etc/systemd/system/hysteria.service https://raw.githubusercontent.com/chika0801/hysteria-install/main/hysteria.service && systemctl daemon-reload

Start the service:

1
systemctl enable hysteria
1
systemctl start hysteria

Check that Hysteria is active (running) on the server:

1
systemctl status hysteria

If necessary, check the log:

1
journalctl -u hysteria

Check that Hysteria is listening on port udp/443:

1
ss -tulpn

NekoRay client

Go to the NekoRay releases page on GitHub.

Download version 3.20 or later, e.g. nekoray-3.20-2023-09-07-windows64.zip.

Extract the archive to give a folder nekoray-3.20-2023-09-07-windows64\nekoray.

The first time you run nekoray.exe, you may see Windows Defender SmartScreen. Allow the program to Run anyway.

You are asked to decide whether you want to use Xray or sing-box as your core. Xray is widely used and has good compatibility with other protocols and clients. More new protocols are supported by sing-box, and in some cases these give better performance.

Since this scenario uses Hysteria2, choose sing-box as your core.

The GUI appears.

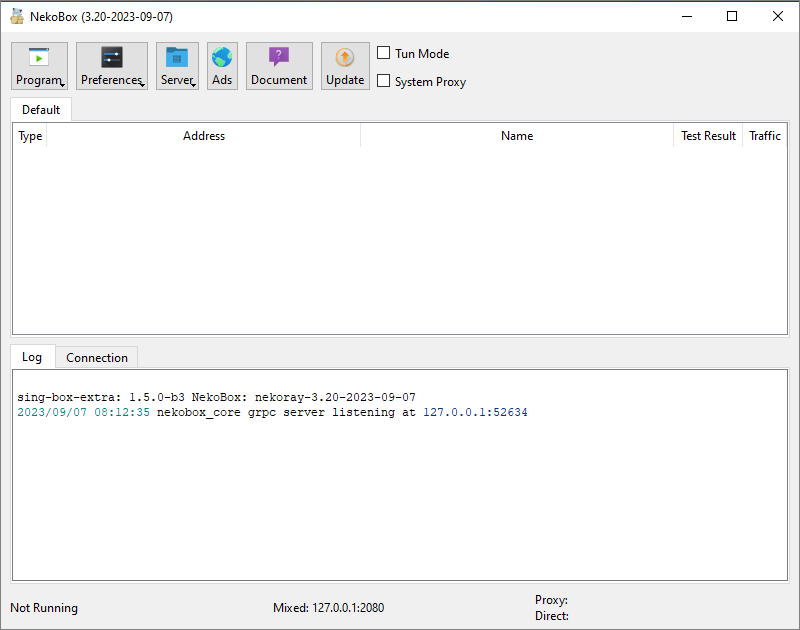
Nekoray graphical user interface

Look at the log pane at the bottom of the window. You need to see a message confirming you have at least sing-box-extra version 1.5.0 to support Hysteria2.

Notice that there is a Tun Mode and a System Proxy mode. You can enable either of these by checking the boxes at the top of the user interace. Tun Mode will proxy the traffic of the entire system, which is suitable for software that cannot or will not use the System Proxy. Browsers can use the System Proxy setting.

In this scenario, check the box for System Proxy.

If you want to check the proxy settings in NekoRay, go to Preferences > Basic Settings > Common, you will see that once you connect, a combined SOCKS and HTTP proxy will start listening on localhost port tcp/2080

Some other buttons to notice:

  • Server is where we will add the server in a moment.
  • Ads takes you to unscreened airport ads at https://matsuricom.pages.dev
  • Document takes you to https://matsuridayo.github.io.
  • Update attempts to update the software.
  • You can reach the NekoRay context menu by right-clicking the NekoRay icon in the Windows system tray.

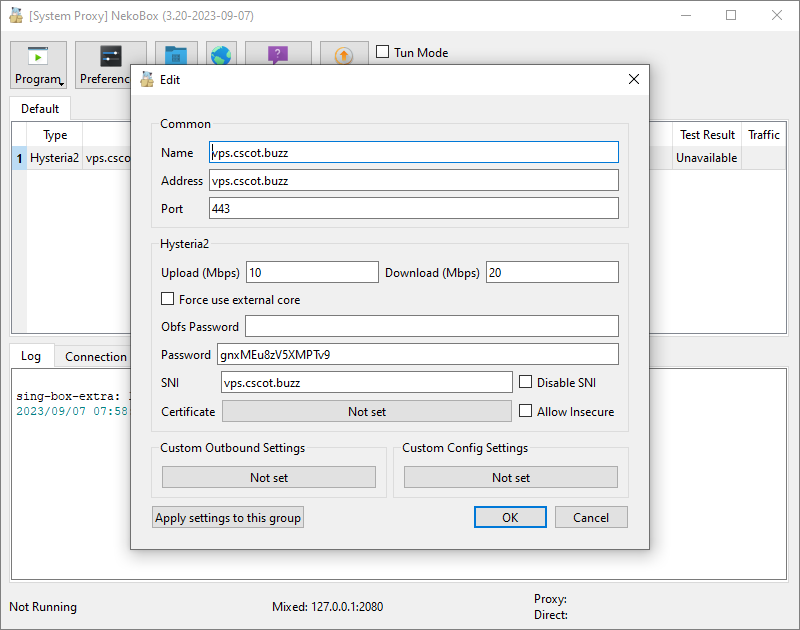
In the NekoRay GUI, select Server then New profile.

Add the details of your server:

Nekoray server new profile

Click OK to add the new server profile.

Select the server’s row, and press Enter to start the connection.

Here’s some simple ideas you can use to investigate problems with VPNs and proxy servers.

  1. Make sure the service is running on the server. Assuming your proxy server runs under systemd, that would mean issuing commands such as systemctl status xray, systemctl status openvpn@server, or systemctl status tor@default (these are just examples of systemctl status commands).

  2. Review the logs on both ends of the connection (server and client). On the server, issue appropriate commands such as journalctl -u xray or tail /var/log/nginx/error.log (these are just examples), depending on what software you are running and how you are running it. Also view the logs on your client.

  3. What is listening on the server and on what ports and protocols? Issue the command ss -tulpn and make sure the results are as expected. Is your server listening where you expect it to be listening?

  4. Is your server IP address reacheable? Issue the ping command on the client.

  5. If you are using TCP, is your TCP port reachable? Attempt to telnet to your TCP port. Can you reach that port, and does it let you connect?

  6. Are packets arriving at your firewall as expected? iptables and nftables both allow you to count packets for each input port and protocol.

  7. Double-check and triple-check that your configuration files match. You’d be amazed how many problems turn out to be due to mismatches between server configuration and client configuration.

  8. Search for previous occurrences of any error messages in a search engine and on the GitHub issues tab for your software repository.

  9. Run tcpdump on the server and make sure packets are arriving as your expect. The equivalent for GUI clients is Wireshark. Make sure the expected packets are going out to the expected destination.

  10. If you’re going to ask for help, produce all the evidence you’ve collected so far, along with the complete instructions that someone else would need to recreate your environment (both server and client).

This post is about how to install the current version of Hysteria, whose GitHub repo is at https://github.com/apernet/hysteria. For a preview of Hysteria 2, see https://github.com/chika0801/hysteria-install.

Server

Domain name

You need to purchase a domain name (e.g. example.com).

Point the hostname (e.g. vps.example.com) to your VPS IP address. Wait about 2-5 minutes for DNS resolution to take effect. You can check whether the returned IP address is correct by pinging the hostname you set. For example:

1
ping vps.example.com

Firewall

Open ports in your server firewall:

  • tcp/80 for ACME to use to apply for or renew your SSL certificate
  • udp/36712 for Hysteria (change the port number from this default, of course)

SSL certificate and key

When using standalone mode to apply for or renew a certificate, the script will listen on port tcp/80. If port tcp/80 is occupied, the script will fail. Therefore nothing else should be listening on port tcp/80.

In the sample commands below

Install the ACME shell script:

1
apt install -y socat
1
curl https://get.acme.sh | sh

Set a shorter alias for the ACME shell script:

1
alias acme.sh=~/.acme.sh/acme.sh

Set up ACME shell script auto-update:

1
acme.sh --upgrade --auto-upgrade

Change the default Certificate Authority to Let’s Encrypt:

1
acme.sh --set-default-ca --server letsencrypt

Apply for an Elliptic Curve Cryptography certificate for vps.example.com in standalone mode:

1
acme.sh --issue -d vps.example.com --standalone --keylength ec-256

Install the vps.example.com certificate to the /etc/ssl/private directory:

1
acme.sh --install-cert -d vps.example.com --ecc --fullchain-file /etc/ssl/private/fullchain.cer --key-file /etc/ssl/private/private.key

Force certificate renewal:

1
acme.sh --renew -d vps.example.com --force --ecc

Program

Download the latest release of program hysteria-linux-amd64 from https://github.com/apernet/hysteria/releases, e.g. for v1.3.5:

1
wget https://github.com/apernet/hysteria/releases/download/v1.3.5/hysteria-linux-amd64

Copy hysteria-linux-amd64 under the name hysteria into the /usr/local/bin directory:

1
cp hysteria-linux-amd64 /usr/local/bin/hysteria 

Assign execute permission:

1
chmod +x /usr/local/bin/hysteria

Configuration

Generate a strong password from https://passwordsgenerator.net, e.g. 46D3SMTTbUkGNMTYbpZ3tzTE.

Create a new file config.json like this:

1
2
3
4
5
6
{
"listen": ":36712",
"cert": "/etc/ssl/private/fullchain.cer",
"key": "/etc/ssl/private/private.key",
"obfs": "46D3SMTTbUkGNMTYbpZ3tzTE",
}

The documentation for Hysteria configuration is at https://hysteria.network

Service

Create a new file /etc/systemd/system/hysteria.service.

Model your systemd service file on the example at https://raw.githubusercontent.com/chika0801/hysteria-install/main/hysteria.service

1
2
3
4
5
6
7
8
9
10
11
12
13
14
15
[Unit]
After=network.target nss-lookup.target

[Service]
User=root
WorkingDirectory=/root
CapabilityBoundingSet=CAP_NET_ADMIN CAP_NET_BIND_SERVICE CAP_NET_RAW
AmbientCapabilities=CAP_NET_ADMIN CAP_NET_BIND_SERVICE CAP_NET_RAW
ExecStart=/usr/local/bin/hysteria -c /root/config.json server
Restart=on-failure
RestartSec=10
LimitNOFILE=infinity

[Install]
WantedBy=multi-user.target

Reload the systemd daemon:

1
systemctl daemon-reload

Start the service:

1
systemctl enable hysteria
1
systemctl start hysteria

Client

Our client here is Windows.

Download the latest release of program hysteria-windows-amd64.exe from https://github.com/apernet/hysteria/releases.

Create a configuration file Downloads\config.json that looks like this:

1
2
3
4
5
6
7
8
9
10
11
12
{
"server": "vps.example.com:36712",
"obfs": "46D3SMTTbUkGNMTYbpZ3tzTE",
"up_mbps": 10,
"down_mbps": 50,
"socks5": {
"listen": "127.0.0.1:10808"
},
"http": {
"listen": "127.0.0.1:10809"
}
}

up_mbps and down_mbps are mandatory on the client side. They should reflect the bandwidth of your current network as accurately as possible.

Save the file.

Open a Command Prompt window and start the program running:

1
cd Downloads
1
.\hysteria-windows-amd64.exe

The messages should include something like this:

1
2
3
4
Client configuration loaded
[INFO] [addr:vps.example.com:36712] Connected
[INFO] [addr:127.0.0.1:10809] HTTP server up and running
[INFO] [addr:127.0.0.1:10808] SOCKS5 server up and running

Leave the Command Prompt window open with the program running in it.

If you have not already done so, install Mozilla Firefox.

From the Firefox hamburger menu, select Settings. On the General page, scroll down to where it says Network Settings. Click the Settings button.

  • Select Manual proxy configuration
  • Set SOCKS Host to 127.0.0.1
  • Set Port to 10808
  • Select SOCKS v5
  • Select Proxy DNS when using SOCKS v5

Click OK.

Test your set-up by visiting websites in Firefox.

Obfuscated WireGuard GUI on Windows

Install WireGuard on server

There are many ways to install WireGuard on a server. Someone else may already have set up a server for you. If you are setting up the WireGuard server yourself, one quick way is to use an installation script. It generates both the server configuration and the client configuration for you.

If you are going to use that script, then just execute these three commands from the README:

1
2
3
curl -O https://raw.githubusercontent.com/angristan/wireguard-install/master/wireguard-install.sh
chmod +x wireguard-install.sh
./wireguard-install.sh

You must make a note of the randomly generated port number with this script. Our example will be 56051. You’ll need to know the WireGuard listening port number when you configure the client.

At the end of the script’s run, you can check the status of the systemd service with the command systemctl status wg-quick@wg0.

Install V2Ray on server

As with WireGuard, it is quicker to use a script for the installation. This tutorial uses the official V2Ray installation script from https://github.com/v2fly/fhs-install-v2ray. Run the following command to download and run the script on your server:

1
bash <(curl -L https://raw.githubusercontent.com/v2fly/fhs-install-v2ray/master/install-release.sh)

The script will provide information such as information, warning, and error messages when it is executed. Please read them carefully.

For the answer to common problems, consult the wiki. If your question is not listed, you are welcome to raise it on the Issues tab. Please read Issue #63 before asking a question, otherwise it may not be answered.

The script does not automatically generate configuration files for you; it only solves problems encountered during the installation phase. We are going to code our own configuration file below. Please refer to the documentation to understand the syntax of the configuration file. You can also refer to configuration file templates contributed by the community. Note that these templates need to be modified and adjusted by yourself after copying and cannot be used directly.

It is not recommended to use the script to install V2Ray in Docker. Please use the official Docker image directly. If the official Docker image cannot meet your custom installation needs, please fork and modify the upstream Dockerfile.

The files installed by the script conform to the Filesystem Hierarchy Standard (FHS):

  • /usr/local/bin/v2ray
  • /usr/local/bin/v2ctl
  • /usr/local/share/v2ray/geoip.dat
  • /usr/local/share/v2ray/geosite.dat
  • /usr/local/etc/v2ray/config.json
  • /var/log/v2ray/access.log
  • /var/log/v2ray/error.log
  • /etc/systemd/system/v2ray.service
  • /etc/systemd/system/v2ray@.service

Configure V2Ray on server

The V2Ray server will accept input in Shadowsocks format and send it to WireGuard running on the same server.

A convenient way to generate a password is to use https://passwordsgenerator.net.

Our example password below is %R#5<eA#ex~ZXuqR, but you must change this to your own choice of password.

Our example port is 1234, but again you must change this to your own choice of port number.

Edit the configuration file /usr/local/etc/v2ray/config.json, using what follows as a template:

1
2
3
4
5
6
7
8
9
10
11
12
13
14
15
16
17
18
19
20
21
{
"inbounds": [
{
"listen": "0.0.0.0",
"port": 1234,
"protocol": "shadowsocks",
"settings": {
"method": "chacha20-ietf-poly1305",
"password": "%R#5<eA#ex~ZXuqR",
"network": "udp"
}

}
],
"outbounds": [
{
"protocol": "freedom",
"tag": "direct"
}
]
}

Start V2Ray with your new configuration:

1
2
systemctl enable v2ray
systemctl start v2ray

Open server firewall

Open the corresponding port, which is udp/1234 in the example, in your server firewall. Some cloud providers call the firewall “security groups.”

Create V2Ray client configuration

Create a configuration file.

This configuration uses dokodemo-door. Dokodemo Door is Japanese for the “Anywhere Door” (どこでもドア) which has appeared in certain manga and video games. In V2Ray terms, dokodemo-door is an inbound protocol. It listens on a local port and sends all traffic entering this port to a specified port number on the server. It is similar to port forwarding.

Replace 56051 in the template below by your WireGuard listening port.

Replace {{ host }} by your server IP address.

Replace %R#5<eA#ex~ZXuqR by your password.

1
2
3
4
5
6
7
8
9
10
11
12
13
14
15
16
17
18
19
20
21
22
23
24
25
26
27
28
29
30
{
"inbounds": [
{
"tag":"wireguard",
"port": 56051,
"protocol":"dokodemo-door",
"settings":{
"address":"127.0.0.1",
"port":56051,
"network":"udp"
}
}
],
"outbounds": [
{
"protocol": "shadowsocks",
"settings": {
"servers": [
{
"address": "{{ host }}",
"port": 1234,
"method": "chacha20-ietf-poly1305",
"password": "%R#5<eA#ex~ZXuqR"
}
]
},
"tag": "proxy"
}
]
}

Save the file.

Install V2Ray command-line client

You can get the command-line client for many different platforms from https://github.com/v2fly/v2ray-core/releases.

For Windows the client is named v2ray-windows-64.zip. Unzip the .zip file.

Run V2Ray command-line client

Open a Command Prompt.

Change into the directory with your V2Ray application and configuration file in it. For example:

1
cd Downloads\v2ray-windows-64

Run V2Ray with your configuration file:

1
.\v2ray.exe run -c config.json

Leave the Command Prompt window open with V2Ray running in it.

Route server IP address directly

Use the calculator at https://www.procustodibus.com/blog/2021/03/wireguard-allowedips-calculator to calculate the expression for all possible IP addresses except your server IP address.

  • Set Allowed IPs to 0.0.0.0/0,::/0
  • Set Disallowed IPs to your server’s IP address
  • Press Calculate

Edit your WireGuard client configuration file.

Replace your client’s original AllowedIPs line with the one from the calculator.

Most important – also change the Endpoint so that it points to localhost, e.g.

1
Endpoint = 127.0.0.1:56051

Save the amended WireGuard client configuration file.

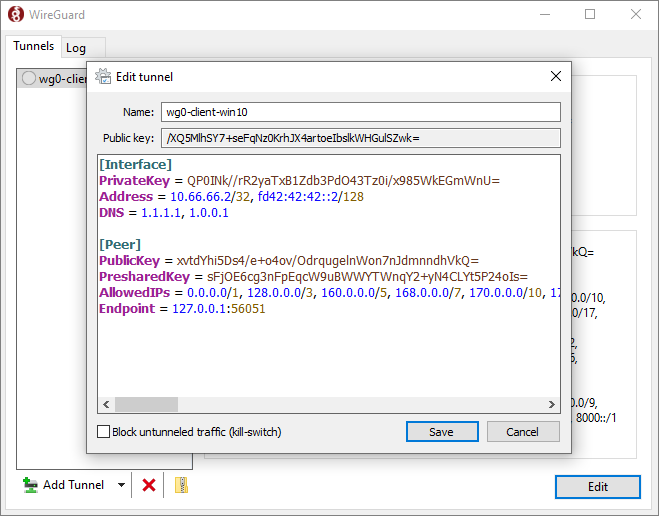
Obfuscated WireGuard GUI on Windows

Install WireGuard on client

Install your WireGuard client from https://www.wireguard.com/install.

Import your amended WireGuard client configuration file (called “Add Tunnel in the Windows GUI).

If you are using the Windows GUI, uncheck the box for Block untunneled traffic (kill switch).

Activate the tunnel.

Smoke test

Open a browser and test your end-to-end connection.

OpenVPN is widely used cross-platform VPN software, originally written by James Yonan in 2001, and now available for Linux, Windows, macOS, Android, iOS, and other platforms.

Here is how to build OpenVPN from source on a Linux server and a Windows client.

The OpenVPN source code for the current release is stored at https://github.com/OpenVPN/openvpn.

The source code for this release and previous releases is stored at https://openvpn.net/community-downloads.

Determine which release you will build.

Our examples use release 2.6.6.

Linux

  1. Download the OpenVPN compressed tarball from https://openvpn.net/community-downloads. In our example:
1
wget https://swupdate.openvpn.org/community/releases/openvpn-2.6.6.tar.gz
1
tar -xf openvpn-2.6.6.tar.gz
  1. Install the prerequisites for the build:
1
apt install -y build-essential libssl-dev iproute2 liblz4-dev liblzo2-dev libpam0g-dev libpkcs11-helper1-dev libsystemd-dev resolvconf pkg-config autoconf automake libtool libcap-ng-dev
  1. Build and install OpenVPN:
1
cd openvpn-2.6.6
1
autoreconf -i -v -f
1
./configure --enable-systemd --enable-async-push --enable-iproute2
1
make
1
make install
  1. Do an initial check of the binary:
1
cd /usr/local/sbin
1
./openvpn --version

Windows

  1. Install Git from https://git-scm.com/download/win.

  2. Install Visual Studio 2022 community edition from https://visualstudio.microsoft.com/vs/community.

  3. Visit https://openvpn.net/community-downloads and download the OpenVPN source archive version 2.6.6.

  4. Use 7-Zip to extract compressed tarball openvpn-2.6.6.tar.gz into openvpn-2.6.6.tar. Then extract openvpn-2.6.6.tar to give folder openvpn-2.6.6.

  5. Open Start > Visual Studio 2022 > Developer Command Prompt for VS 2022.

  6. In the Developer Command Prompt for VS 2022, install the Microsoft C/C++ dependency manager:

1
cd /d %USERPROFILE%
1
cd Downloads
1
git clone https://github.com/microsoft/vcpkg.git
1
cd vcpkg
1
bootstrap-vcpkg.bat
1
vcpkg integrate install
  1. In the Developer Command Prompt for VS 2022, build OpenVPN:
1
cd /d %USERPROFILE%
1
cd Downloads\openvpn-2.6.6
1
msbuild /p:Configuration=Release /p:Platform=x64
  1. In a regular Command Prompt window, do an initial check of the binary:
1
cd Downloads\openvpn-2.6.6\x64-Output\Release
1
.\openvpn.exe --version

Testing

  1. The easiest way to create a testbed on the server is to download and run the @angristan script:
1
curl -O https://raw.githubusercontent.com/angristan/openvpn-install/master/openvpn-install.sh
1
chmod +x openvpn-install.sh
1
./openvpn-install.sh
  1. Prevent APT from upgrading the OpenVPN package that came from the repositories:
1
apt-mark hold openvpn
  1. Edit the systemd service file /etc/systemd/system/openvpn@.service. Change the executable from /usr/sbin/openvpn to /usr/local/sbin/openvpn.

  2. After saving the file, reload the systemd daemon:

1
systemctl daemon-reload
  1. Restart OpenVPN with your own binary:
1
systemctl restart openvpn@server
  1. On a Windows PC client, download the OpenVPN client configuration file that you generated on the server. Open PowerShell and issue the command:
1
scp root@YOUR.SERVER.IP.ADDRESS:xxxxxxxx.ovpn Downloads
  1. Download and run the standard OpenVPN installer from https://openvpn.net/community-downloads. There is no problem if it gives a message at the end of the install to say that there are no connection profiles (configuration files) yet.

  2. In the OpenVPN GUI, change the Settings so that it does not launch on user logon.

  3. Exit the OpenVPN GUI.

  4. Copy the xxxxxxxx.ovpn client configuration file from Downloads into Downloads\openvpn-2.6.6\x64-Output\Release.

  5. Run your binary by opening a Command Prompt with Run as Administrator and issuing the commands:

1
cd C:\Users\YOURUSERNAME\Downloads\openvpn-2.6.6\x64-Output\Release
1
.\openvpn.exe --config xxxxxxxx.ovpn

It is important that your proxy client not send packets to a proxy server when those packets are simply going to return to your own country. A firewall correlating packets can easily see that you are running a proxy server. Instead you must route domestic packets directly.

Domestic IP addresses are defined in the file geoip.dat. Unfortunately you cannot use the standard geoip.dat, because it does not include a section for Iran. If you try to use a rule such as geoip:ir, you will get an error. Instead you must generate your own geoip.dat.

This post shows you how.

Sign up for GeoLite2

You will need a free GeoLite2 account.

Open a browser and visit the MaxMind sign-up page:

https://www.maxmind.com/en/geolite2/signup

Provide your email address and the other details requested.

A password reset link is sent to you by email. You can then log in to MaxMind with your email address and password.

Download GeoLite2 databases

Under Database Products and Subscriptions, click the link Download Databases.

The database you want is GeoLite2 Country: CSV Format.

Download the zip file. It has a name that looks like GeoLite2-Country-CSV_YYYYMMDD.zip.

Unzip the zip file.

The files you will need are:

  • GeoLite2-Country-Locations-en.csv
  • GeoLite2-Country-Blocks-IPv4.csv
  • GeoLite2-Country-Blocks-IPv6.csv

Install Git

We assume you are working on a computer that runs Ubuntu Linux.

Install Git on your computer:

1
2
sudo apt update && sudo apt upgrade -y
sudo apt install -y git

Install Go language

Determine latest version of Go. We will use 1.20.5 in our examples.

Download and extract this version of Go:

1
2
3
sudo rm -rf /usr/local/go
wget https://go.dev/dl/go1.20.5.linux-amd64.tar.gz
sudo tar -C /usr/local -xzf go1.20.5.linux-amd64.tar.gz

Add Go to your path:

1
2
echo 'export PATH=$PATH:/usr/local/go/bin' >> $HOME/.profile
source $HOME/.profile

Check your version of Go:

1
go version

Clone project code

1
git clone https://github.com/v2fly/geoip.git

Install project dependencies

Navigate to project root directory:

1
cd geoip

Install dependencies:

1
go mod download

Copy GeoLite2 files into position

Create a directory for the GeoLite2 databases:

1
mkdir geolite2

Copy the files below into your new ./geolite2 directory. This will be a straight cp if you have them on the same computer, or an scp if they are on a different computer.

  • GeoLite2-Country-Locations-en.csv
  • GeoLite2-Country-Blocks-IPv4.csv
  • GeoLite2-Country-Blocks-IPv6.csv

Edit config file

go run ./ will use config.json in the current directory as the default configuration file.

Edit config.json in your ~/geoip directory.

Make it look like this example. See config-example.json if you want more configuration option examples.

1
2
3
4
5
6
7
8
9
10
11
12
13
14
15
16
17
18
19
20
21
22
23
24
25
26
27
28
29
30
31
32
33
34
35
36
37
38
39
40
41
42
43
44
45
46
47
48
49
50
{
"input": [
{
"type": "maxmindGeoLite2CountryCSV",
"action": "add",
"args": {
"country": "./geolite2/GeoLite2-Country-Locations-en.csv",
"ipv4": "./geolite2/GeoLite2-Country-Blocks-IPv4.csv",
"ipv6": "./geolite2/GeoLite2-Country-Blocks-IPv6.csv"
}
},
{
"type": "private",
"action": "add"
},
{
"type": "test",
"action": "add"
}
],
"output": [
{
"type": "v2rayGeoIPDat",
"action": "output",
"args": {
"outputName": "geoip.dat"
}
},
{
"type": "v2rayGeoIPDat",
"action": "output",
"args": {
"outputName": "geoip-only-ir-private.dat",
"wantedList": ["ir", "private"]
}
},
{
"type": "v2rayGeoIPDat",
"action": "output",
"args": {
"oneFilePerList": true,
"wantedList": ["ir", "private", "test"]
}
},
{
"type": "text",
"action": "output"
}
]
}

Save your finished config.json file.

The input is the data source and its input format, whereas the output is the destination of the converted data and its output format. What the run will do is to aggregate all the input format data, then convert them to the output format and write them to the GeoIP file(s), using the options in the config.json file.

Generate GeoIP files

The generated files will be located in the output directory by default. Do go run ./ -h for more usage information. For a standard run, using your finished config.json, just do:

1
2
3
cd ~/geoip
go run ./
ls -l output/dat

GeoIP usage example

Client

1
2
3
4
5
6
cd ~
wget https://github.com/v2fly/v2ray-core/releases/download/v5.7.0/v2ray-linux-64.zip
sudo apt install -y unzip
unzip v2ray-linux-64.zip
cp geoip/output/dat/* .
./v2ray uuid

Edit config.json and use this as an example:

1
2
3
4
5
6
7
8
9
10
11
12
13
14
15
16
17
18
19
20
21
22
23
24
25
26
27
28
29
30
31
32
33
34
35
36
37
38
39
40
41
42
43
44
45
46
47
48
49
50
51
52
53
54
55
56
57
58
59
60
61
{
"log": {
"loglevel": "warning"
},
"routing": {
"domainStrategy": "AsIs",
"rules": [
{
"type": "field",
"ip": [
"geoip:private",
"geoip:ir"
],
"outboundTag": "direct"
}
]
},
"inbounds": [
{
"listen": "127.0.0.1",
"port": "1080",
"protocol": "socks",
"settings": {
"auth": "noauth",
"udp": true,
"ip": "127.0.0.1"
}
},
{
"listen": "127.0.0.1",
"port": "1081",
"protocol": "http"
}
],
"outbounds": [
{
"protocol": "vmess",
"settings": {
"vnext": [
{
"address": "YOUR.SERVER.IP.ADDRESS",
"port": 1234,
"users": [
{
"id": "46daa707-ba12-b549-ff17-2d820486cd66"
}
]
}
]
},
"streamSettings": {
"network": "tcp"
},
"tag": "proxy"
},
{
"protocol": "freedom",
"tag": "direct"
}
]
}

Save the file. Run with this config.json:

1
./v2ray run

Server

1
2
3
su -
apt install -y curl
bash <(curl -L https://raw.githubusercontent.com/v2fly/fhs-install-v2ray/master/install-release.sh)

Edit the configuration file /usr/local/etc/v2ray/config.json, using this as an example:

1
2
3
4
5
6
7
8
9
10
11
12
13
14
15
16
17
18
19
20
21
22
23
24
25
26
27
28
29
30
31
32
33
34
35
36
37
38
39
40
41
42
43
44
45
{
"log": {
"loglevel": "warning"
},
"routing": {
"domainStrategy": "AsIs",
"rules": [
{
"type": "field",
"ip": [
"geoip:private",
"geoip:ir"
],
"outboundTag": "block"
}
]
},
"inbounds": [
{
"listen": "0.0.0.0",
"port": 1234,
"protocol": "vmess",
"settings": {
"clients": [
{
"id": "46daa707-ba12-b549-ff17-2d820486cd66"
}
]
},
"streamSettings": {
"network": "tcp"
}
}
],
"outbounds": [
{
"protocol": "freedom",
"tag": "direct"
},
{
"protocol": "blackhole",
"tag": "block"
}
]
}

Enable and start:

1
systemctl enable v2ray; systemctl start v2ray
0%